Railings
Railings DIY Deck PlansRailings: How to Install Wood Deck Rail Posts
Railings: How to Install Wood Deck Rail Posts DIY Deck PlansRail posts are typically made from 4x4 lumber. Depending on the material you use for your deck surface and trim, pressure treated posts, or cedar posts will work well. Post wraps, or covers are available to match most types of composite material as well and will generally fit 4x4 posts.
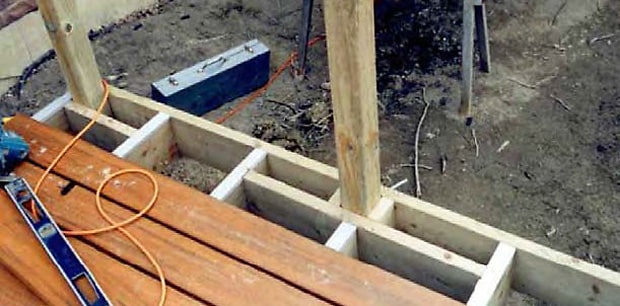
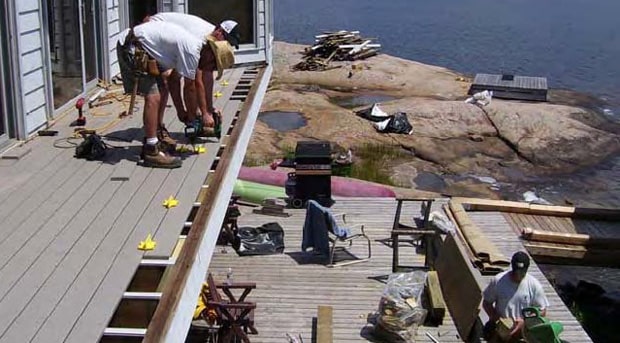
It is easiest to install posts before the decking. This can be done as the finishing step of your deck frame, or as the decking is being installed, pausing for post installation as you go.
Rail Post Layout
Mark the positions of your rail posts before installing decking. In general, one post every 4 to 8 feet is typical, check your local building codes and be sure to investigate your railing system to determine specific requirements.
There are two ways to layout deck posts:
- Start from one corner and position a rail post every so many feet to the opposite corner of the deck, or the end of the rail, if stairs or openings are present. The spacing will depend on code and railing requirements. All rail posts, except the last post will be evenly spaced.
- Measure the length of your rail section from corner to corner; divide the space evenly, so that posts are equally spaced. Choose spacing to meet minimum requirements of code and your rail choice.
Rail Post Installation
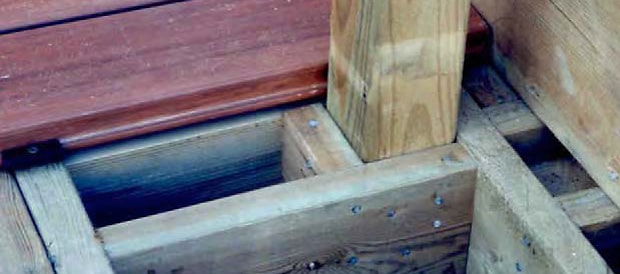
Rail posts are set on the inside face of the rim joist, or outside framing member. The post is then boxed in with blocking to create a sleeve for the post.
- Mark the position of the post.
- Install blocking between the two nearest joists, so that the blocking is 3½" off the inside face of the rim joist.
- Install blocking between the rim joist and the first blocking you installed, as needed to box the post in on all four sides.
- Set your post in place, with the bottom end flush with the bottom of the rim joist.
- Measure the height and cut the post to length.
- Install the post permanently using lag bolts through the blocking and rim joist into the post.
Intersecting with a Joist
If possible, lay out your rail posts to fit in the corner of the joist and rim joist. If spacing forces a post to be installed where a joist is mounted to the rim joist, cut the joist off 5 inches short of the rim joist. Install cross blocking between the joists on either side and reattach the cut joist to the blocking.
Forty-five Degree Corners
Anywhere that your deck comes to a forty-five degree corner, you have two choices of how to manage your post.
- Rip two posts on a 22½° angle along one edge and attach them together to create a 45° corner post.
- Install a standard post, so that one corner of the post is aligned with the inside corner of the angle.
Installing 22½° Corner Posts
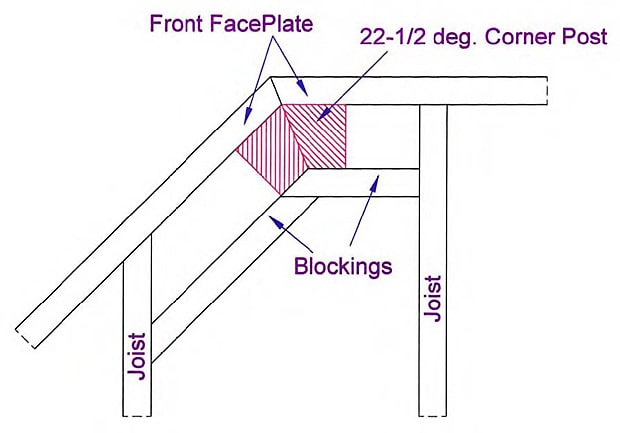
22½° posts are used when rails or privacy screens continue around an inside or outside 45 degree corner. Fasten 22½° post through both the front faceplate and with blocking to the joists.
Rail Sections Sharing a Corner Post
If a square post is being used on a cut corner of the deck cut the 2x4’s of the rail section around the rail post. Be sure to keep the same inset from the outside faceplate as the other rail sections.
Rail sections share a 4x4 corner post when 22½° posts do not permit. This often happens with maintenance free posts.
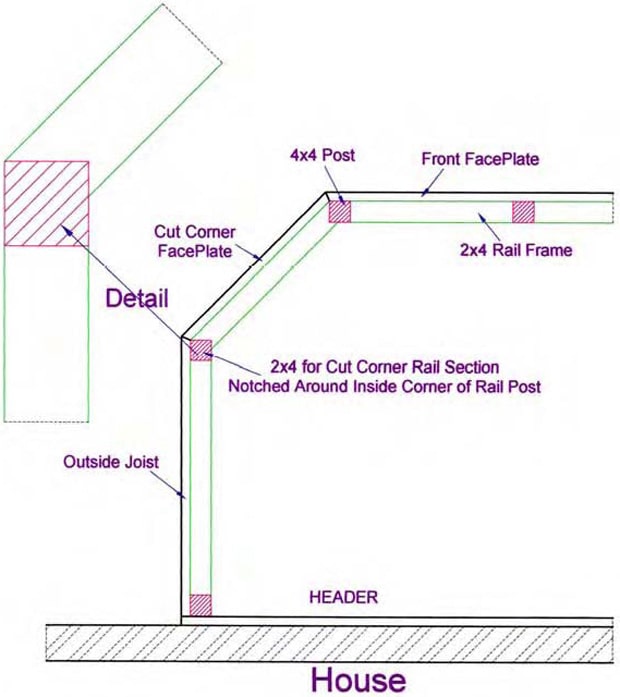
Railing Adjustment
When using method two for 45° corners, notch your railing to fit around the post. The rail width will be wider than the angled face of the post on one side. Cut the notch, so that the extra width fits around the back corner of the post and the front edge of both railing and post are flush.
Decking Around Posts
Cut to fit the decking as described in scribing around square shapes. Leave a slight gap for the expansion and contraction of your decking materials and wooden post, to prevent future issues.
Pro Tip
Rail posts can be installed a little longer than needed and left uncut. A chalk line and level are then strung along the row of posts to mark the top height of all posts in a single row.
Cut the posts to this height, so that the top of the posts are completely level, even if slight variations in the deck occur. The top line of your rail will be the most visible marker as to whether you deck is level. This ensures the best aesthetics.
Railings: How to Install a Deck Railing
Railings: How to Install a Deck Railing DIY Deck PlansWhile many aspects of deck construction may not even require permitting or inspection in many areas, especially in the rural US, it is wise to pay attention to building codes, as they describe some of the safest ways to construct decks. Railings are one area that is often looked at closely during inspections, so be sure to do your homework on the local codes before buying material and starting the installation process.
Types of Railing
Deck rails come in a huge variety of styles and installation methods. You can find them in almost any common material, from metal to wood and composite lumber products. There are three main categories of railing construction.
- Complete rail systems: These come either fully assembled or ready to assemble and are the simplest method for rail construction. They are also typically the most expensive. If you choose this route, study the manufacturer’s literature closely before you begin.
- Railing components: Often similar to complete rail systems, these types of railings come with pre-machined top and toe rails and balusters of various styles that fit between the rails. These types of rails go together quickly and take much of the guess work out of construction.
- DIY railing: Standard lumber can be made into a simple railing fairly simply. You will need material for the top and toe rails and something to use for balusters in between.
Standard Rail Construction
The standard is a 36 to 42 inch high rail with balusters every 4 inches, to prevent small children from easily slipping through. Hand rails are required for most steps with more than one riser and have specific size and shape requirements.
If you are buying material from a home center or lumber yard, they will likely have some hand rails to choose from for your stairs. These may need to be installed in addition to the deck railing system in some cases.
Top Rails
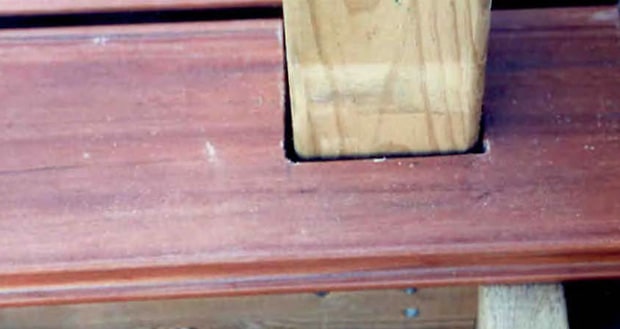
Top rails typically are shaped to fit the hand and have either a dado (a long, narrow groove) on the bottom side, or “mortises” (a round, or square hole for the end of the baluster) for each baluster. A mortised rail is the simplest and strongest. With a dadoed rail, you will need to space each baluster individually.
Toe or Bottom Rails
Bottom rails often match top rails in shape or dimension and can be purchased with either a dado, or individual mortises for each baluster. Sometimes they are narrower than the top rail.
Rail Installation
It is easiest to build railings from the bottom up. This makes gravity your friend, as it holds parts down, for easier installation.
- Cut and position spacers on the deck along the section of railing between the posts, tall enough to position the bottom face of the toe rail at the desired height above the deck.
- Place your toe rail on the spacers, and cut to fit between the posts, if needed.
- Attach the toe rail to each post. This can be supported by L brackets, or other hardware that came with your rail system, or screws can be used in the case of lumber rails. Predrill all holes and use at least two screws in each post and in each end of the rail.
- Install balusters into the toe rail. Mark their positions with a tape measure, if your toe rail is dadoed. If you have mortises, fit one baluster in each hole.
- Install the top rail to fit over the balusters. When working with a dadoed top rail, mark each balusters position. With mortises, start from one side and slip the balusters into their spots one at a time.
- Fasten the top rail, similar to the bottom rail.
Rail Systems
Use spacers as described above. Trim the rail sections to fit as needed. Position each section of rail between the posts and, starting with the toe rail; fasten it in place using the manufacturer’s suggested method.
Trim and Post Caps
Trim can be added along the bottom edge of the top rail, top edge of the toe rail, or in the form of caps on each post, to create a neater appearance, or add decorative detail.
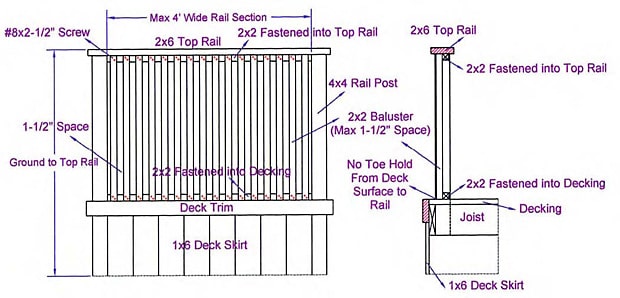
No Toe Hold Rail
A simple rail can be built, with only a top rail and a strip of blocking along the bottom, in line with the posts, directly on the deck floor. This is commonly seen on backyard decks, made from PT or cedar lumber.
- Install your top rail between the posts as previously described.
- Install a nailing strip along the bottom of the top rail and along the deck, directly below, and in line with the strip on the top rail. The strip is typically made from 2x2 lumber and nailed, or screwed in place.
- Install one baluster every four inches, running from the bottom face of the top rail, to the deck. Nail or screw the top and bottom end of each baluster into the nailing strip.
- A second strip can be added on the outside of the nailing strip for trim and added strength.
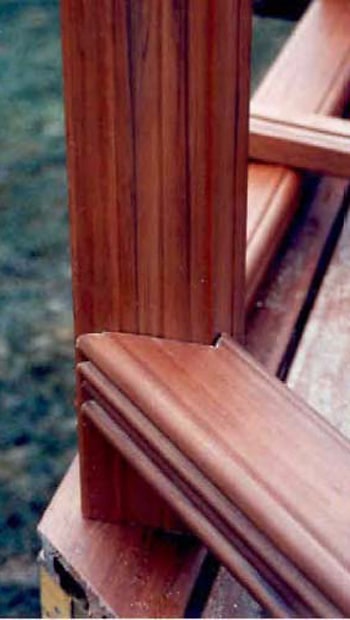
Railings: How to Install Glass Panels in Wood Frame
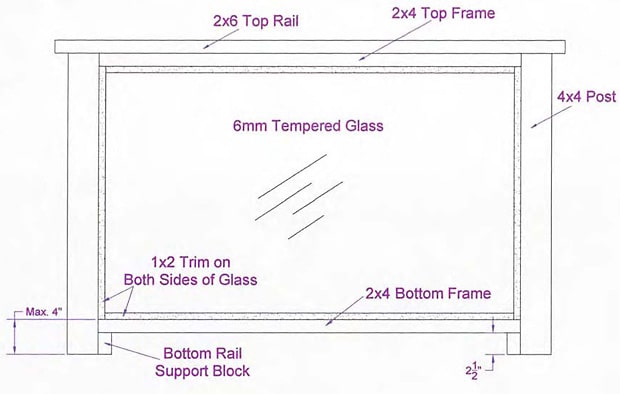
Railings: How to Install Glass Panels in Wood Frame DIY Deck PlansOne alternative to a wooden rail on your deck is a wood framed rail, with heavy tempered glass panels in place of the traditional wooden balusters. A wood frame glass paneled rail allows the view from your deck to remain virtually unrestricted. It’s also a great option when the architectural style of the house calls for something more modern.
Glass Panel Railing Specifications
Glass panels present a couple of challenges to rail building. First, their breakability makes them a safety hazard, calling for a specific type of glass. Second, they are heavier than the equivalent wooden balusters, and require adequate support to prevent structural failure.
Since the wooden frame of your rail is fully exposed, a decorative species, such as cedar works best. The pieces will need to be structurally sound and capable of supporting the following live loads.
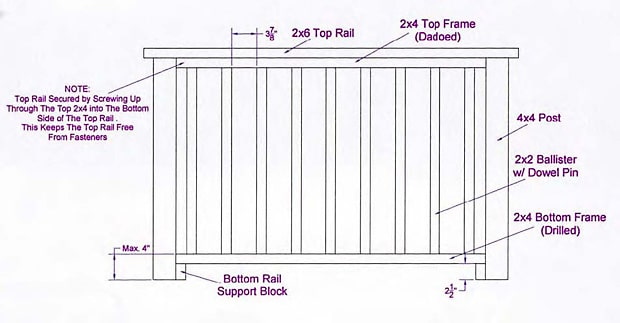
- Your Top Rail needs to support a horizontal pressure of 50 pounds per lineal foot, or 250 pounds across the length of each section.
- The Top Rail must support a vertical force of 100 pounds for lineal foot.
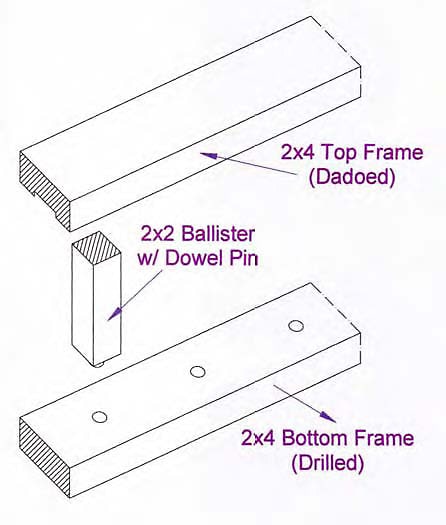
- The bottom frame will need to support a glass panel of 6 mm tempered glass.
- The glass panel itself must be capable of sustaining a horizontal pressure of 113 pounds per lineal foot.
- Use three inch screws to fasten the top rail and top and bottom frames in place.
Confirm all construction details with your local building code.
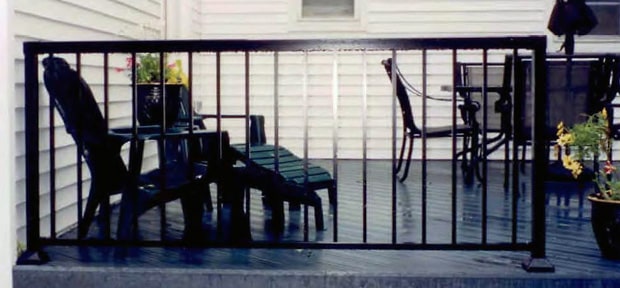
Railings: How to Install Aluminum Railings
Railings: How to Install Aluminum Railings DIY Deck PlansPlease check with your local building code enforcement agency to confirm the construction specifications if using Aluminum rails. This section is included as a general educational guide only. Consult the manufacturer’s installation guides for complete details.
Another option for your deck railing is a modular aluminum railing system. Aluminum is highly corrosion and rust resistant, strong and light weight. The modular systems, or S.T.A.R. makes the installation simple.
Snap Tight Aluminum Railing (STAR)
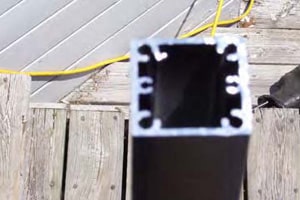
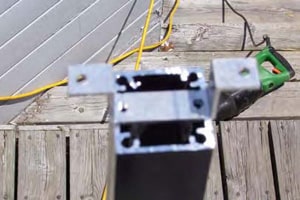
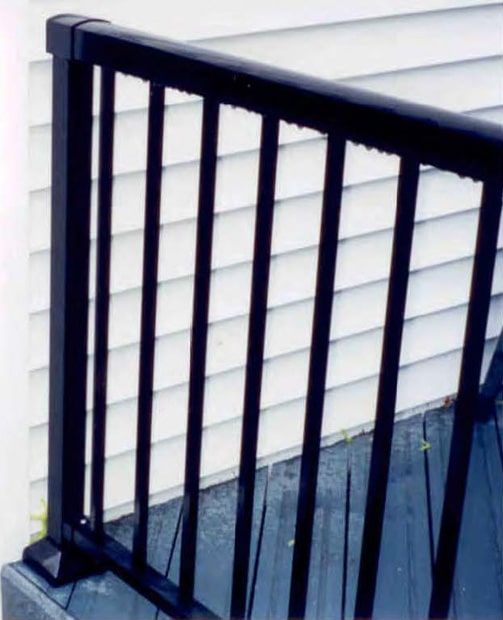
This section the installation process for the STAR system. The STAR system features a continuous, square aluminum top rail. The post bases feature base plates that slide down over the mounting bracket at the bottom each post to hide the bolt fasteners.
Aluminum Railing Installation
Since deck boards are not thick enough to support a fastener long enough to securely mount the STAR system posts, blocking needs to be installed in the deck frame, before decking is applied in every place that a post base will be mounted on top of the deck. Use long deck screws to secure the blocking.
Measure and cut your posts using a reciprocating saw with a metal blade, circular saw with an abrasive blade, hack saw, or other power saw with a metal blade. Railings can be cut using the same tool.
- Measure the edge of the deck where the rail is to be installed.
- Evenly space the posts along the entire length of the area where the railing will be installed. Do not exceed the maximum length of rail section between posts.
- Install rail bracket to each post head for fastening rail in place.
- Cut top rail a little long at each end. Fit a top rail end cap to each end.
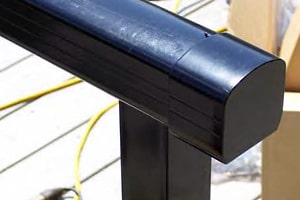
Top Mount Cover Sleeves
Where joints are required between sections of rail, a top mount rail sleeve is required. Mount the top mount cover sleeve on top of the post where the two sections meet. Cut your rail to fit into the cover sleeve on each side.
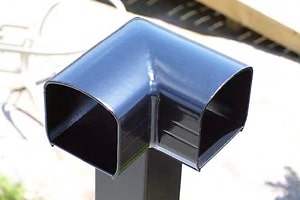

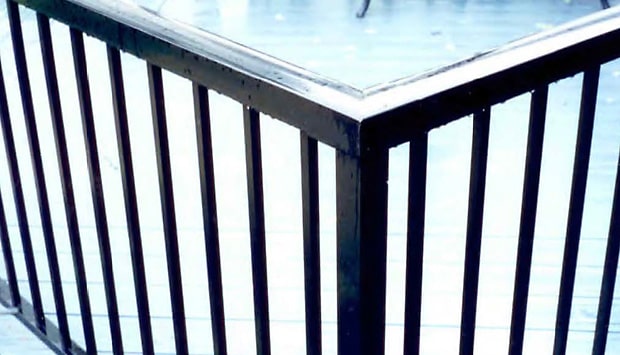
At every 90 degree corner, install a corner sleeve. Corner sleeves create a square corner by receiving a rail into each side of the corner. The sleeve is secured into place with screws from the underside. The rail is fastened in place with screws up from the bottom on each side.
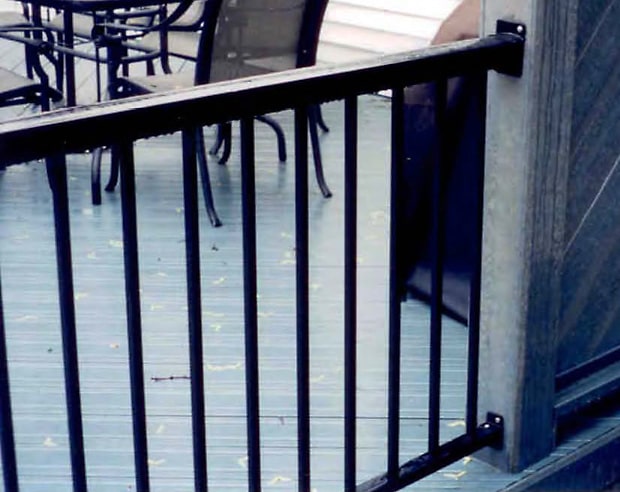
Where a rail terminates against the house you can choose to use an end post, with a top mount cover sleeve for the top rail, and the bottom rail mounting to the side of the post as you would for any post, or the railing can terminate against the house, supported by hardware brackets.
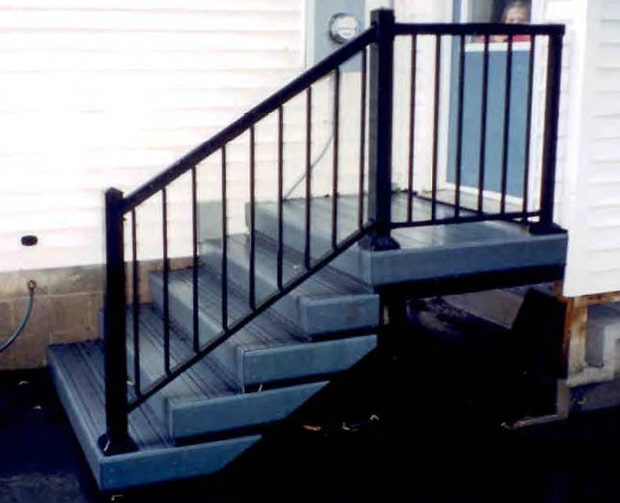
Stair rail sections are designed so that the top and bottom rails can run at the same angle as the stairs. The balusters are mounted loose to allow them to remain vertical, parallel to the posts. Mount a post at the top and bottom of the rail. Cut your rail section to fit between the two posts. Mount the rail to the top post and swivel the bottom end of the rail to fit in the brackets. Then attach using the supplied screws.
For more installation instructions, consult the manufacturer’s install manual for details.
Installing Glass in an Aluminum Rail
An aluminum railing system designed for holding glass has a U shaped top and bottom rail, with an open groove facing down from the top and a matching groove facing up from the bottom rail. The glass is slid into place, with the bottom rail attached at both ends, then the top rail is fitted into place.
Glass panels can be either “friction fit” or held in place by a gasket. Friction fit panels are installed with the glass directly against the aluminum rail. Gravity and a snug fit hold the panel securely into place. A gasket panel features a rubber strip in both top and bottom rails, designed to fit snugly against the glass.