Railings: How to Install a Deck Railing
Railings: How to Install a Deck Railing DIY Deck PlansWhile many aspects of deck construction may not even require permitting or inspection in many areas, especially in the rural US, it is wise to pay attention to building codes, as they describe some of the safest ways to construct decks. Railings are one area that is often looked at closely during inspections, so be sure to do your homework on the local codes before buying material and starting the installation process.
Types of Railing
Deck rails come in a huge variety of styles and installation methods. You can find them in almost any common material, from metal to wood and composite lumber products. There are three main categories of railing construction.
- Complete rail systems: These come either fully assembled or ready to assemble and are the simplest method for rail construction. They are also typically the most expensive. If you choose this route, study the manufacturer’s literature closely before you begin.
- Railing components: Often similar to complete rail systems, these types of railings come with pre-machined top and toe rails and balusters of various styles that fit between the rails. These types of rails go together quickly and take much of the guess work out of construction.
- DIY railing: Standard lumber can be made into a simple railing fairly simply. You will need material for the top and toe rails and something to use for balusters in between.
Standard Rail Construction
The standard is a 36 to 42 inch high rail with balusters every 4 inches, to prevent small children from easily slipping through. Hand rails are required for most steps with more than one riser and have specific size and shape requirements.
If you are buying material from a home center or lumber yard, they will likely have some hand rails to choose from for your stairs. These may need to be installed in addition to the deck railing system in some cases.
Top Rails
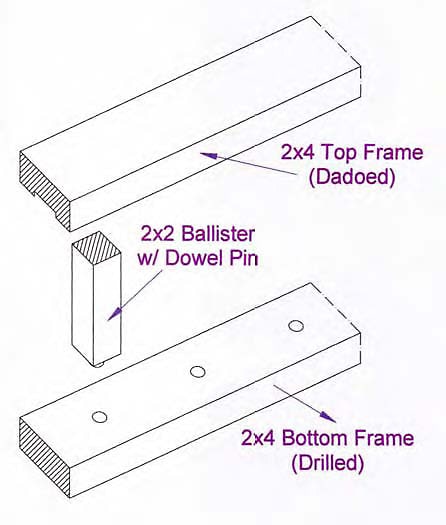
Top rails typically are shaped to fit the hand and have either a dado (a long, narrow groove) on the bottom side, or “mortises” (a round, or square hole for the end of the baluster) for each baluster. A mortised rail is the simplest and strongest. With a dadoed rail, you will need to space each baluster individually.
Toe or Bottom Rails
Bottom rails often match top rails in shape or dimension and can be purchased with either a dado, or individual mortises for each baluster. Sometimes they are narrower than the top rail.

Rail Installation
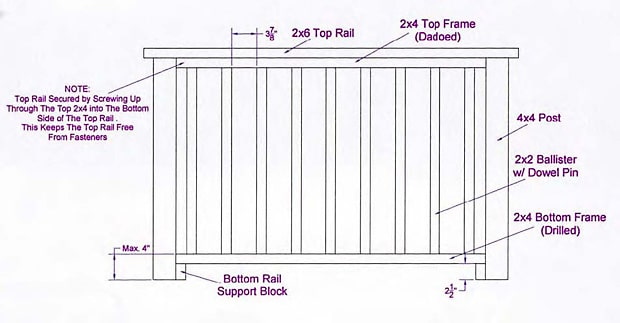
It is easiest to build railings from the bottom up. This makes gravity your friend, as it holds parts down, for easier installation.
- Cut and position spacers on the deck along the section of railing between the posts, tall enough to position the bottom face of the toe rail at the desired height above the deck.
- Place your toe rail on the spacers, and cut to fit between the posts, if needed.
- Attach the toe rail to each post. This can be supported by L brackets, or other hardware that came with your rail system, or screws can be used in the case of lumber rails. Predrill all holes and use at least two screws in each post and in each end of the rail.
- Install balusters into the toe rail. Mark their positions with a tape measure, if your toe rail is dadoed. If you have mortises, fit one baluster in each hole.
- Install the top rail to fit over the balusters. When working with a dadoed top rail, mark each balusters position. With mortises, start from one side and slip the balusters into their spots one at a time.
- Fasten the top rail, similar to the bottom rail.

Rail Systems
Use spacers as described above. Trim the rail sections to fit as needed. Position each section of rail between the posts and, starting with the toe rail; fasten it in place using the manufacturer’s suggested method.
Trim and Post Caps
Trim can be added along the bottom edge of the top rail, top edge of the toe rail, or in the form of caps on each post, to create a neater appearance, or add decorative detail.
No Toe Hold Rail
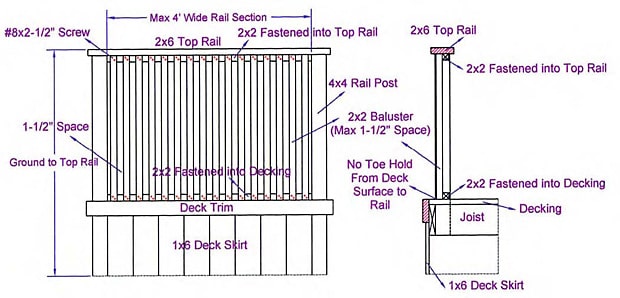
A simple rail can be built, with only a top rail and a strip of blocking along the bottom, in line with the posts, directly on the deck floor. This is commonly seen on backyard decks, made from PT or cedar lumber.
- Install your top rail between the posts as previously described.
- Install a nailing strip along the bottom of the top rail and along the deck, directly below, and in line with the strip on the top rail. The strip is typically made from 2x2 lumber and nailed, or screwed in place.
- Install one baluster every four inches, running from the bottom face of the top rail, to the deck. Nail or screw the top and bottom end of each baluster into the nailing strip.
- A second strip can be added on the outside of the nailing strip for trim and added strength.
