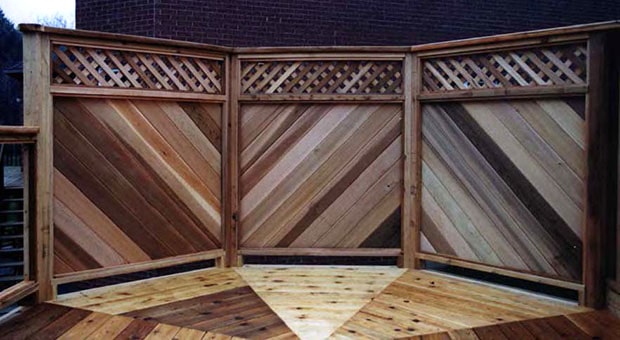
Privacy Screens
Privacy Screens DIY Deck PlansMany decks are elevated well above grade, exposing you to the view of your neighbours. While that may be fine in many cases, you may not want to be on display every time you use your deck. A privacy screen is essentially a decorative fence attached to your deck to provide privacy from your neighbours. Because a privacy screen may be replacing a railing on higher decks it must be constructed to the same standards as a railing to provide safety, as well as privacy. (Check local building codes for specific requirements when installing privacy screens also being used as guard rails)
Privacy screen posts are installed the same way as rail posts, with each of them set inside the outside joist and/or faceplate. Match the space from the bottom 2X4 framing member to the top of the deck surface the same space as the railing horizontal bottom space. Install the top 2X4 at the finished height of the privacy screens less the thickness of the finished top rail. Privacy screens are often trimmed in with routered 1X2 trim around the perimeter to give it a more finished, professional look.
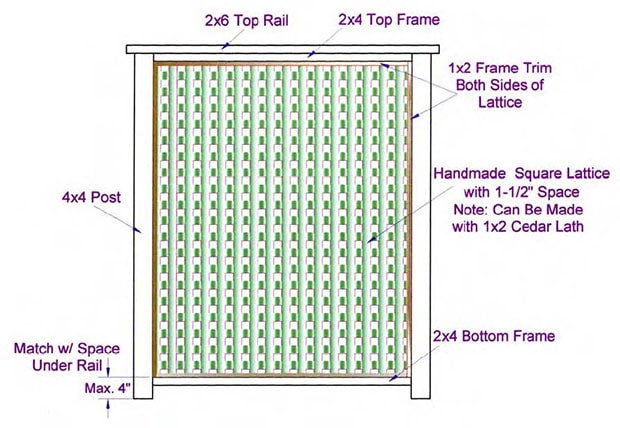
Privacy Screens: How to Build a Lattice Privacy Screen
Privacy Screens: How to Build a Lattice Privacy Screen DIY Deck PlansThis privacy screen is made with handmade square lattice with 1 1/2" spaces. It could also be made with lath or 1x2. Be sure the staples are facing the outside of the deck. If you use angled lattice it is installed in the same way. 1x2 is used to frame the lattice and can be routered in the outside edge to give a more finished professional look.
Materials List
| Posts | 2 | 4x4x6' |
| Top | 1 | 2x4x4' |
| Bottom | 1 | 2x4x4' |
| Trim | 4 4 |
1x2x4' (horizontal) 1x2x5' (vertical) |
| Lath | 20 15 |
4' Lath (horizontal) 5' Lath (vertical) |
| Top Rail | 1 | 5' |
Note: If building more than one section, recalculate the number of posts and the length of the top rail.
| Posts | 2 | 4x4x8' |
| Top | 1 | 2x4x4' |
| Bottom | 1 | 2x4x4' |
| Trim | 4 4 |
1x2x4' (horizontal) 1x2x6' (vertical) |
| Lath | 23 15 |
4' Lath (horizontal) 6' Lath (vertical) |
| Top Rail | 1 | 5' |
Note: For heavy lattice change lath strips to cedar 1x2"
Privacy Screens: How to Build a Tongue and Groove Privacy Screen
Privacy Screens: How to Build a Tongue and Groove Privacy Screen DIY Deck Plans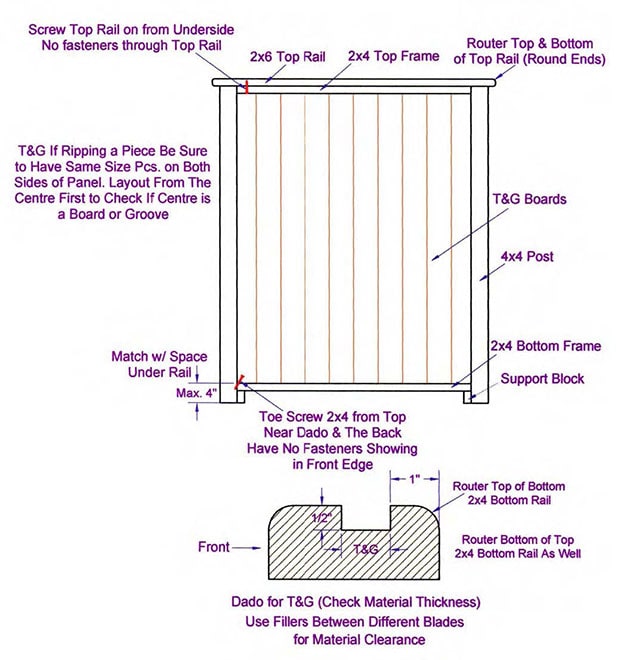
Material List
| Posts | 2 | 4x4x6' |
| Top | 1 | 2x4x4' (dado) |
| Bottom | 1 | 2x4x4' (dado) |
| Panel | 9 | 1x6x5' (T&G) |
| Trim | 4 | 1x2x5' (vertical) |
| Top Rail | 1 | 2x6x5' |
| Posts | 2 | 4x4x8' |
| Top | 1 | 2x4x4' (dado) |
| Bottom | 1 | 2x4x4' (dado) |
| Panel | 9 | 1x6x6' T&G |
| Trim | 4 | 1x2x6' (vertical) |
| Top Rail | 1 | 2x6x5' |
Note: If building more than one section recalculate the number of posts and length of the top rail.
Example: A 12’ length of privacy screen requires 4 posts and a 14’ Top rail.
Privacy Screens: How to Build a Tongue and Groove Privacy Screen with Top Lattice
Privacy Screens: How to Build a Tongue and Groove Privacy Screen with Top Lattice DIY Deck Plans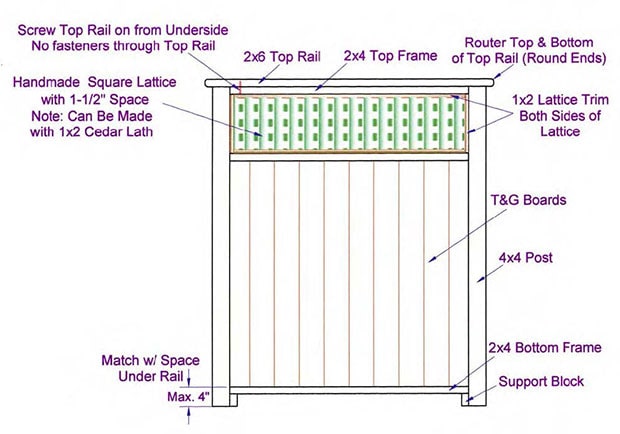
Material List
| Posts | 2 | 4x4x6' |
| Top | 1 | 2x6x5' |
| Horizontal Frames | 3 | 2x4x4' |
| Lath and Trim | 8 4 |
1x2x4' (horizontal) 1x2x6' (vertical) |
| Panel | 10 | 1x6x4' (T&G) |
| Posts | 2 | 4x4x8' |
| Top | 1 | 2x6x5' |
| Horizontal Frames | 3 | 2x4x4' |
| Lath and Trim | 8 4 |
1x2x4' (horizontal) 1x2x6' (vertical) |
| Panel | 10 | 1x6x5' (T&G) |
Note: If building more than one section recalculate the number of posts and length of the top rail.
Privacy Screens: How to Build a V - Pattern Tongue and Groove Privacy Screen
Privacy Screens: How to Build a V - Pattern Tongue and Groove Privacy Screen DIY Deck Plans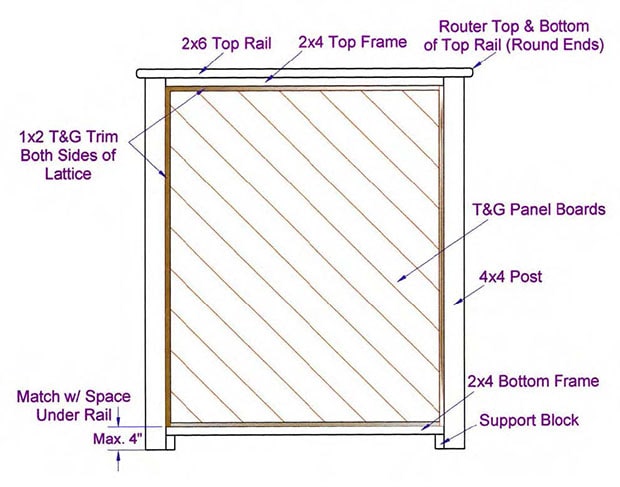
Material List
| Posts | 2 | 2x4x6' |
| Frame | 2 | 2x4x4' |
| Trim | 4 | 1x2x4' (horizontal) |
| 4 | 1x2x5' (vertical) | |
| Top Rail | 1 | 2x6x5' |
| Panel | 2 | 1x6x1' (T & G) |
| 2 | 1x6x2' (T & G) | |
| 2 | 1x6x3' (T & G) | |
| 2 | 1x6x4' (T & G) | |
| 2 | 1x6x5' (T & G) | |
| 2 | 1x6x6' (T & G) |
| Posts | 2 | 2x4x8' |
| Frame | 2 | 2x4x4' |
| Trim | 4 | 1x2x4' (horizontal) |
| 4 | 1x2x6' (vertical) | |
| Top Rail | 1 | 2x6x5' |
| Panel | 2 | 1x6x1' (T & G) |
| 2 | 1x6x2' (T & G) | |
| 2 | 1x6x3' (T & G) | |
| 2 | 1x6x4' (T & G) | |
| 2 | 1x6x5' (T & G) | |
| 2 | 1x6x6' (T & G) |
Note: If building more than one section recalculate the number of posts and length of the top rail.
Privacy Screens: How to Build a V-Pattern Tongue and Groove Privacy Screen with Top Lattice
Privacy Screens: How to Build a V-Pattern Tongue and Groove Privacy Screen with Top Lattice DIY Deck Plans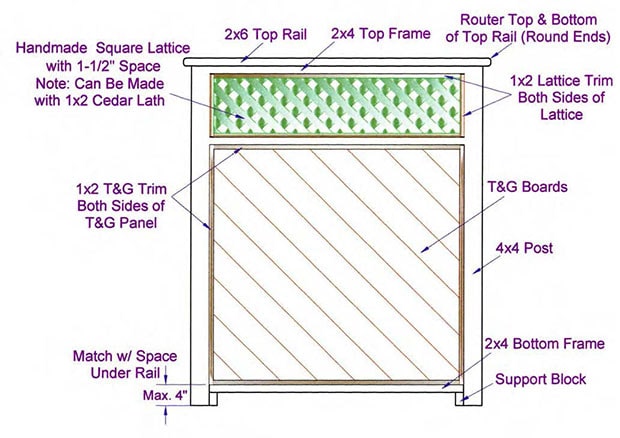
Material List
| Posts | 2 | 4x4x6' |
| Top | 1 | 2x6x5' |
| Horizontal Frames | 3 | 2x4x4' |
| Lath and Trim | 8 4 |
1x2x4' (horizontal) 1x2x6' (vertical) |
| Panel | 10 | 1x6x4' (T&G) |
| Posts | 2 | 4x4x8' |
| Top | 1 | 2x6x5' |
| Horizontal Frames | 3 | 2x4x4' |
| Lath and Trim | 8 4 |
1x2x4' (horizontal) 1x2x6' (vertical) |
| Panel | 10 | 1x6x5' (T&G) |
Note: If building more than one section recalculate the number of posts and length of the top rail.
Privacy Screens: How to Build a Frosted Glass Privacy Screen
Privacy Screens: How to Build a Frosted Glass Privacy Screen DIY Deck Plans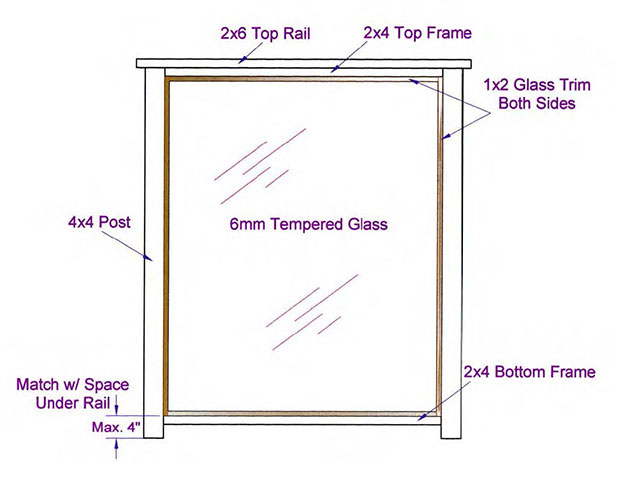
Material List
| Posts | 2 | 4x4x6' |
| Frame | 2 | 2x4x4' |
| Trim | 4 4 |
1x2x4' (horizontal) 1x2x5' (vertical) |
| Top Rail | 1 | 2x6x5' |
| 1/4" tempered glass panel to be ordered to fit. | ||
Note: If building more than one section recalculate the number of posts and length of the top rail.
Privacy Screens: How to Build a Fixed Louver Privacy Screen
Privacy Screens: How to Build a Fixed Louver Privacy Screen DIY Deck Plans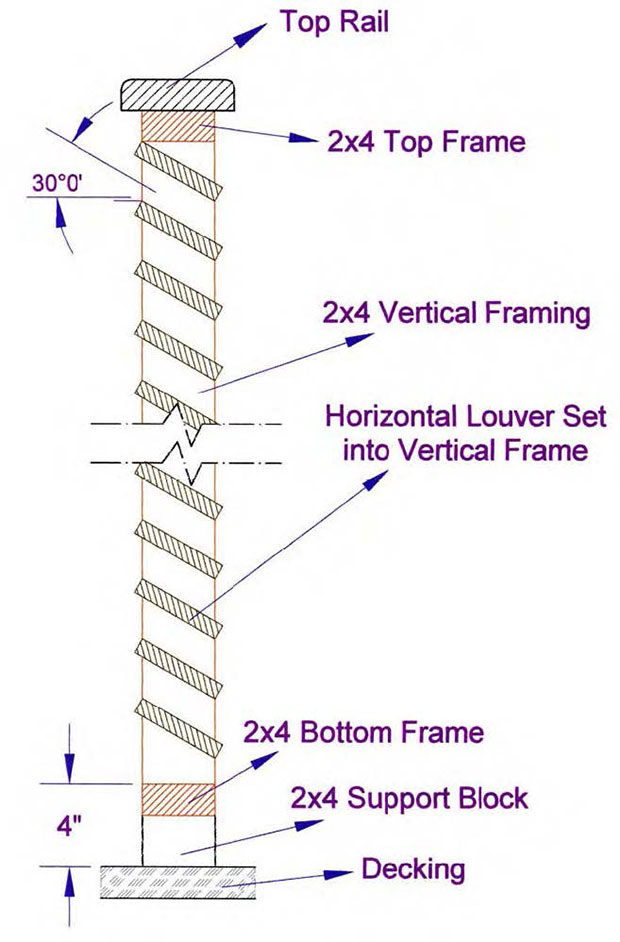
Horizontal louvers are a fixed piece that is set between a cut out or routered out vertical frame. Louvers are mainly made out of cedar but can also be made out of some maintenance free products.