How to Frame an Arch or Curve on Your Deck
How to Frame an Arch or Curve on Your Deck DIY Deck Plans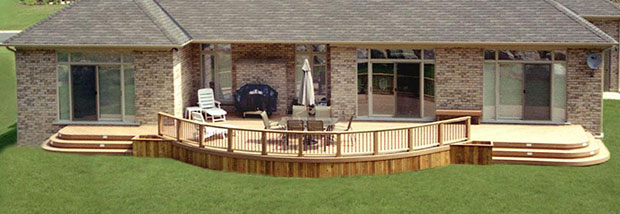
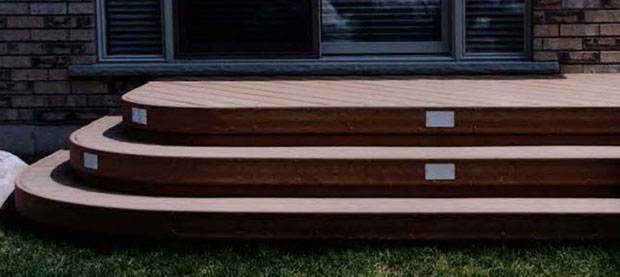
Curves along the edge of your deck, and steps, add a unique visual element to your deck that set it apart from simpler designs. You can find some deck plans with curves in our online store. Curves require some extra work, and more experience to build. We'll show you how below.
To frame an arch, or curve along the edge of your deck, your joists need to be long enough to cover the range of the curve. The curve itself can be laid out using a string, or light piece of lumber as a compass.
Marking Your Curve
Using a String
- To use a string to mark the curve on your joist ends first measure the width of the curve you intend to create, from one end to the other.
- At the edge of the deck, where your curve will be, mark the center of the curve’s width. From this center mark, measure back half the width of the curved area onto the center joist, perpendicular to the edge to be curved. For example, for a 36 inch curve, from the middle of the edge to be curved, measure back, perpendicular to that edge, 18 inches.
- Drive a screw in at this point so that about one inch of it remains standing out above the surface of the joist to tie a string onto.
- Tie a string to this screw long enough to reach the edge of your proposed curve. From the edge of the proposed curve, measure back 1 ½ inches to account for the face plate. Tie a pencil, or other marking instrument to the string, so that, when your marker stands upright with the string tight from the screw, the point of your marker hits 1 ½ inches back from edge point of your proposed curve. (in our hypothetical 36 inch curve, this will be 16 ½ inches)
- Keeping the string taut, move around the curve, marking each joist on its top edge at the angle of the curve, until all joists are marked in line with your proposed curve.
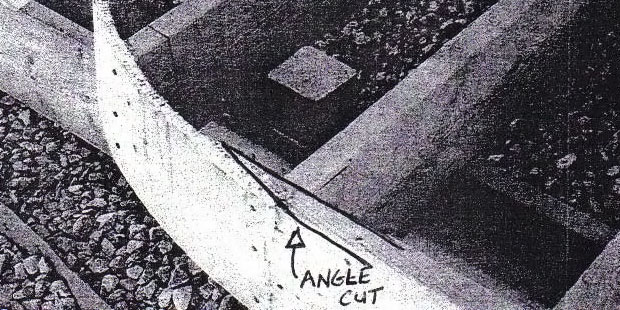
- From the top mark you just made, use a speed square, or other square to mark each joist on each face, in line with the end of the line you just marked. This will indicate the angle of the cut for each joist. Use a reciprocating saw to cut the joists off following these lines.
Using a Board
For this method follow the basic instructions for the string method, substituting a strip of lumber in place of the string.
- Select a straight piece of lumber for your “compass board”, ½ to ¾ inches thick and about 1 ½ inches wide and at least half as long as your curved area is wide. (for our hypothetical 36 inch curve, the board need to be more than 18 inches long)
- Measure your curved area as described in the string method and mark the center spot at the edge of your proposed curve.
- Measure back from the edge half the width of your curve along the middle joist and make a mark.
- Drive a screw through your compass board at one end, so that it fastens the board at the marked spot and the free end extends out past the edge of your desired curve. Leave the screw loose enough that the board can rotate around it easily, like the hand of a clock.
- Measure from the head of the screw along your compass board and make a mark, 1 ½ inches back from the edge of your proposed curve. (on our 36 inch curve, this would be 16 ½ inches)
- Drill a hole through your board at the mark you just made, slightly larger than the diameter of your writing utensil so that the marker fits easily through the hole without too much wiggle room.
- Fit the writing utensil through the hole and rotate the board along the arc of your curve, pivoting from the screw. Mark each joist where your “compass” passes over it. Mark the faces of the joist as described in the string method and cut them.
Cutting Your Joists
Cut the joists off following the marks you just made. Use a handsaw, or reciprocating saw with a coarse blade. Start your cut lined up with the top edge mark and use the marks on the faces of the joist to keep your blade aligned to the correct angle as you cut down through the joist.
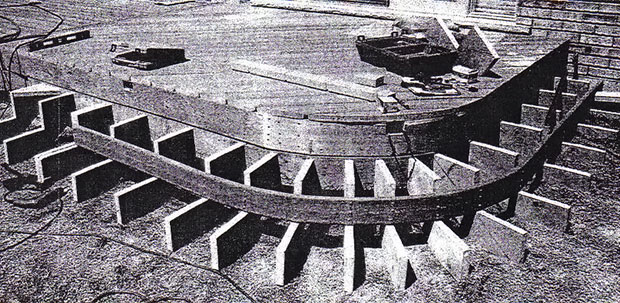
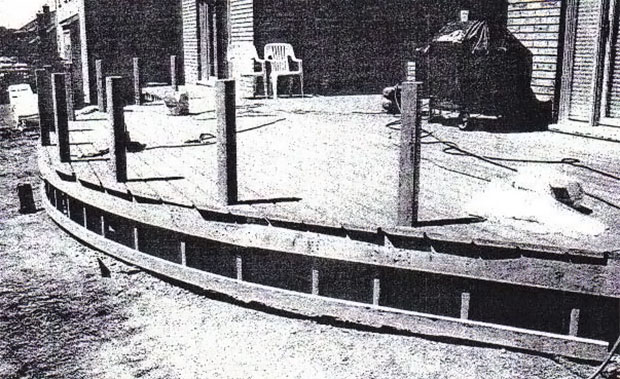
Blocking
Install Blocking between the joist ends along curves to prevent joist spacing from shifting. Cut your blocking pieces from joist materials and miter the ends so that each piece fits as close to the ends of the joists as possible. Nail, or screw blocking in place by toe-nailing your fasteners through the mitered ends into your joists.
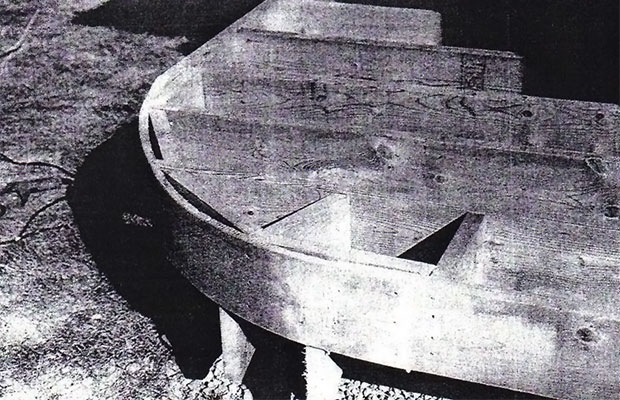
Installing the Face-plate
Standard two by lumber does not bend well. If your curve is more than slight, you will need to work with something thinner. Standard framing lumber, ripped to ¾ inches thick on a band saw will work for average curves. You will need two layers to provide a ridged edge.
For tighter curves, slice your framing material thinner and build it up. Three layers of ½ inch thick material works well. With multiple layers, apply wood glue between layers and use clamps along the face to laminate the pieces together.
Small vertical cuts, known as “kerfs” can also be made in the back face of ¾ inch material with a circular saw set to 3/8 inch depth, to make the piece more flexible. Cuts are typically spaced ¾ inches apart.
Attach your face-plate pieces with screws through the face-plate at each joist end with screws. Use at least three screws in each joist, top middle and bottom. Do this with each layer, positioning screws in top layers so that they do not hit screws already installed. Use a countersink bit, so that screw heads will run in flush with the face-plate surface.
Face-plate Splices
Where joints are required in curved face-plates, use a reciprocating saw to cut miters at greater than 45° at the ends where the two pieces meet. The angles should be the same on both pieces. This creates a thin wedge at the end of both pieces, for a longer overlap. Glue and nail the overlap, then sand the joint smooth once the glue is set.
Skirt Supports
If the curved edge of your deck is a step, or matches up to one, a skirt is needed underneath the edge of the deck face-plate. The skirt should be set back so that the face-plate stands out at least ¾ inch in front of the skirt. To do this, attach skirt supports to each joist end, so that they extend below the bottom edge of the joist the same height as the thickness of the joists, or 7 ½ inches for 2x8 joists.
Install the skirt using the same material and technique as the face-plate.
Cedar or Composite Decks
Remember to use cedar for the top layer of curved face-plates on cedar decks for appearance. On composite decks, a layer of composite material should be installed on top of your curved face-plate. Since composite material is not strong enough to serve as structural support, a full 1 ½ inches of face-plate must be installed before adding the composite.
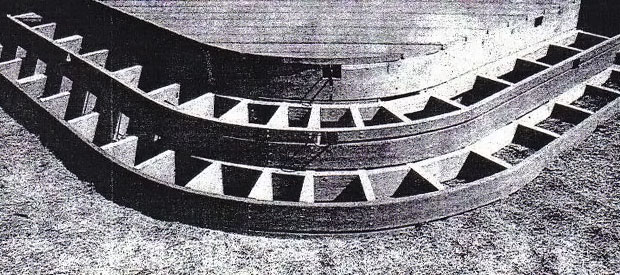
Framing Curved Stairs
Cut stair stringers from 2 x 12 PT lumber for every 16” of straight face-plate and one every 8 to 12” on the curves. Stringers on curves will need to be set on an angle to the main frame, so that the stringer is as close to perpendicular with the face-plate as possible.
Block between joist ends as described for deck edge curves.
Install the face-plate as described for deck edges. Leave room for cedar, or composite if called for. Mark spaces and cut for deck lights, if called for.
Pro Tip
Composite decking companies, including Trex, often make color matched edge cladding that can be bent to fit curves. Use this if possible, rather than cutting composite material thinner to fit tight curves.
Install the front trim board, flush with the deck top, over your face-plate, using the same techniques.
Decking boards cannot be bent to follow curves in the edge of the frame. Lay your deck boards to overlap face-plates and mark the curve as previously described, by running a pencil along the bottom face, against the face plate. Remove the marked boards, cut to fit and reinstall. Use a jig saw or band saw for cutting the curves.
Have a look in the shop for some deck plans with curves.