Gazebos
Gazebos DIY Deck PlansGazebos: How to Build a Gazebo Foundation
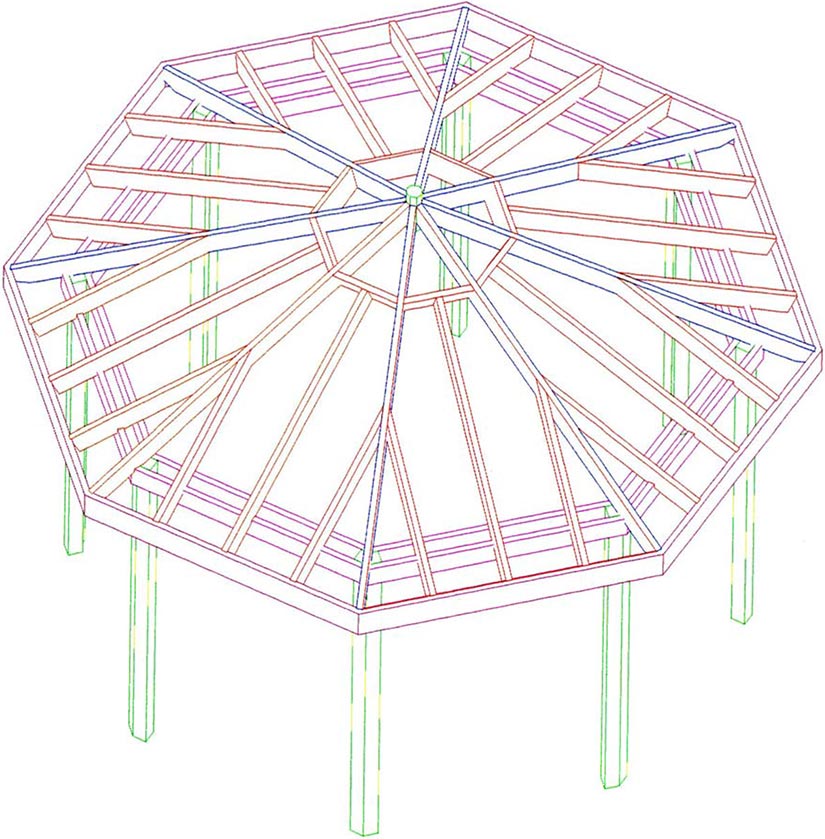
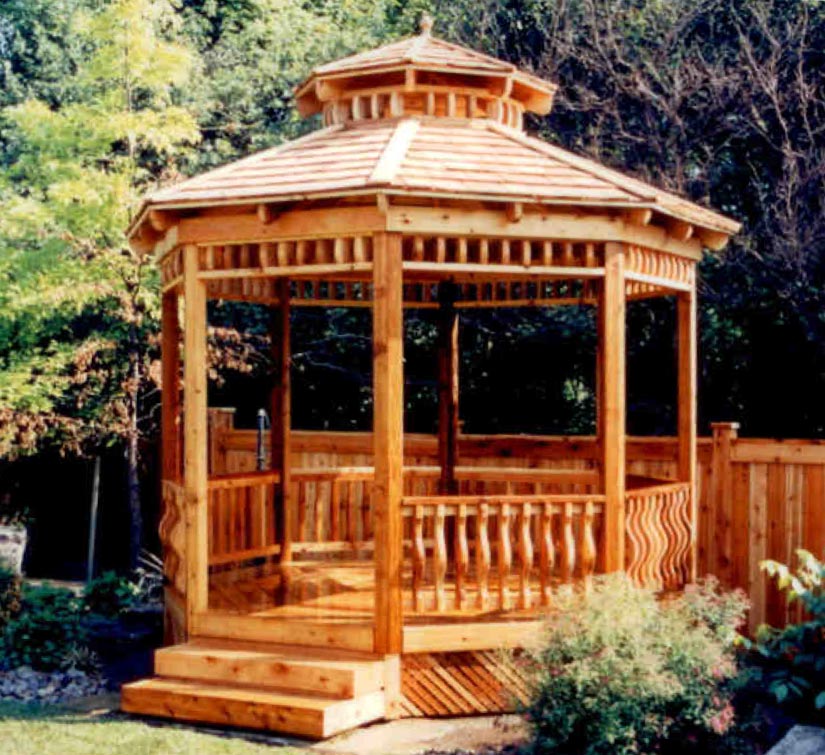
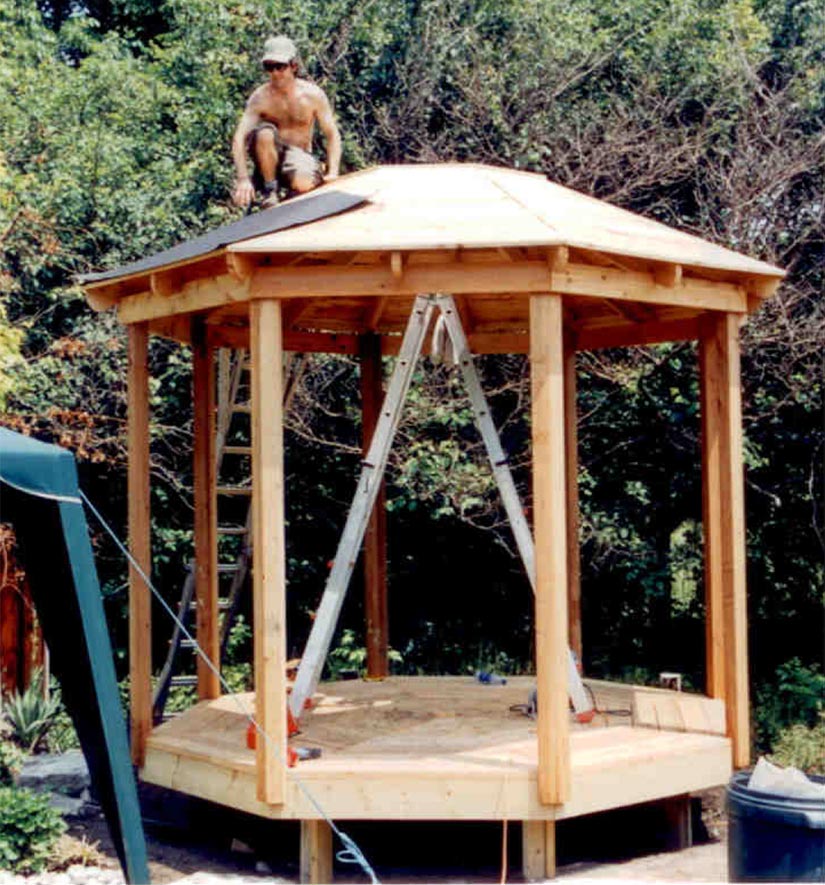
Gazebos: How to Build a Gazebo Foundation DIY Deck PlansGazebos are a fairly traditional garden structure used for outdoor entertaining. They are defined by their solid roof and open sides, are typically free standing and can have from four to eight sides. Our gazebo plans feature a traditional octagon pattern. Gazebo construction is more complex than most deck building, due to the angled framing and eight sided structure.
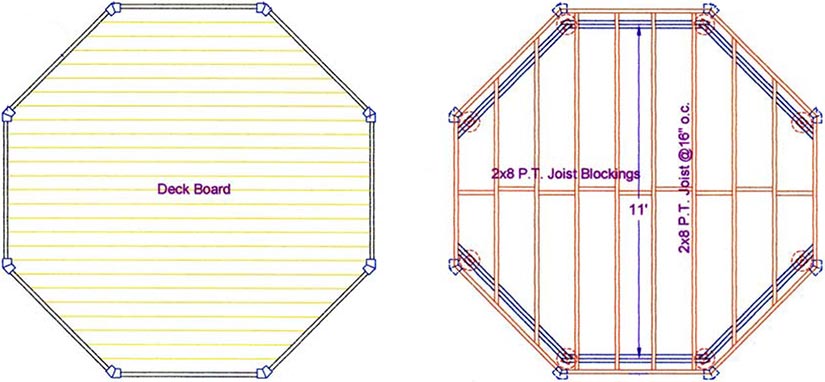
There are two basic foundation styles available in our gazebo plans. The first features a “pie shaped” floor pattern with eight, equally sized triangles. The other is a much simpler framing scheme with standard 16” oc joists for straight decking. The “pie” plan is favored for aesthetics, while the standard framing is favored for simplicity.
The dimensions of each piece will vary based on the plan you selected and will be included in the cut list with your plan. The construction techniques are similar, regardless of gazebo size.
Eight Equal Triangles Framing
The frame is supported on 4x4 posts set in standard footings as described in the post setting section of this deck building guide. The center of the frame is a double joist “beam” running directly down the middle. On either side of this, two, concentric, half-octagon frames provide the joist structure that your decking will be applied to.
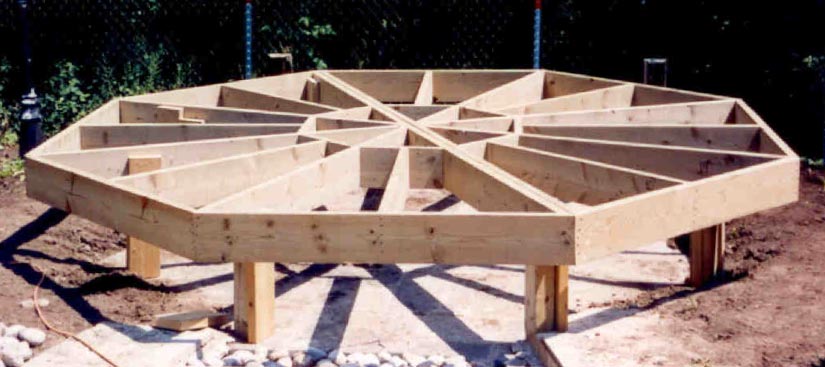
Since there are eight sides, all angles are set at 22 ½ °, versus the 45° standard angle for square cornered structures. Any structure that has a constant perimeter will have corner angles that add up to 360°. With a four cornered structure that means four 90° corners, each made up of two 45° angles. With an octagon it is eight 45° corners made up of two 22 ½ ° angles each.
Post Footing Layout
The simplest way to layout an octagon pattern is with two overlaid rectangles following the dimensions from your plan for spacing. The two rectangles should set at 90° to each other, to create a “cross” shape so that the center of both rectangles are in exactly the same position. The distance between the left corner of one rectangle to the right corner of the other, should be exactly the same as width of the rectangle.

Use your plan to determine where the joists will fall inside this outline and layout your posts accordingly. Determine which posts need to be notched to support the frame and make your cuts.
Octagon Frame Construction
The frame is built in two identical half-octagon sides. Half of the central beam serves as the base of each frame, with three spokes running off of this beam to create four triangle sections. The outer frame, or rim joist, is cut in four equal length pieces with ends mitered at 22 ½ ° to create 45°corners at the end of each spoke and the ends of the beam.
Blocking with mitered ends is installed between these spokes to create the center half-octagon for each side. A short spoke is cut to fit inside each of piece of blocking running to the center. All joints need to be securely toe nailed so that each half-octagon is sturdy.
Assembling the Frame
Join the two half-octagons by aligning the two center beam pieces in the center, with each end supported on top of a post. Attach the remaining “spoke” joists to their corresponding posts with lag bolts to hold the foundation in place.
Framing for Straight Decking
The frame for a straight deck uses a perimeter double beam, as outlined in the deck building guide on framing. Two concentric octagons are formed around the posts, with one attached to the inside face of the posts, and the other on the outside.
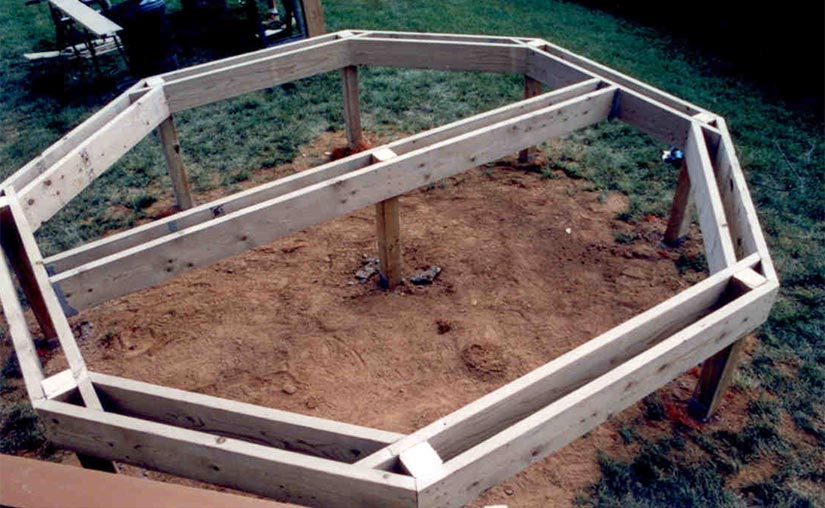
Assemble the outside octagon first. The pieces are all equal length and cut at 22 ½° on both ends. Fasten to the posts first, then attach at the corners by toe nailing through the mitered ends. The inside octagon has two different length pieces, four long, four short. The ends are cut at 45°. Install the long pieces first. Bolt them to the posts, then toe nail the ends to the outside octagon pieces.
Fit the shorter pieces in place with their ends resting on the longer pieces at either end and toenail them in place. Use fasteners long enough to go through both octagon pieces and into the post at each end of each of the four shorter pieces.
Top Frame
The top frame is larger. Begin construction by cutting all eight outside frame pieces to length. Miter each end of each piece at 22 ½°. Start by attaching two of the outside frame pieces together, by nailing joists between them. Space the joists at 16”oc. Fasten the remaining outside frame pieces together and measure and cut each joist to fit along the angled sections. Nail them in place.
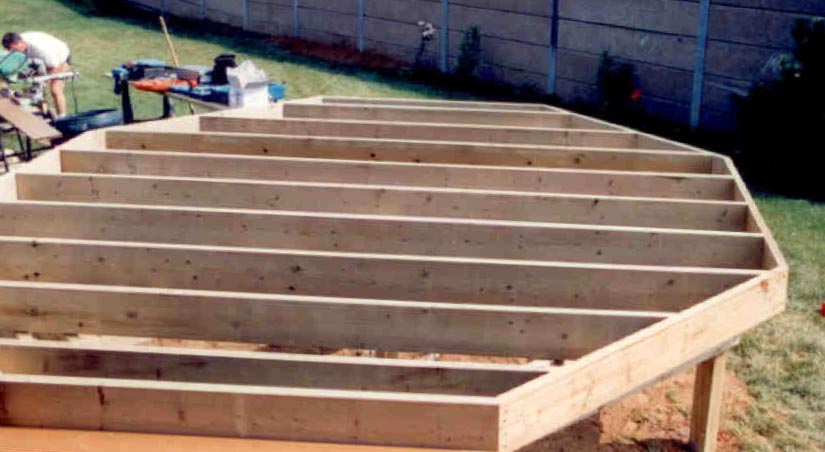
Mount the top frame on top of the beam foundation you constructed and toe nail it in place, or fasten the upper frame to the foundation with hurricane ties.
Installing Floor Decking
Eight Section Floor Frame
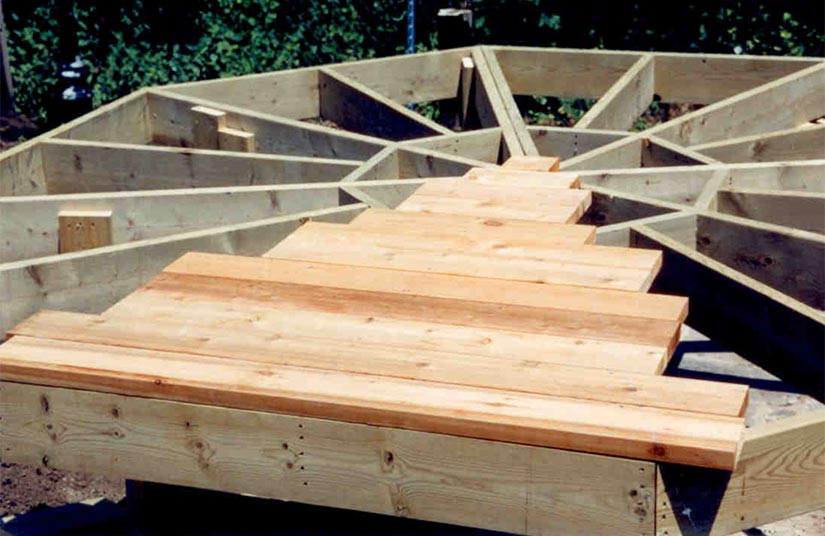
Lay decking section, by section. Position each row of boards parallel to the outside edge, starting from the edge. Cut each piece to overlap the diagonal line separating the triangle sections on each end. Fasten the boards in place. Mark the diagonal ends even with the diagonal “spokes” underneath, using a chalk line and set a circular to a depth that is just barely more than the thickness of the deck boards and cut the boards off on the chalk line.
Cut one end of the boards for the next section to match up to the ends of the first. This will be 22 ½ ° if your cut is straight. Adjust if needed. Cut the other end so that it extends over the diagonal line at the other end of the second section. Fasten the boards in place and mark and cut them as you did for the first section.
Continue like this until seven sections of the octagon have decking. Measure and cut each piece to fit snugly for the last section and fasten it in place.
Straight Decking Floor Frame
Install deck boards as you would for standard deck construction. Start along one edge, perpendicular to the joists. Cut the boards so that they overhang the edges of the frame at either end and fasten them in place. Install all of the deck boards in this manner. Mark and cut the edges with a chalk line to match the frame.
Gazebos: How to Frame Your Gazebo Roof
Gazebos: How to Frame Your Gazebo Roof DIY Deck PlansGazebo Corner Posts
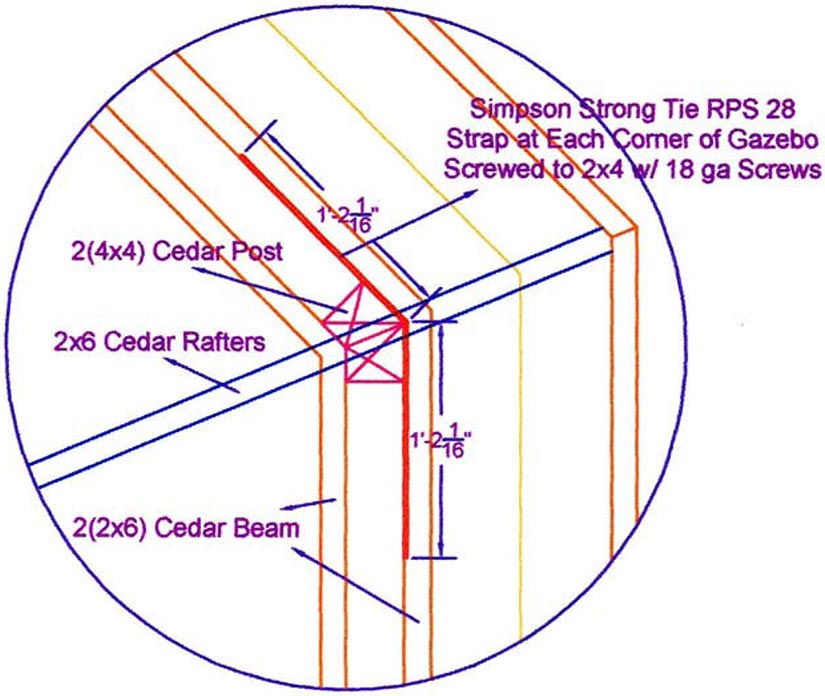
The roof structure is supported by ripped down 4x4 posts fit together in pairs at each of the eight corners. Consult your plan for thickness. The inside edge of each post piece will be cut at 22 ½ °, so that they fit together to form the corner. Fasten them to the substructure at the bottom with lag screws and toenail the posts together through the mitered edge. The bottom end is notched to fit over the edge of the outside plate.
Gazebo Roof Foundation Ring
This ring sits at the top of the posts and is built similarly to the outside beam structure of your foundation, if you chose the straight decking model. There are two concentric octagons. Assemble the outside ring first.
- Cut the pieces to length with 22 ½ °miters at each end. Fasten them to the tops of the posts and to each other at each corner.
- Cut the inside octagon with 45° miters at each end. There will be two lengths of pieces, four short, four long.
- Install the long pieces first. Lag bolt them to the posts and toenail each end where it meets the inside face of the outside octagon.
- Install the four short pieces by toe nailing through the ends. Use fasteners long enough to go through both pieces and into the posts.
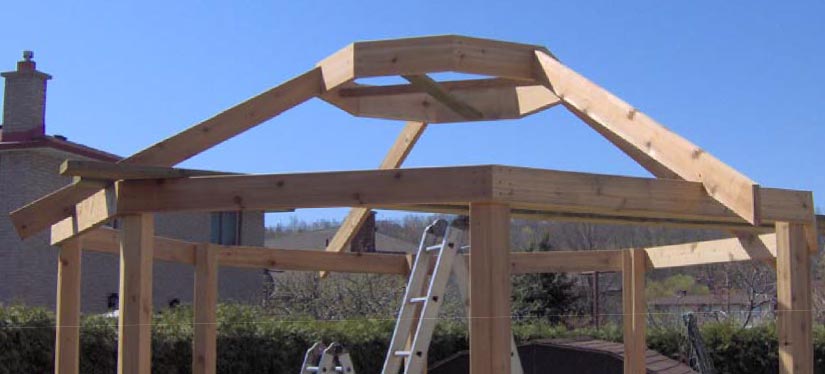
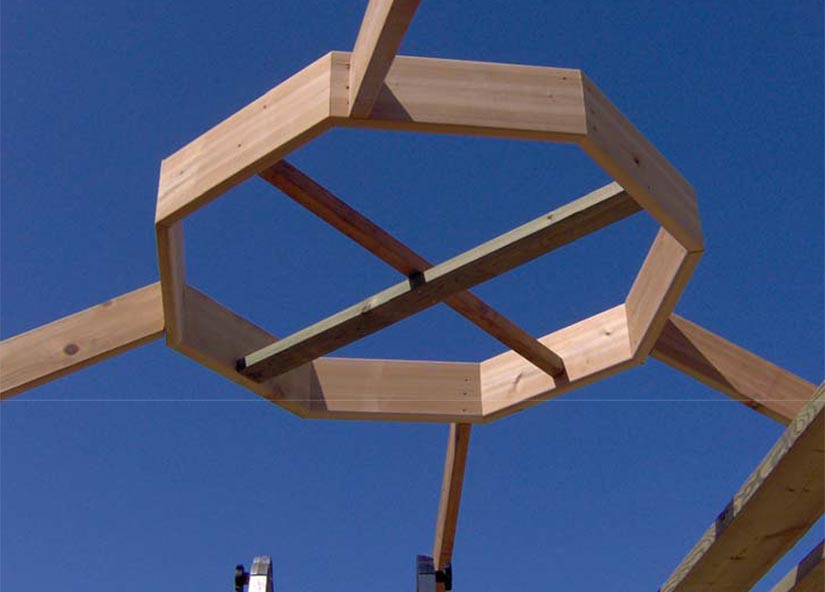
Building the Single Tiered Gazebo Roof

- Cut your eight full length rafters to size. The top end is mitered according to the plan, while the bottom end gets a special notch, known as a “bird’s mouth” (see image in Short Rafters section, below) that will rest atop the fascia ring, to keep the rafters from pushing out too far.
- Cut the bird’s mouths with a jig saw, or reciprocating saw.
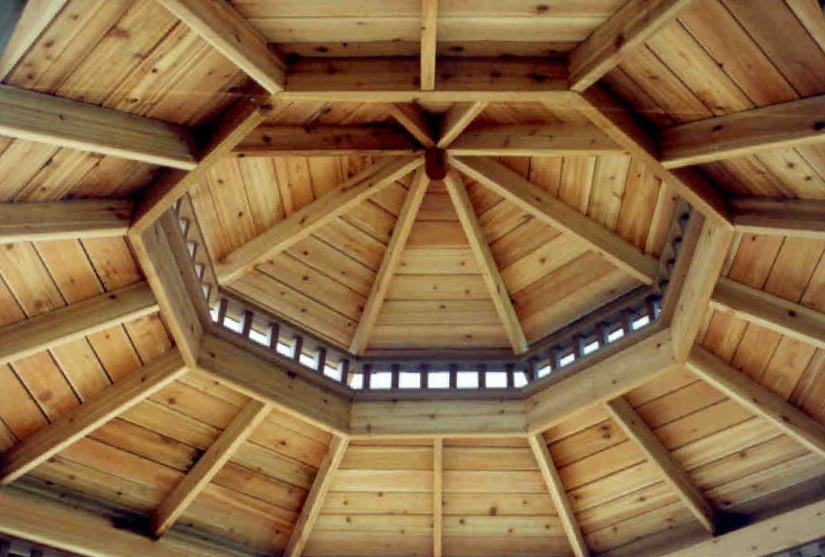
- Cut the center spire according to your plans. This piece is eight sided and all eight rafters will rest against it at the top, so that they are angled up, pinned between the bird’s mouth and the spire.
- Determine how high above the floor your spire is supposed to be and support it, so that the rafters rest with the notch of the bird’s mouth, firmly on top of the fascia ring and the top end against the spire.
- Toe nail each rafter to the fascia ring and the spire
Blocking the Rafters
Cut and install mitered blocking between the rafters to form an octagon, about ¼ of the way down from the spire. Cut the blocking to suit your plan and install it, by toe-nailing the mitered ends of each piece to the faces of the rafters on either end of each piece.
Short Rafters
- Measure and cut a shorter piece to fit between every two rafters, with a bird’s mouth, and the end mitered to fit against the blocking you installed. They will help to stiffen the structure.
- Cut two more short rafters with mitered ends, for each short rafter. Consult your plan for length and miter angle.
- Fit the mitered short rafters alongside the main rafters one on either side of each of the short rafters you installed.
Fascia Boards
- Mark and cut your rafter ends according to your plan, so that the end of each rafter is vertical.
- Cut and install a band of rafter material around the outside edge of the roof frame, attached to each rafter end.
- Toe nail the corners of the fascia boards together at each corner.
Alternative Rafter End Treatment
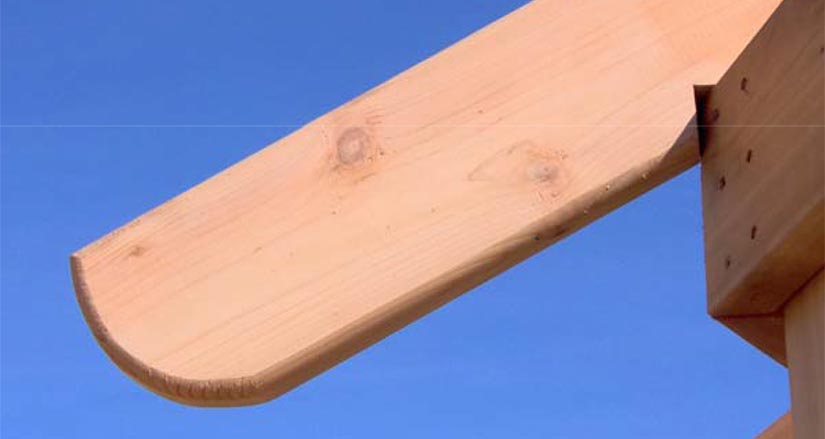
Rafter ends can also be left long and cut to present decorative ends, instead of installing fascia. In this case, install blocking between the rafter ends to stiffen them and keep them vertically plumb.
Building the Two Tiered Gazebo Roof
Main Gazebo Roof
The main roof is framed similarly to the single tiered roof. An octagon frame takes the place of the spire to hold the place for the second roof tier. Assemble the frame with removable cross bracing through the center to hold it ridged while the rafters are installed. This frame is the same dimensions as the bottom frame ring of the second tier.
Main Gazebo Roof Rafter Installation
- Cut a birds mouth in each rafter and miter the upper end to fit flush against the octagon center frame.
- Support the octagon from underneath to hold it at the proper height and level.
- Install rafters one at a time, installing opposing rafters to support the octagon.
- Fasten rafters by toe nailing into the frame at the birds mouth and driving fasteners into the end of each rafter, from inside the octagon.
- Install two rafters against each flat face of the octagon and one at each corner of the roof.
Rafter tails can be cut for fascia, or left long and cut with a decorative detail as described in the single tiered roof section.
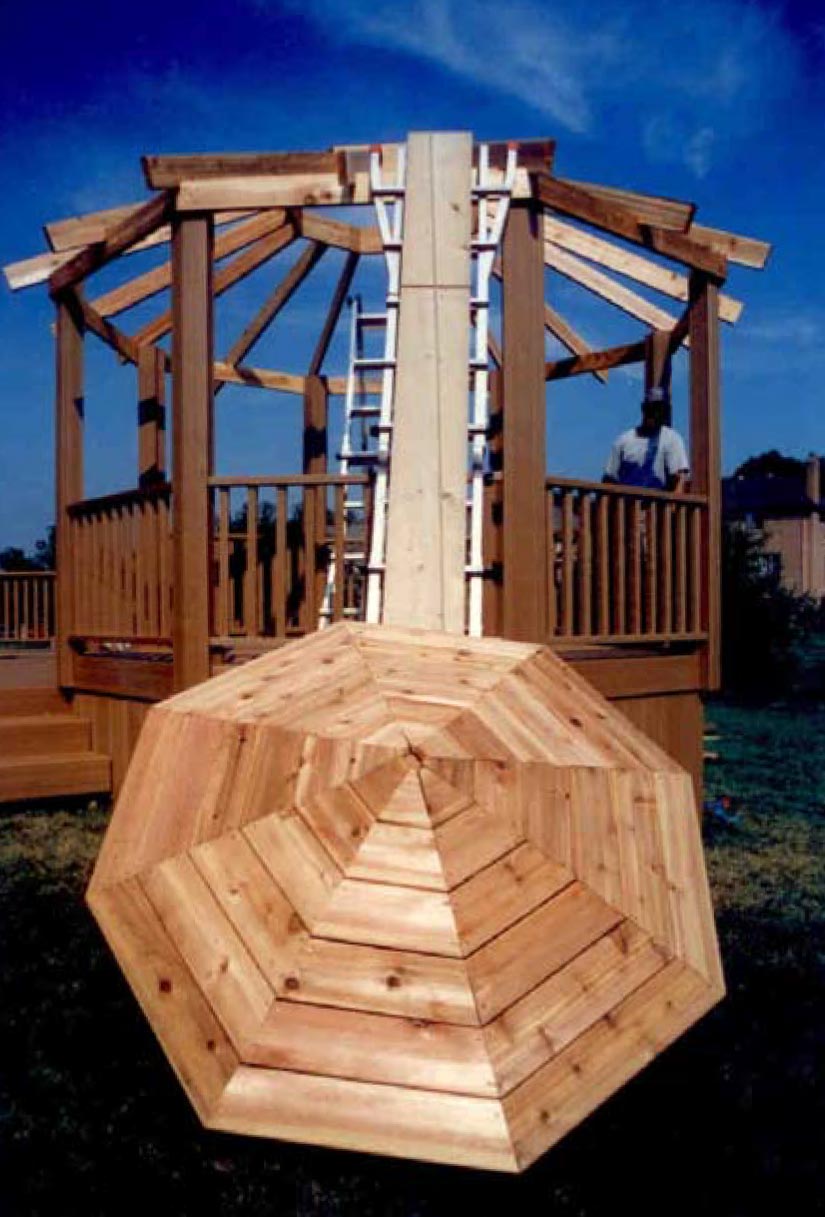
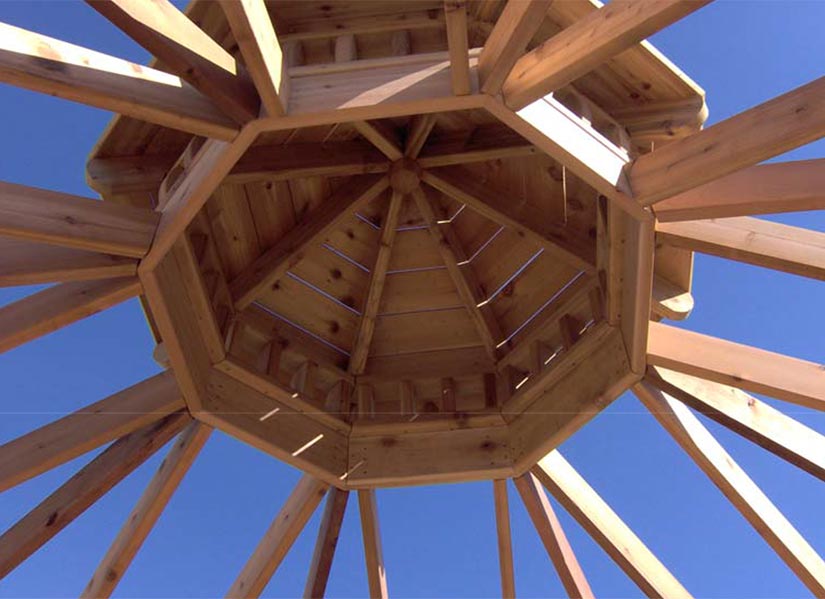
The Top, or Second Tier Gazebo Section
The top section of the roof, or “cupola”, rises up out of the lower roof once assembled, with vents on all eight faces. Cut and assemble the pieces of this separately, on the ground, before installation. Assemble the section similarly to the instructions for the single tiered roof.

The base of this top roof section is two octagonal frames made of 2x4, with the same outside dimensions as the center frame of the main roof. Half-moon shapes cut from 2x4 with a band saw create an open rail section between the two octagons.
The upper roof is framed using similar techniques as described for a single tiered roof. Roof decking, felt paper, and shingles are added to the upper roof section before it is installed.
Installing the Second Roof Tier
Once all rafters are secure, but before roof decking goes on, put the second tier roof assembly in place and fasten it down. Inspect the center octagon frame for stability before beginning this process. The roof assembly puts a lot of downward pressure in a very small area. Apply weight to ensure the roof frame is stable before introducing this additional stress.
Lifting the Second Tier Gazebo Roof
Position a heavy step ladder, long enough to reach from the ground to the center octagonal frame on a fairly low angle, with its feet firmly on solid ground and the top end extending just past the top edge of the octagon.
Cut lumber planks to fit over the ladder steps to create a bed for your “ramp”. The second tier roof assembly will slide up this and into position.
Work Safely
- Secure a rope long enough to pass over the entire gazebo structure to the ground on the opposite side, to the second tier roof assembly.
- Station a helper at the ground end of this rope to take out slack as the assembly is raised, to prevent it sliding back down.
- With at least one strong helper, put the assembly in place at the bottom of the ladder and slide it up the ladder slowly.
- Have the rope handler keep the rope tight at all times so that the assembly will not slide back.
Fit the Second Tier Roof Carefully and Fasten in Place
Carefully take the assembly up and over the edge of the octagon and slide it over until it fits neatly on top of the octagon. Fasten the second tier roof assembly in place from underneath the octagonal frame.
Gazebos: How to Install a Gazebo Railing and Trim
Gazebos: How to Install a Gazebo Railing and Trim DIY Deck PlansGazebo Railings
Any standard wood deck railing system or custom deck railing can be used for gazebo construction. Any gazebo that is set more than 12” above grade will require a rail to meet building code. Check local codes to determine specifics. In general, rails are 36” to 42” in height, and have spindles or “balusters” spaced less than 4” apart.
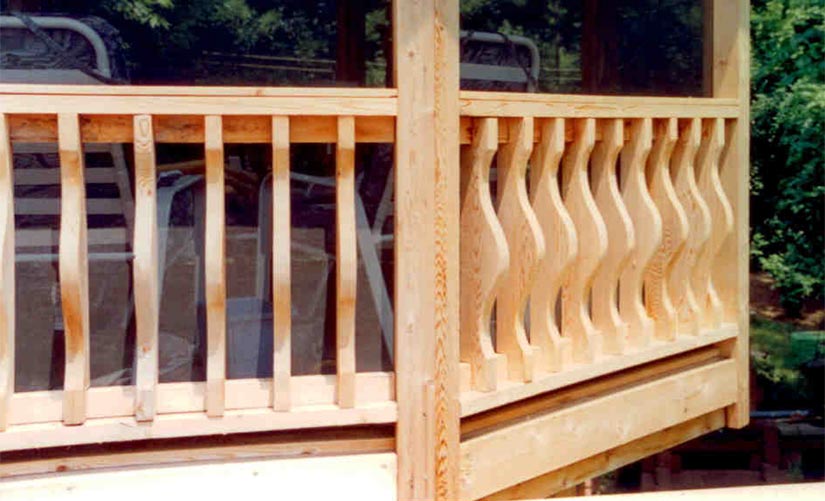
There are also rules regarding width and thickness of rail cap, check local codes to determine specifics. In general, most rail systems are designed to meet code.
- Measure between posts at the height of the top of your rail and at the height of the bottom of your rail to ensure proper fit.
- Cut top and bottom rails to fit each section specifically. A miter saw works best.
- Install your bottom rail between posts first. If you are using a sectional rail system, the whole rail may be installed at once. Use spacer blocks under the bottom rail to hold it at the proper height. Use a level to double check the pitch of the rail.
- Install rail with fasteners to both posts. If brackets are used, attach brackets first, then position bottom rail to fit. Otherwise, pre-drill your rails to prevent splitting and use screws to fasten them in place.
- Fit your balusters or spindles into the bottom rail and fit the top rail in position on top of the spindles.
- Fasten the top rail in position as you did the bottom.
Pro Tip
Modern deck railings use balusters that fasten to both top and bottom rails once in place. If you are installing one of these rails, double check the spacing between top and bottom rails to ensure it is consistent.
Gazebo Trim
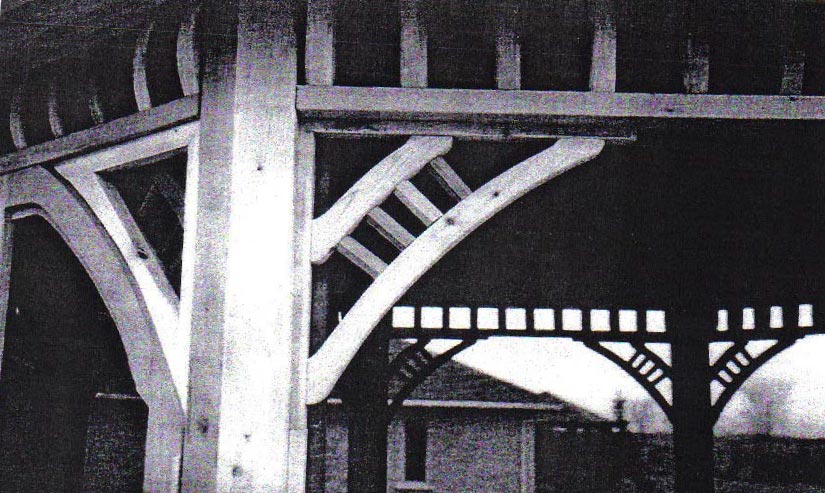
Trim pieces such as corner brackets, or corbels are often fitted into the 90° corners between the horizontal roof framing and the posts, or the top rail and posts.
Brackets are often cut out, fitted with decorative beads and appliques, or made from metal. Corbels are solid wood or plaster brackets. Both are typically triangle shaped.
- Fit the brackets into the corner and mark any and all screw holes on the bracket to the rail, post, or horizontal frame.
- Drill pilot holes through the brackets if they do not exist already. Mark the holes as described in step one.
- Fasten the bracket in place with the screws provided with your bracket or corbel, or deck screws.
Wooden trim pieces can be used to cover gaps in construction around post bases and other places. When using screws to fasten trim, always predrill before installation.
Gazebos: How to Install the Gazebo Roof Deck
Gazebos: How to Install the Gazebo Roof Deck DIY Deck PlansUse standard 5/4 cedar decking boards for your roof deck. This will provide a solid foundation for the remaining two layers. Install the boards so that the good face is turned toward the ground. The underside is visible and the top side is not only out of view, but will be covered by felt and wood shingles.
Installing the First Section
- Position deck boards on each “pie shaped” section, starting at the lower edge. Fit the first board parallel to the fascia, overlapping it evenly, according to plan dimensions.
- Fasten the board in place so that both ends overhang the edges of the triangular section. Use two fasteners into the top edge of each joist through the deck board.
- Add decking boards, moving toward the peak of the roof. Cut each board so that the ends overlap the edges of the triangular area between the main rafters and fasten them down.
- Mark the edges of the triangular section with a chalk line even with the center line between the triangular sections.
- Set a circular saw to a depth just barely deeper than the thickness of your deck boards. Cut along the chalk lines on both sides and remove the cut away pieces.
Completing the Gazebo Roof Deck
- Cut the ends of the boards for the next section to match the first, on a 22 ½ ° miter, long enough that the remaining end will overlap the opposite edge of the triangular section between main rafters.
- Fit the boards in place as before, starting from the bottom edge. Fasten each board in place as previously described.
- Mark and cut the long ends of the boards to fit the triangular area between the corner rafters.
- Continue decking in sections until you reach the last section. Measure and cut each piece to fit the last remaining section with miters on both ends.
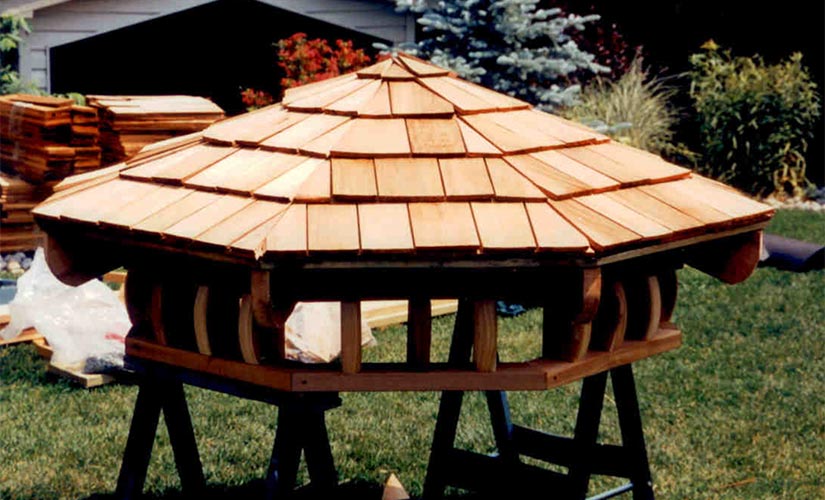
Finishing the Gazebo Roof
The gazebo roof goes on in three layers to provide a water tight surface. The middle layer is made up of roof felt. On top of that, shingles are installed to suit. Common choices are shingles that match your home or surrounding out buildings, or cedar shingles to match the trim of the gazebo.
Installing Roof Felt
- Roll roof felt across the first section so that it overlaps by at least six inches on both sides.
- Nail the felt in place with roofing nails fitted with plastic washers. Use one nail every six to twelve inches, smoothing the felt to keep it taut between nails.
- Cut the bottom edge of the felt along the edge of the fascia with a utility knife, or heavy scissors.
- Install the remaining sections in the same way, overlapping the felt along the edges where it meets the other pieces.
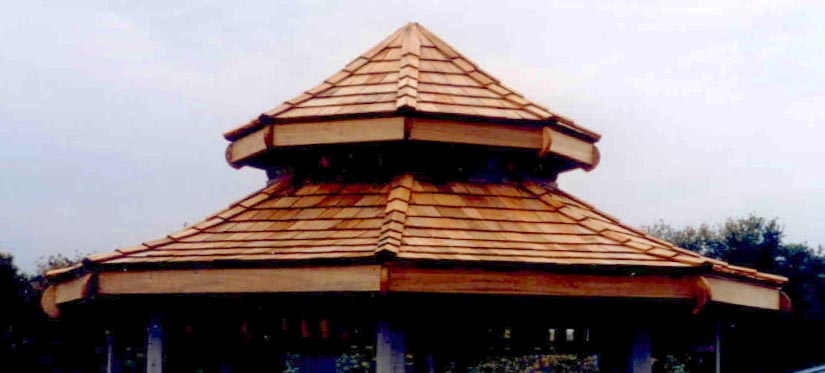
Installing Shingles
Shingle installation is a fairly simple procedure. It will vary slightly depending on whether you use cedar shingles or composite. The image below shows a fully shingled, curved roof.
- Start shingle installation along the bottom row at one corner. If you are using composite shingles a solid starter strip is used. Cut each shingle to fit using a utility knife, so that the edge is angled to fit with the rafter.
- Nail the shingle in place using manufacturers recommended fasteners and spacing. Shingles above should cover nails on the row below.
- Fit the shingles side by side until the bottom row is filled across an entire section.
- Start the next row above the first, using the manufacturer’s recommended spacing. Continue adding shingles until you reach the top.
- Use ridge shingles to cover the gap between sections along the corner rafters. Follow manufacturer’s recommended procedure for fitting and fastening.