Wood Riser Stairs
Calculating Stair Rise
Use a string and string level to determine the height of the stairs.
- Mark the end of our stairs with a stake driven in at the point where the bottom riser will sit. The distance should be evenly divisible by twice the width of your decking boards. If not, adjust the position of the stake.
- Stretch your string out to the stake and adjust it until the level bubble is centered.
- Measure from the string to ground level at the base of the stake.
- Divide the height of the string by 8. Divide any remainder and add it equally to each step (for example, 33” deck height, equals 4 stairs, 8 ¼” each)
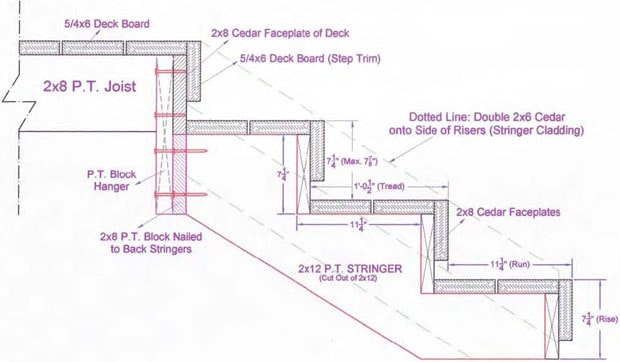
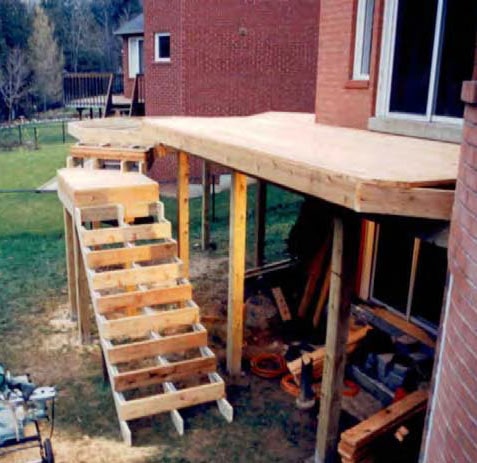
Stringer Stair Construction
Stair stringers are cut from 2x12 lumber. For exposed side stringers, use cedar lumber. Make one stringer for each 16 inches of stair width. Allow for light boxes if riser lights will be installed. Stair risers are cut from 2x8 material. Stair treads are made from deck board material.
- Use a framing square to mark stringers. Use the outside of the “L” to mark for rise and tread.
- Starting from the outside corner of the square, find the mark that indicates the dimension of your tread. Position the square with that mark on one long edge of the 2x12 and the corner of the square on the board.
- Starting from the same point, locate the mark that matches the dimension of your rise on the other “leg” of the square. Position it on the same edge you used for the tread mark.
- Trace along the square’s outside corner to mark a “v” notch with one angle of the V being equal to the tread, and the other equal to the rise.
- Repeat for each step, so that the tread starts where the rise below ended.
- Cut along the marks to remove the “v” sections.
- Cut the ends of your stringer at 90 degrees to the top tread, and the bottom rise, sot that the bottom will set flat on the ground and the stop will rest flat against the drop block.
Attaching Stringers to Deck With Drop Blocks
Stringers must be securely attached to the deck at the top end. The bottom end is typically left free floating, with gravity holding it in place. Work carefully to ensure the stringer height is spaced properly down from the top of the deck and level.
- Attach 2x4 drop blocks at each corner and at least one in the center of your stairs.
- Position them so that the top end rests against the bottom of the deck boards, with one flat face against the inside of the rim joist, or deck face plate.
- Screw them in place.
- Attach a piece of 2x6 horizontally along the bottom edge of the rim joist across the width of the stairs.
- Screw through this stair “ledger” to the drop blocks.
- Fit the Stringers so that the back angle of the top fits flush against the face of the stair stringer you installed. Screw through the ledger into the stringer.
- Attach treads to the top of each step notch on the stringer with screws.
Attach risers to the front of each notch.
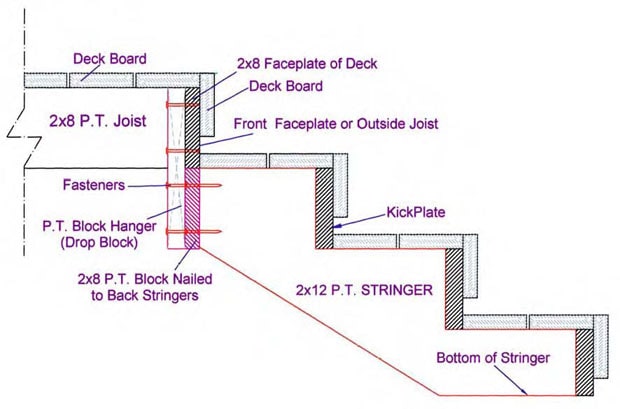
Drop blocks for stair support are fastened to the back of the front faceplate or outside joist. The stairs are secured to the drop blocks thru the back frame of the stairs.
DO NOT install drop blocks where rail posts or step lights are to be installed.
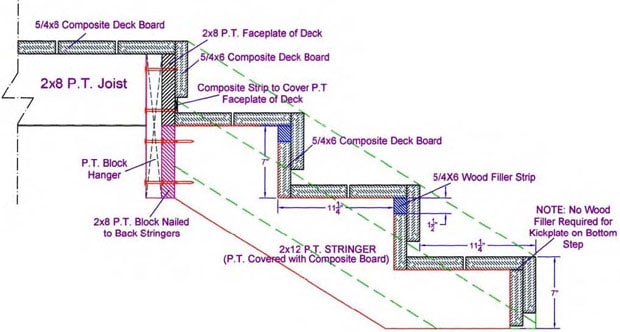
Low Maintenance Riser Stairs
To create composite deck stairs, use the same construction techniques described for standard stairs. Replace the treads and risers with composite material. Be sure that stringers are spaced no more than 16 inches apart. Composite material will not support the same weight as PT and other wood lumber. Add blocking as needed below stair treads to prevent sagging.
- Low maintenance stairs are built similar to wood stairs
- A kick plate of decking or trim is used rather than 1 ½ “ Cedar
- A wood filler the same thickness as the maintenance free kick plate supports the front edge of the tread and is covered up by the stair trim
- Stringer cladding may be one or two pieces wide depending on the width of the material
Riser Stairs and Landings
Landings are used to break up the run of the stairs and often to change the stair direction. Landings are supported by their own post, beam, joist structure.
Be sure to off set the center stair stringer if lights are being installed into the risers of the steps. Stair rail is installed at 32” to 36” in height on the stairs.
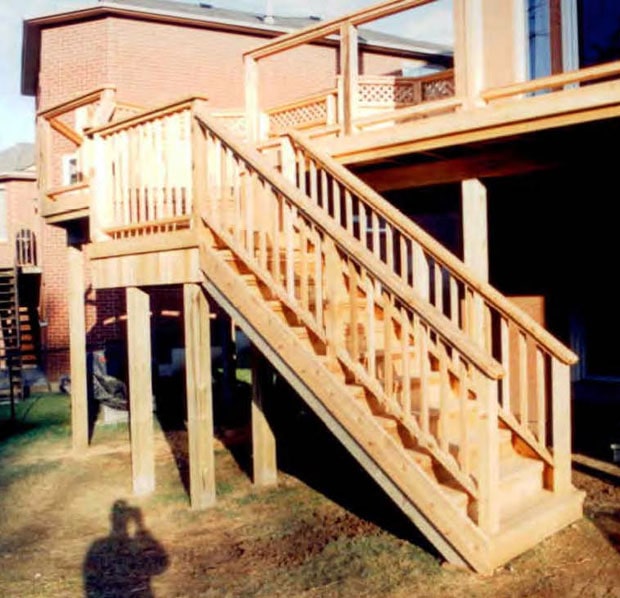
A 2x8 cedar trim board is fastened to both outside stringers just above each piece of riser trim. This adds strength to the stringers, boxes in the stairs, and closes in the space under the bottom rail to meet building code. Low maintenance decking and cladding can also be used for almost maintenance free stairs.
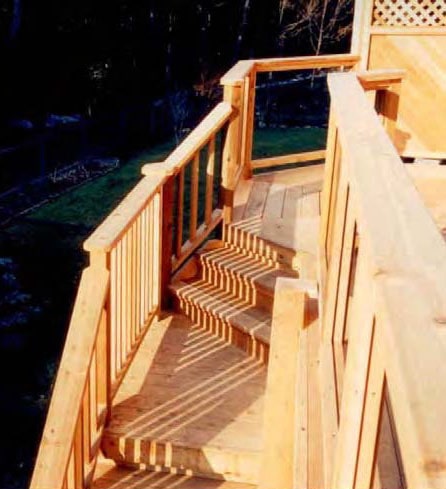
This landing has been used to change direction of the stairs. 42” hand rail was required on the landing for this high deck.
Riser Stairs that Finish on a Landing
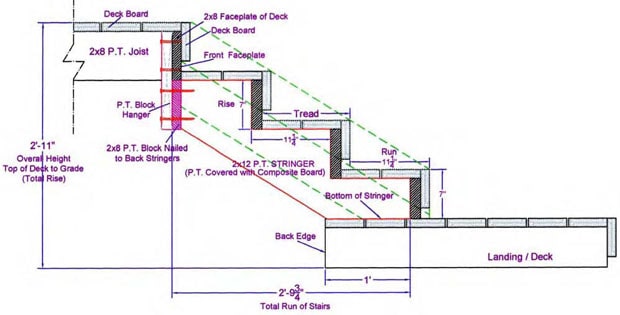
To calculate number of stairs and stair rise and run:
- Overall rise (35”) divided by maximum rise (8”) = 4.375 = 5 stairs
- Overall rise (35”) divided by 5 stairs = 7” step rise
- Landing is 3 treads/ 4 risers (4x7”) below deck level
- Run is always 2 boards wide on stringer stairs
- Run (11 ¼ ) x 3 stairs = 33 ¾ “ Front faceplate to kick plate of last step
- We recommend that the landing extends 12” under the bottom step
- Total run (33 ¾ “) – 12” support of landing under step = 21 ¾ “
- Front faceplate of deck to back edge of landing = 21 ¾ “
Remember:
Deduct 1 ½” or thickness of the kick plate off of the top of the back of the stringer which allows for the front kick plate. Deduct the thickness of the decking off of the bottom of the stringer.
Stair Trim
Make sure that any riser trim that is added to your steps is positioned flush with the tread to prevent tripping hazards. Use trim at least 3 ½ inches wide and make sure it is completely secure. Smaller trim is likely to work its way loose and cause a hazard. Avoid trim on the sides or rear of treads. The goal should be to keep the surface open and free from possible obstructions.