How to Build a Deck
How to Build a Deck DIY Deck PlansThis deck building guide will take you through the entire deck building process from checking your material list, to pouring footings, substructure, decking, railings, and more.
Each chapter focuses on a different step in the deck building process. Follow through the guide as you come to each step of your deck build for great tips and techniques.
Deck Plan Preparation: Before You Get Started
Deck Plan Preparation: Before You Get Started DIY Deck PlansPreparation: Inspect Your Deck Building Lumber and Materials
Preparation: Inspect Your Deck Building Lumber and Materials DIY Deck PlansDeck building requires a lot of varied materials. This can be a lot for a DIY deck builder to figure out. Here are a few things you should know when shopping for, or accepting a delivery of building materials.
How to Visually Inspect Materials
There are four essential qualities that need to be inspected before accepting a delivery, or purchasing deck materials.
- Dimensions of the material must be correct
- Materials should conform to certain standards in shape, especially lumber
- The appearance of trim and deck top materials is essential to the deck’s appearance
- Structural integrity should be consistent
How to Check Dimensions
There are three dimensions that matter when inspecting lumber. Hardware and other materials often have important dimensions as well but are fairly standard and can be returned if they are wrong. Lumber is often not returnable, or carries a hefty restocking fee. Getting it right saves time and money.
- The thickness of the board should be consistent from one to the next in lumber that is the same size
- The width of the board should also be consistent within the same size
- The length of the board should be at least the length advertised, sometimes a quarter to half inch longer
Understanding Nominal Dimensions
Lumber is named for its “nominal” dimensions, which are typically larger than the actual dimensions of the board. This is because the piece is rough cut to the dimension it is named for, (for example a two by four)then smoothed on a planer to get the actual dimensions.
- As a standard rule, the finished dimension of lumber under one inch thick is named for its actual dimension and should be very close to that thickness
- The finished dimension of lumber one inch thick is approximately ¾ inch thick, having ¼ inch shaved off of the top and bottom faces in the milling process
- The finished dimension of lumber more than one inch thick is approximately ½ inch thinner than its named or “nominal” dimension. So a four by four is approximately 3 ½ inches thick.
- Dimensional lumber is ½ inch narrower than its nominal width. So a two by four, or one by four is 3 ½ inches wide.
- Sheet goods, such as plywood, are named for their actual dimensions
- Lumber comes in lengths with two foot intervals starting with six or eight feet, running up to 16 or 20 with longer pieces available by special order
Inspecting Your Lumber
All lumber should be the same thickness and width within a single board size. If, for example, your two by fours (typed as 2x4 from here on) are 1 5/8 inch thick, and all boards are the same, this could cause issues with hardware, but would not weaken it. If the boards were 1 3/8, they would fit the brackets, but would be considerably weaker.
Check enough boards to get a representative sample. It is not necessary to check each board. Dimensions are typically very consistent. Identify the size of each group of boards to ensure you have the right materials.
Use your materials list as a check list. Mark off each item as it is verified and counted. You will also want to check for the following factors.
- Twisted, curved, or “cupped” boards. Slight curvature can be straightened in construction. Anything that will not stack properly should be rejected.
- Checks, splits, or cracks more than an inch or two long and visible on both faces indicate structural weakness, reject this lumber
- Framing lumber with some bark, or roughness at edges is fine. If it is extensive, or makes the board hard to use, reject it.
- Decking material and trim should be as close to ideal as possible. Reject material that you find unacceptable visually. You may have to accept the best available material in some cases.
Other Materials
Check dimensions and quantity of fasteners, bolts, brackets, and other hardware. Labeled sealed boxes can be checked by their label. Open bin hardware should be checked for correct dimensions.
Reject rusted, corroded or visibly damaged hardware. The strength of your deck will rely on the fasteners and hardware. As with lumber, use your materials list and check each item for quantity and mark it off your list. It is always best to buy a few extra of everything. One extra bolt could save a half day of going after more hardware.
If you are receiving a delivery, check carefully, since your signature may indicate you are waiving your right to return material or agreeing to pay the restocking fee on returned material.
Preparation: Deck Building Tools
Preparation: Deck Building Tools DIY Deck PlansWhat Tools Do I Need for Deck Construction?
The simple way to create a tool list for almost any DIY project is to start by thinking through the project from the ground up and listing tools needed in each phase. This list is divided into two categories, one for the minimum required tool to get the job done and one for the best tool for the job.
Pro Tip
When purchasing hand tools, heavier is usually better. They last longer and most tools are designed to move things, such as dirt, nails, cutting through boards, so the weight makes it more efficient.
On power tools, look for strength more than features, such as lasers, etc. The most important measurement of power is amperage for corded tools and torque in cordless tools. RPMs (revolutions per minute) sound important, but a faster tool is not necessarily a better tool.
Flashy tools, designed to look cool, are almost always designed for home owners. Professional tools are typically designed for comfort and ease of use.
Deck Layout and Marking
The tools for this are simple, but necessary:
- Measuring tape: at least as long as your deck’s longest dimension, if possible.
- Wooden stakes: at least one for every corner on the deck. They should be pointed and stout enough to survive being pounded in.
- Hammer: for pounding corner stakes. A larger hammer, such as a 3 pound engineer’s hammer, works best.
- Mason’s line or other string: for tying between stakes. This makes post spacing and marking simpler.
- String level: for setting the mason’s line level at the correct height.
Tool upgrades:
- Multiple string levels: They are inexpensive and having more than one can make the job faster.
- Laser level: used to establish the deck height and level.
- A measuring wheel or commercial grade reel tape measure: simplifies the measuring process.
Footing Excavation and Installation
There are a lot of tools you can use for footing excavation. If you are working on a budget, you will likely want to use hand tools, or rent rather than buying.
Here are the minimum required tools for footing installation:
- Handheld posthole diggers: The heavier ones cut deeper and make the work easier.
- Sharpshooter, or other small spade: for removing rubble and widening holes when needed. The heavier steel will cut into the turf faster. Choose a stout, comfortable handle.
- Bucket for soil removal: You will likely have left over soil. A 5 gallon bucket works well for putting it where you need it.
- Bucket for concrete mixing: This can be the same 5 gallon, as long as you clean it.
Tool upgrades:
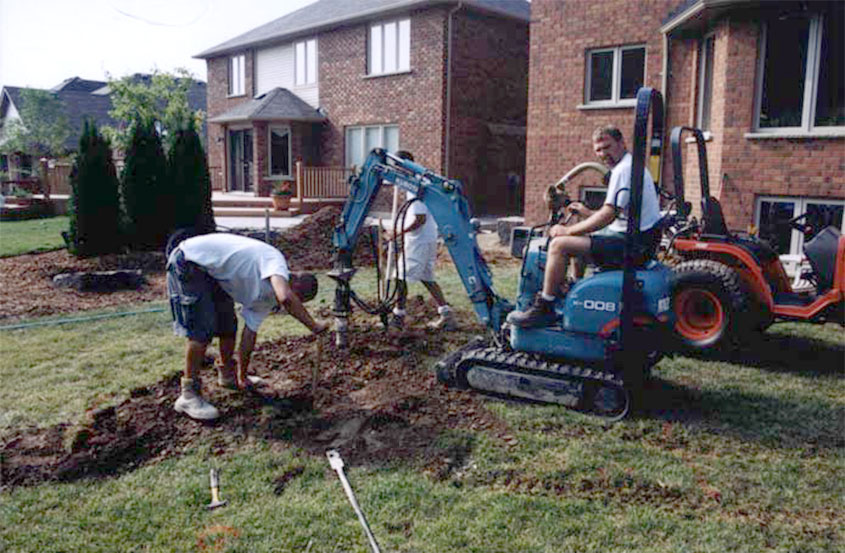
- Power auger: can be rented, or purchased from any tool supply. An auger will cut the digging time for each footing to less than half. Especially helpful for large decks, or especially large or deep footings.
- Wheel barrow: for moving soil and mixing concrete.
- Concrete mixer: keeps cement moving for large jobs so you can mix larger batches.
Carpentry tools
The tools in this section will be used throughout the rest of construction.
Measuring and marking tools minimum:
- 25 foot tape measure: for measuring all lumber to be cut and misc. measuring tasks.
- Framing levels: for leveling frame members to each other.
- Quick square, or rafter square: for marking square cuts on board ends.
- Framing square: for checking corners and ensuring square joints.
- Pencil, chalk or crayon: for marking cuts.
Tool Upgrades:
- Laser level
- Board clamps: for holding joints in place while fastening. There are several different styles, use what works well for you. These are very useful if you’re working solo.
- Chalk line: for marking cuts over longer distances.
Cutting Tools
- Good, sharp hand saw: a hand saw is only really usable for small projects, unless no power is available, or you are very determined.
- Box blade or utility knife: for cutting mason’s twine and other misc.
Tool Upgrades:
- Circular saw: often called a “skill” saw after a popular brand. This is the most versatile of all power saws and will do all of the cutting you need, with a little practice.
- Miter saw, or chop saw: makes cutting boards to length fast and easy.
- Jig saw: for cutting notches, or making other shaping cuts.
- Reciprocating saw: for making cuts in hard to reach places.
Drills and Fastening Tools
- Standard cordless or corded drill: for drilling holes in framing members for bolts, etc. If you are using a cordless drill, you will need additional batteries. *caution: some lesser models may not survive heavy duty use.
- Framing hammer: a good 20 oz. claw hammer with a smooth face is best
- Nail removal bar: a medium sized one will work well for most things. Even if you are not using nails, they can be used for prying other things into position.
- Wrench: a good adjustable wrench works well for tightening bolts in posts.
Tool Upgrades:
- Professional grade cordless drill/ driver: the batteries will last longer and a good cordless drill will handle all of your drilling and driving needs. Get heavy duty bits, too.
- Framing nailer: can be used for some framing tasks, or for attaching decking, building rails, etc.
- Roofing nailer: works well for attaching decking if you want speed over quality (screws are best).
- Pin nailer: will come in handy for trim on railings, deck edges, benches, etc.
- Pneumatic stapler: for attaching lattice and other light weight elements.
- Air compressor: for use with nailers. You will also need a long, flexible air hose. The more expensive, softer hoses are easier to work with.
- Socket wrench and sockets: for driving lag bolts and tightening nuts and bolts.
- Impact driver: for driving bolts, and other driving tasks.
Specialty Tools
- Deck spacer: for properly spacing deck boards.
- Nail bags or tool belt: saves time and energy searching for tools and going for more fasteners.
- Pilot bit with countersink: for predrilling screw holes and setting heads flush with deck.
Preparation: How to Check a Materials List, or Write Your Own
Preparation: How to Check a Materials List, or Write Your Own DIY Deck PlansIf you are working with one of our deck plans, your plan comes with a materials list. Our lists are very detailed and cover everything from the footings, framing and hardware, up to the deck covering, railing and skirting.
What a materials list should include
A good materials list will include everything from the ground up that is included in the full construction of the plan. A materials list should describe the material, give a quantity and include sizing information. If you are using your own list, or a list from another plan source, here are the basics that should be included:
- Footings, including concrete, forms if needed and any specialty brackets, or hardware
- Post materials, including hardware and fasteners, with full dimensions of lumber and board lengths
- Framing materials including lumber, brackets, fasteners and hardware, with full dimensions of lumber and board lengths.
- Decking materials including lumber, or other decking, (such as composite materials), fasteners and specialty hardware. (if required for your plan) It should include deck lumber dimensions and board lengths.
- Step or bench materials including frame materials, decking, hardware and fasteners including lumber dimensions and board lengths.
- Railing materials including posts, rail, balusters, brackets, other hardware and fasteners including lumber dimensions and board lengths.
Writing your own materials list
If your plan did not come with a materials list, you are working on a custom project, or you have adapted a plan so that materials have changed, you will have to write your own materials list. Working from the bottom up is the best way to ensure that nothing gets left out. You should be able to work from your plan to determine what is needed.
Start from the bottom up
Start from the footings. Will your deck require in ground footings, be set on piers, or is it a small grade level deck set on deck blocks? Be sure to include quantities and sizes of every piece. Start with the concrete required for traditional in ground footings, or grade level blocks. If you are using brackets to set your posts on piers, include size and quantity. Be sure to include any bolts, other hardware and fasteners needed for each footing.
Framing lumber is calculated based on the square footage and the joist spacing. Our plans work from a 16 inch on center spacing, but many small decks are built with a 24 inch on center spacing. The number of joists required will be based on this spacing plan. Joists typically run the whole width or length of the deck, so lengths should be the same in most cases, across the entire deck. You will need one piece for every 16 or 24 inches, depending on your spacing. Select your board lengths as close to the correct length as possible to minimize waste.
Double check lumber sizes for safety on framing
You will also need to consult a span table to ensure your joists are heavy enough to carry the load. These charts will show you how large your joists need to be for the size of deck you are building. Typically, the outside frame, or rim joists, are the same size, or slightly larger than the inside joists. Include enough lumber for the outside frame.
You will need joist hanger brackets and fasteners for each piece, in addition to brackets, screws or nails and possibly bolts for attaching to posts. Give as much detail as you can when describing hardware to make shopping simple.
Always include extra decking material
The decking is calculated by square footage. You will also need to include approximately 15% extra for unusable short pieces, or missed cuts. Remember that lumber sizes are "nominal" meaning a 2x6 deck board is actually only 5 ½ inches wide. You can account for this in your 15% extra. One other tricky definition to be aware of is the 5/4 deck board. This is a fairly standard size of decking lumber that is approximately 1, 1/8 inch thick, as opposed to the 1 ½ thick 2x lumber used in framing.
*When calculating decking material, include stair and bench tops if they will be made from the same material.
Rails, stairs and skirting vary from deck to deck
The materials for the accessories, such as rails, steps and skirt will depend on your deck design. Safe railings can be made from simple dimensional lumber, but many plans call for more decorative or specialty railing products. Skirting is usually optional, unless neighborhood or building codes call for it. Describe these products carefully when writing your list. If you are unsure, consult the website of your favorite home improvement center for information.
As with the rest of your materials list, include quantities, descriptions and sizes on every piece when possible. Home improvement center, or lumber yard employees can be very helpful, but they do their best work when the customer knows what's needed.
Preparation: Tips for Organizing Materials at Your Job Site
Preparation: Tips for Organizing Materials at Your Job Site DIY Deck PlansOnce you have inspected your material and determined that you have the tools required to complete your project, it is time to think about setting up your job site. Even if this is a DIY project on your own home, working like a professional will save time, material and money. It will also give you the best possible finished product. Here are some tips for staging your job to make it as simple as possible.
Stacking Materials
It is always best to stack materials off of grassy areas for two reasons. First, the dew and moisture from the plant material will seep into your material causing potential warping and making it heavier and harder to work with. Second, it kills the grass. If available pavement is not too far from your deck site, stack materials there.
Use cross blocks to stack material on. Cross blocks are pieces of lumber laid flat on the stacking surface, perpendicular to the material, and spaced to support the material to prevent warping. In general, you will need one cross block for every 4 feet of length in your lumber, plus one for the end. (For example, 12 foot pieces should have 4 cross blocks)
Cross blocks help air circulate around material, drying it. They keep it up and out of water in case of rain, or irrigation. They also make bottom boards easier to lift.
Here are some simple rules for stacking to make it simple to access materials:
- Stack perpendicular to nearby walls to allow access at the end of the material. This allows you to see material sizes and pull pieces from the stack easier.
- Stack like materials together. This prevents confusion and saves time in sorting later.
- If individual stacks are not possible, stack longest material on the bottom and start with materials you will use last so that your first materials are on top.
Setting up your Tools
Tools should be set up in stations. Set up your cutoff saw (miter saw, chop saw, or circular saw) near your materials stack so that leftover pieces can be easily restacked and only cut pieces are carried onto the deck. A miter saw stand, or saw horses are best to get the saw up to waist level where it will be easy to see and work with.
If you are sanding, drilling, or performing other milling tasks before the boards are installed, set those tools up near the saw with another set of saw horses to keep your work at waist height as much as possible to reduce fatigue and make it easy to see and easy to handle.
Pro Tip
Safety is a huge concern with electrical power tools. Here are some tips to keep your work space safe!
- Use heavy duty electrical cords rated to handle the amperage your tools are pulling.
- Use heavy duty power strips with built in breakers to plug tools into.
- Plug large tools, such as miter saws and air compressors, into separate circuits if at all possible.
- Keep tools that are not being used staged in a separate area out of the construction and traffic zones.
- Manage cords carefully and keep them clear of traffic areas. Be aware of where your cord is at all time to reduce the risk of damaging the cord and prevent tripping.
Plan to clean up your work site every day. Put tools away so they are easier to find and stack unused materials correctly. Wrap up all cords and dispose of debris. It will save you time getting started in your next work session and save money replacing materials and tools.
How to Layout a Deck, Including Footing Positions
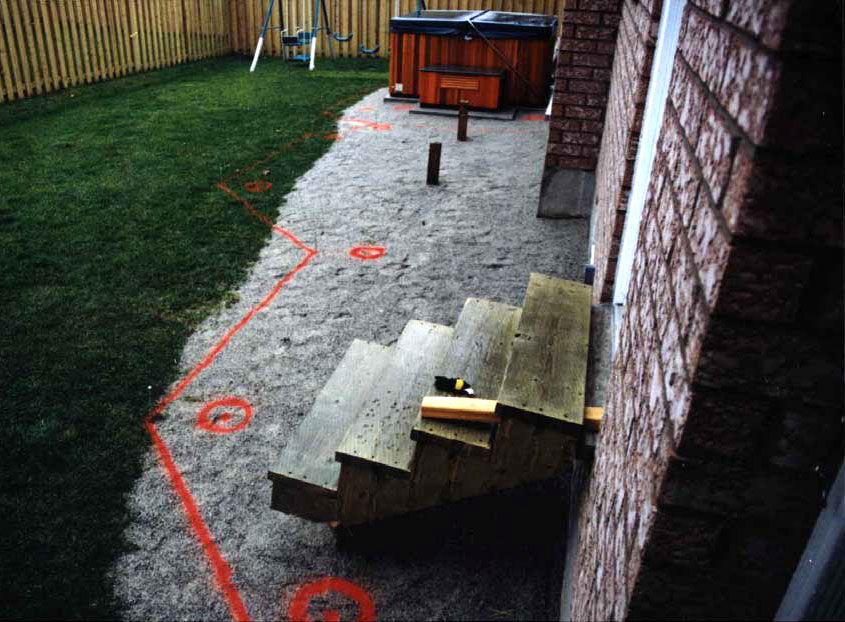
How to Layout a Deck, Including Footing Positions DIY Deck PlansBefore you dig your first footing, you will need to layout your deck in the correct position and dimensions to ensure that each footing is located in the right position. This is done by transferring the shape and dimensions of your scale deck plan to the construction area in full size.
Start from one corner and establish a straight line along one of the longest edges by driving an 18 to 24 inch tall wooden stake into the ground at each corner of that line. If one edge is against the house, or another structure, start with that and measure out to establish the outside edge.
From this line, measure and drive in a stake at each corner of the deck to establish the outline. Tie mason’s twine, or other string between your stakes to create the outline of the deck.
Pro Tip
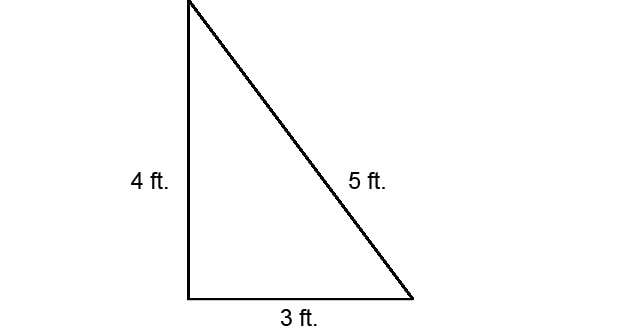
To create a square corner in your deck outline, use the “rule of 3,4,5”. Measure from the corner stake along one angle of your corner to 3 feet. Measure from the post along the opposite angle to 4 feet. Mark both points and measure between them diagonally. The distance should be 5 feet. Adjust your second angle in or out until the distance is 5 feet exactly for a perfectly square corner!
Deck Height and Level
To establish the deck’s height in your outline, adjust the string at your first corner to the appropriate height, and use string levels to adjust the remaining strings to match.
Layout and Footing Locations
Starting with your perimeter, mark the location of each deck post to locate the fitting position. In general, posts should be spaced no more than 8 feet apart. Some builders position them every 4 feet for a completely rigid frame.
The maximum distance between footings is determined by the size of your joist material. Here is a list of some common joist sizes and maximum “spans”. A span is the unsupported distance between two posts. A “cantilever” is the unsupported end of a joist that extends past the last support post at the edge of your deck.
- Maximum joist span of a 2X8 is 10’ – 6” at 16” o.c.
- Maximum cantilever of a 2X8 is 24” at 16” o.c.
- Maximum cantilever of a double 2X8 beam past a support post is 12”
- Maximum span of a double 2x8 beam is 6’.
- The standard size of most cardboard footing forms is 8” in diameter. This may change depending on your locale.
Check local building codes to confirm all span and spacing information.
How to Excavate Post Holes and Set Posts for Your Deck
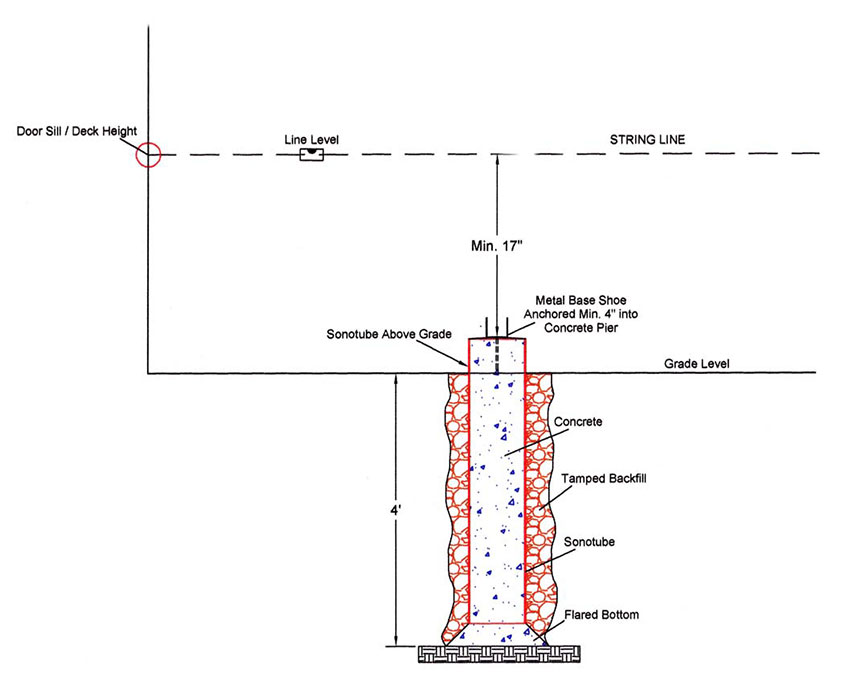
How to Excavate Post Holes and Set Posts for Your Deck DIY Deck PlansPost holes are dug to create the footings that are the foundation of your deck, and just like your house, the deck is only as strong as its foundation. Our deck plans are designed to be used with poured footings and posts set in brackets attached to the top of the footing.
The footings are constructed using a round cardboard tube form that is 8” in diameter (often called a sonotube, after a popular brand). You should check your local building codes to ensure this is adequate to pass inspection in your area.
Pro Tip
Other footing options exist depending on where you live. In temperate regions, such as a the southwest United States, posts are often set into the concrete footings and extended up to support the deck.
If your local building code permits this type of construction it is easier, faster, and less expensive. When using this style of support, set the post’s base in at least 2 inches of small gravel at the bottom of the footing hole, to prevent water from building up around it.
Digging Your Footings
You have already marked your footing locations in your deck’s layout. At each location, dig a hole, deep enough to pass your frost line by at least two inches and wide enough to accept the cardboard form and leave an inch or two on all sides.
On the safe side, dig your footings at least 48 inches deep, or check with your local code enforcement. Your deck will not pass inspection with inadequate footings and the posts can be forced up by frost when the ground freezes, known as “heaving” which can destroy it.
- Dig each footing 48 inches deep and 10 to 12 inches across, centered on the location you marked when laying out your deck. Make sure each footing is dug in line with the strings you tied between your corner stakes.
- The bottom of each hole should be flared out slightly on all sides, to provide a larger “foot” at the base of the footing, to further discourage movement.
- Shovel 2 to 3 inches of concrete into the bottom of each footing hole before inserting the cardboard form.
- Measure and cut each cardboard footing form to rest on top of the concrete you shoveled in and rise to 2 inches above grade to prevent the post from standing in water.
- Shovel dirt into the hole to backfill around all sides of the cardboard form to keep it vertical. Use a small level across the top of the tube and adjust to that for a level post base.
- Use a wrecking bar, or small shovels to tamp the earth in around the form. Be careful not to tear the form, or shift its position.
- Fill the concrete form to the top with concrete. Level off the top with a float.
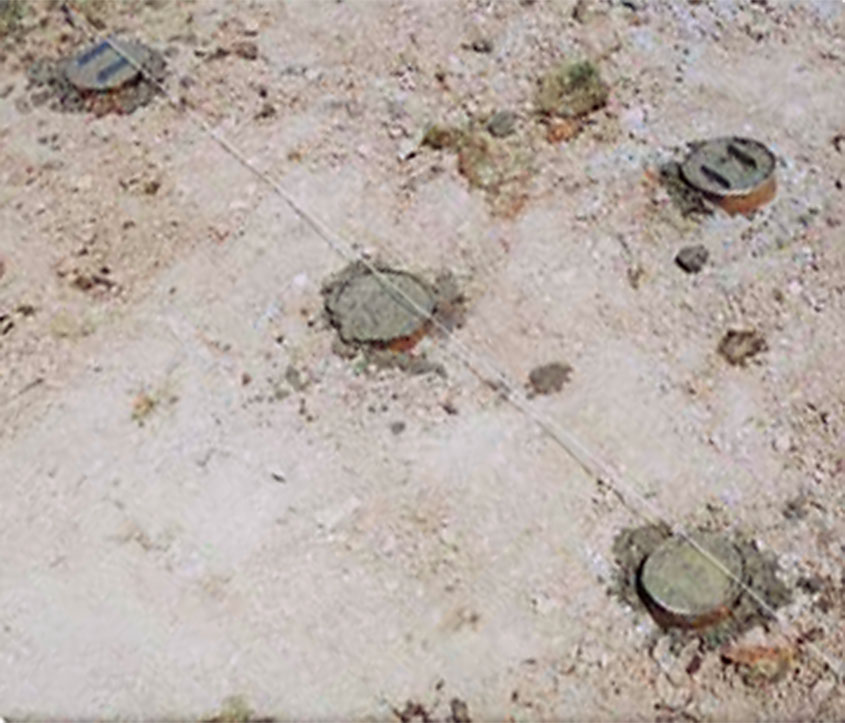
- Position a bracket on top of each footing, so that it aligns with the required post placement. The open side should face up, with the bracket aligned to the inside of the string.
- Set corner brackets first and stretch a string between them for positioning of the remaining brackets
- Set remaining brackets
Pro Tip
Some brackets come with lags, or bolts attached that sink into the concrete. For flat bottom brackets, use 3 inch Tapcon style concrete anchors and a hammer drill to attach the brackets, once the concrete is fully set. They are cheaper, stronger and easier than lead sleeve anchors.
Determining Deck Height
Set your deck height even with the bottom of the door threshold, or sill. Mark a line along the house wall at this height with a chalk line. Make a second below the first so that it is the same distance below the top line as the thickness of your decking.
Adjust the outline strings you setup during layout to match the height of the bottom line. This will indicate the top edge of the deck’s frame.
Cutting Posts
Measure down from the outline string to the bottom of the bracket on top of each footing. Cut a piece of Pressure Treated (PT) 4x4 lumber to fit this measurement for each footing. These are your deck support posts.
- Mark all four sides for a smooth, square cut.
- If available, use a miter saw for best results.
- If you use a circular saw, it will take two cuts. Cut along the line on one face, roll the post ½ way over and cut along the line on the opposite face.
Installing Posts
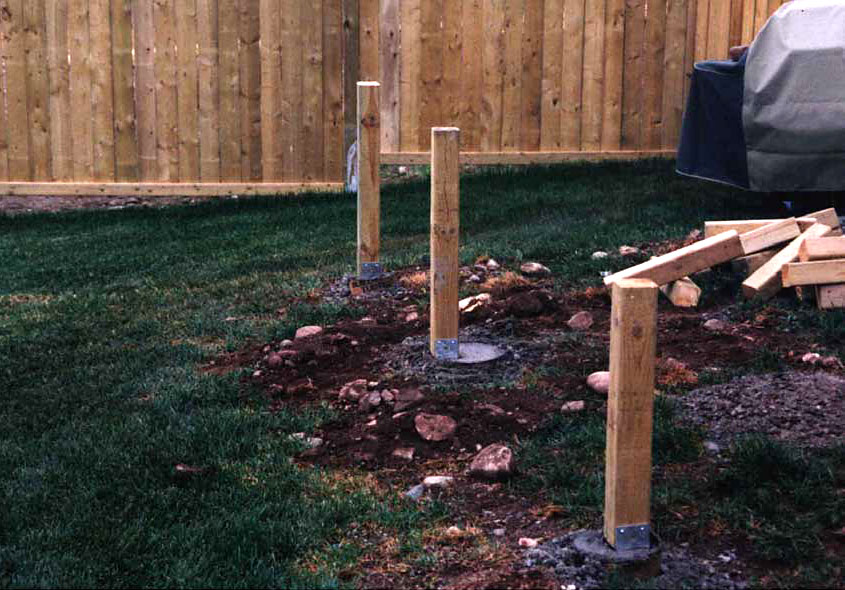
Fit each post into the bracket it was cut for, so that all post tops are level and even with the outline string. Make any adjustments in post height now by trimming them down if they are too tall, or replacing posts cut to short.
- Set each post into its bracket and check it for “plumb” (vertically level) with a level.
- Drive one treated deck screw through each hole in the bracket.
- Double check post placement and height with a string and level. Make any adjustments now before framing is in place.
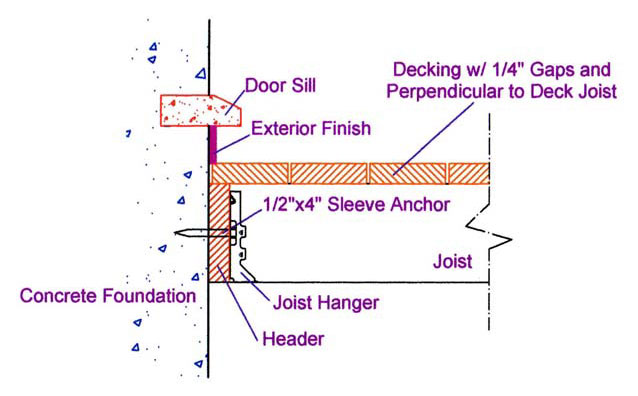
How to Install a Deck Ledger Board, or Header
How to Install a Deck Ledger Board, or Header DIY Deck PlansA ledger board, or header, is a horizontal piece of lumber attached to a wall to support the ends of deck joists. The ledger can be attached using one of three methods.
- “Through bolts” are driven into brick or stone, then protrude through the ledger, where they are fastened with a nut.
- Lag bolts are driven through the ledger and the brick or siding and into the house’s frame.
- Tapcon style concrete screws can be used in place of through bolts in many cases.
Fasteners should be installed at staggered heights, to discourage the ledger from splitting, and should be spaced no more than 24” oc. Check your local code on fastener spacing.
- Mark anchor locations on your ledger and drill through the board with a ½” bit
- Position the ledger against the wall and mark the anchor positions through the hole onto the wall.
- Drill pilot holes for lead sleeve anchors into the brick and drive a through bolt anchor into each hole.
- Reposition the ledger so that the “through bolts” protrude through the ledger. Fasten in place with nuts and a socket wrench.
Installing Ledger to Concrete wall
A 2X8 ledger is fastened to the concrete foundation wall using ½”X4” sleeve anchors, or other concrete anchors. Anchors should be installed at staggered heights in between joists. Follow the instructions above, substituting the appropriate anchors.
Fastening Wall Ledger
Onto Brick Veneer
(Confirm with local building code)
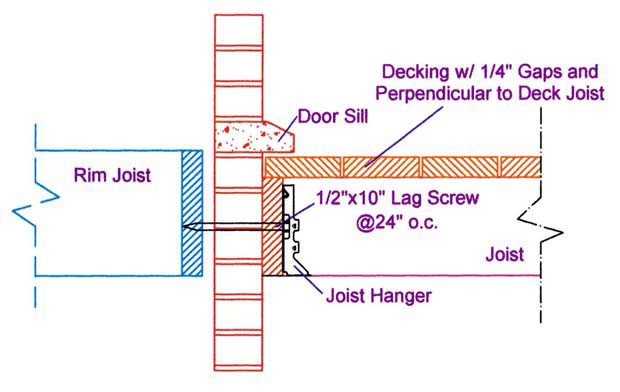
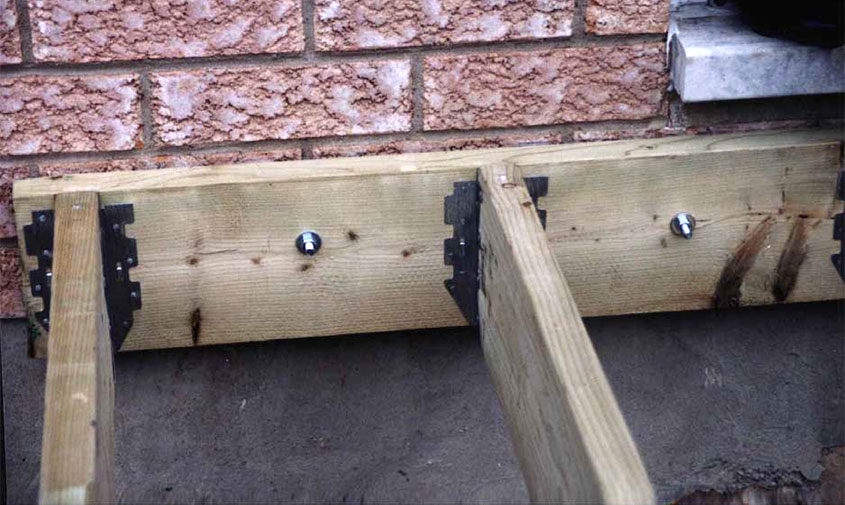
To attach a ledger against a wall through brick veneer:
- Mark anchor locations on your ledger and drill through the board with a ½” bit
- Position the ledger against the wall and mark the anchor positions through the hole onto the wall.
- Drill through the brick veneer with a ½ inch masonry bit in a hammer drill, until you reach the wood frame behind. Do not drill into the wood.
- Reposition the ledger board and fit a ½” lag bolt, 10” long into each hole and drive them in slightly with a hammer.
- Use a socket wrench or impact driver to drive the bolts into the frame until the ledger is snug against the wall.
Onto Siding
(Confirm with local building code)
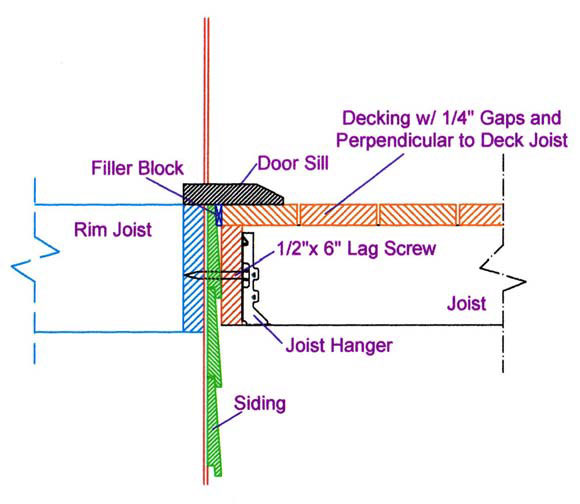
When fastening to siding follow the same steps as above. Tack a shim strip in place to hold the ledger board level.
Onto Solid Concrete
(Confirm with local building code.)
To fasten to solid concrete, follow the instructions for brick veneer and substitute a sleeve anchor, or other appropriate concrete anchor.
Onto Stone or Stucco
(Confirm with local building code.)
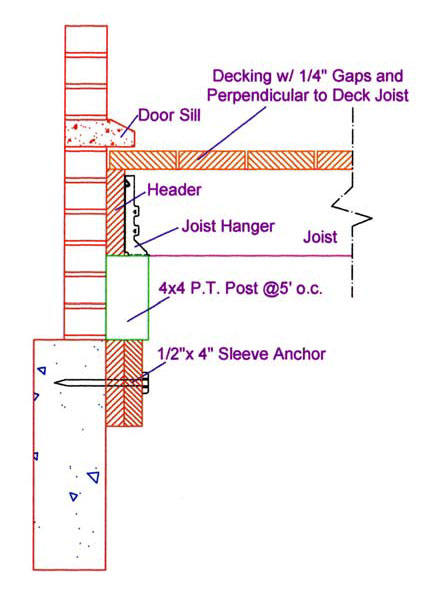
When fastening to uneven stone, or stucco, the ledger board must be supported from beneath with a ledger attached to the solid concrete foundation at the bottom of the wall.
- Drill two lengths of ledger board for anchors as described above and anchor them both to the solid concrete, stacked to provide a 3” wide ledge along the top edge.
- Cut pieces of PT 4x4 post to fit from the top of the double ledger support to the bottom of the deck ledger above.
High Decks into Unfinished Basements
(Confirm with local building code.)
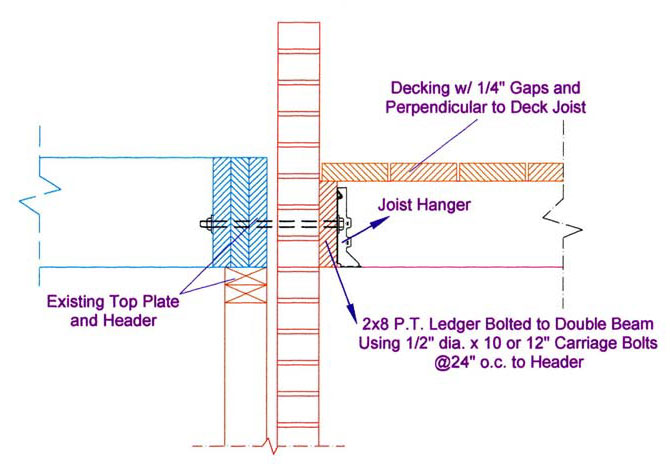
To fasten a deck ledger to an exposed basement wall, use the same “through bolt” procedure as described for brick veneer above. If code permits, lead sleeve anchors, or Tapcon style concrete lags can also be driven into the exposed basement wall in place of the through bolts.
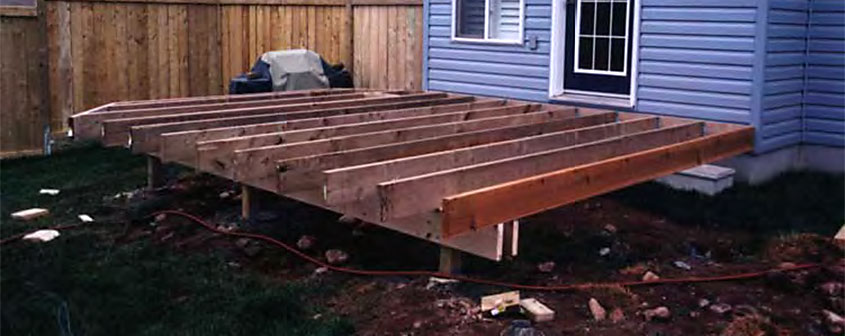
How to Install 2x8 Deck Beams
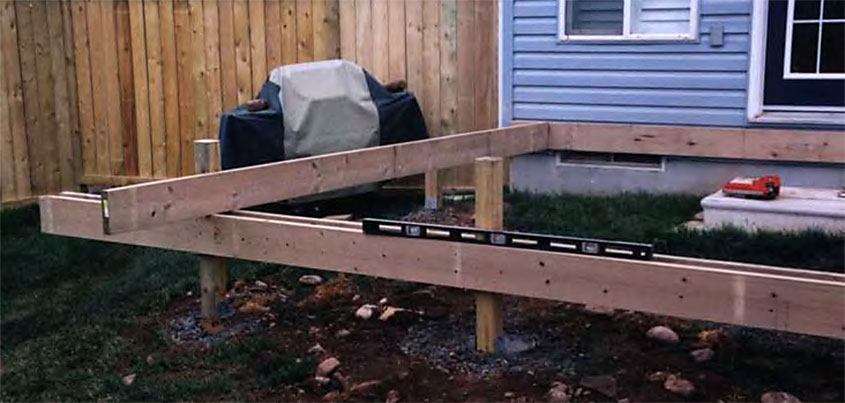
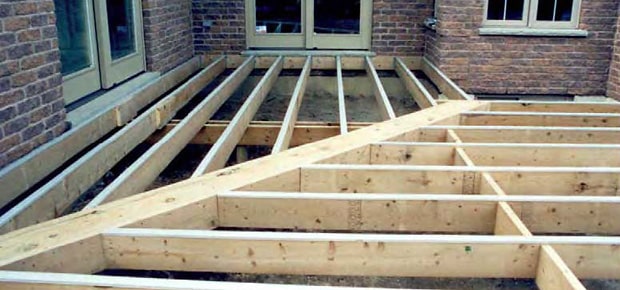
How to Install 2x8 Deck Beams DIY Deck PlansDeck beams sit on top of the posts and support the deck joists. If the outside edge of your deck is at least 17” above grade, a double 2x8 deck beam should be installed to support the joists along the outside. The joists will then extend over the beam in a cantilever position.
In decks that extend more than 16’ out from the house, a similar beam is installed, parallel to the house, at 16’ so that joist ends can overlap on top of the beam, since 16' is the span limit of 2x8 joists.
- Position a joist so that one end is against the ledger board, with the top edge even with the top edge of the ledger, at the house wall and the other end extends out to the outline string and the posts. Place it even with one post.
- Lift the outside end until the top edge is level. It should be even with your deck height string, if that is still in place.
- Tack the joist to the post with a single screw to hold it in place temporarily.
- Do this at each outside post.
- Position a piece of 2x8 lumber against the outside face of the posts and lift it up until the top edge touches the bottom edges of the joists you attached to the posts.
- Use lag bolts to fasten the 2x8 to the post faces, two bolts in each post.
- Repeat steps 5 and 6 with a second 2x8 on the opposite face of the posts to create the double beam.
Lift up the 2X8 beam to the bottom side of leveled joist and fasten into 4X4 support post using 2 rows of four 3¼” galvanized nails. Be sure all posts of the beam are level before fastening it to the posts completely. For high decks, beams must be notched into both sides of the 6X6 support post.
*For tall decks, 6x6 posts are substituted for the 4x4 posts and support beams are notched into the faces of the 6x6 posts.
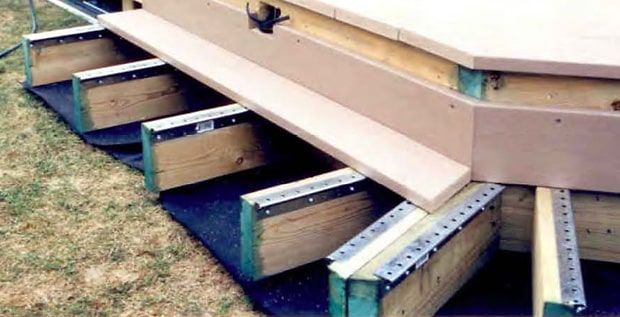
Installing Beams for Cut Corners
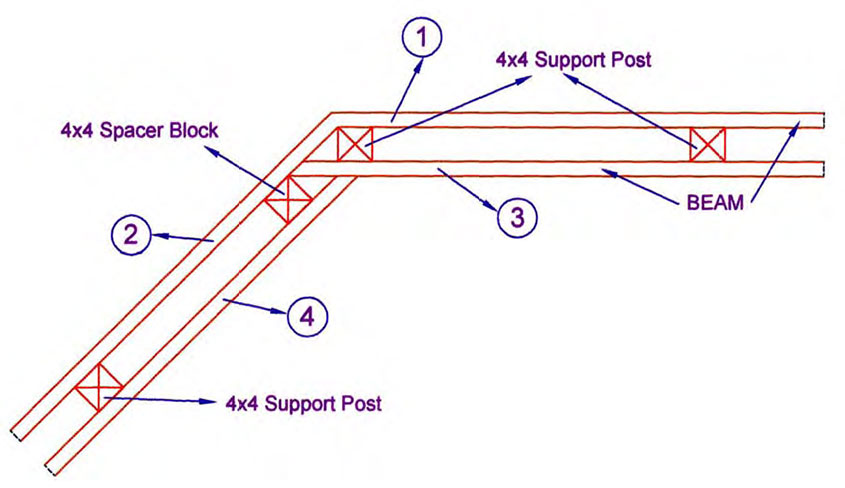
When installing wrap around beams position the overlap correctly by following the numbered pattern above.
- Run the inside front beam (3) into the backside of the front beam (2) this allows more fasteners to help secure beam (2).
- Install a 4x4 spacer block between the beams to help secure beam (4)
- Miter the end of beam (4) to fit snugly into the back face of beam (3).
Attaching the beams into each other distributes the weight so that each beam supports the others and creates a stronger joint.
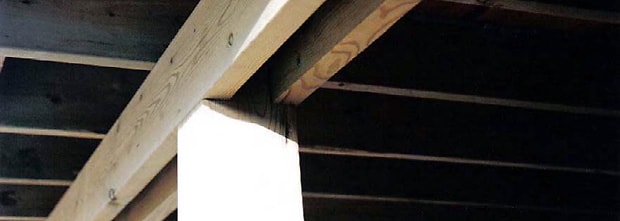
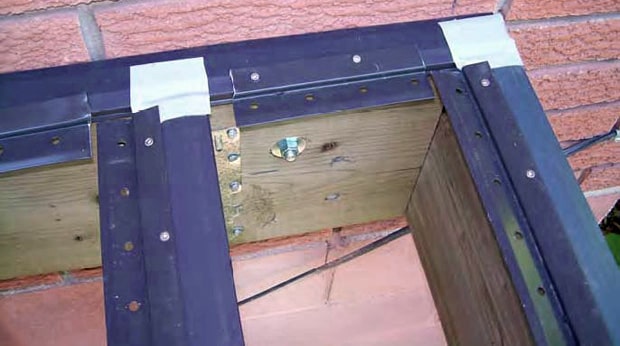
Let in Beams
Where a beam meets a brick or stone wall and is cantilevered too far off of the nearest support post, code dictates the beam be “let in”. The brick or stone is cut out to allow the beam to extend past the face. The end of the beam is then supported by the brick or stone underneath its end.
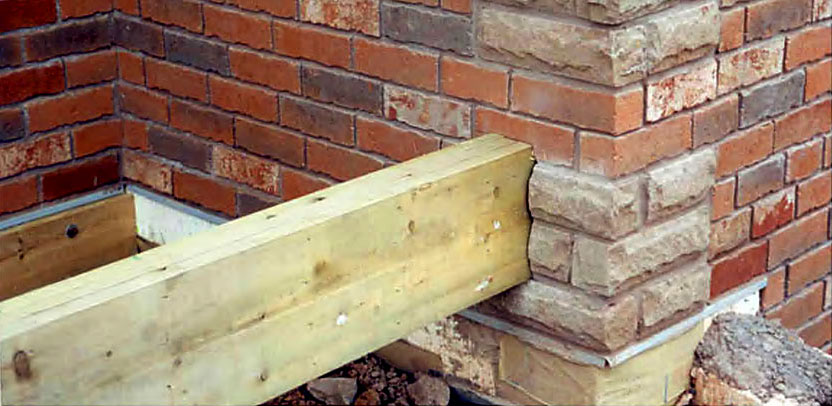
This beam is let in past the brick veneer with minimum 3” bearing over solid foundation. (However check your local building code) *In many locations, this will not be a factor. Check before cutting into expensive masonry.
Framing Using Beamless Substructure
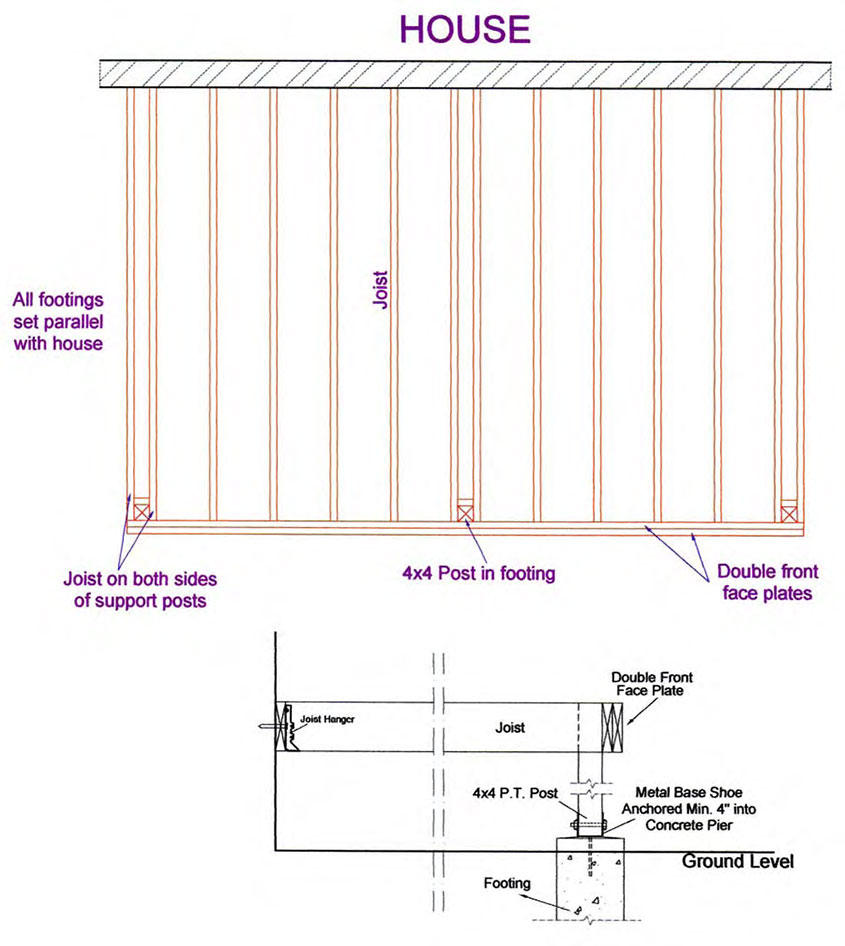
In cases where the deck is less than 17” above grade, the framing is constructed without using a beam. Simply attach a double 2x8 “face plate” against the outside face of your posts using 5” lag bolts, at the same height and level with the ledger against the house, so that the two pieces mirror each other.
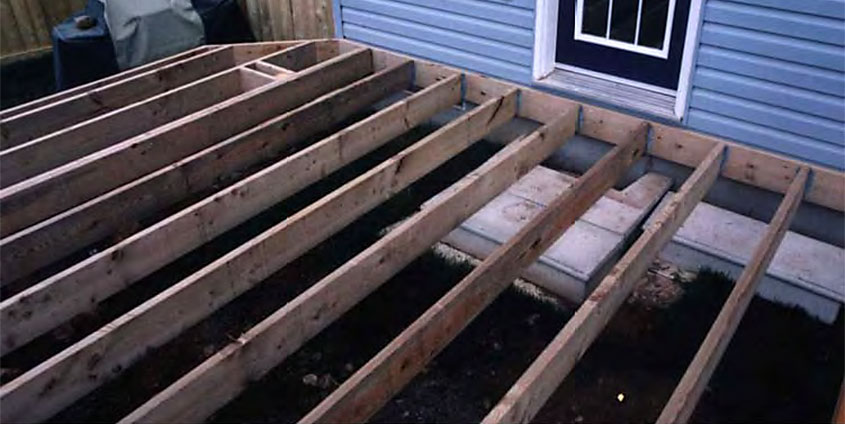
How to Install Deck Joists
How to Install Deck Joists DIY Deck PlansMost of our deck plans call for 2x8 joists. Joists are the floor supports that your decking will ride on and typically extend out from the house perpendicularly, between the ledger and face board, or with one end resting on the double beam.
The simplest and strongest way to install deck joists is to use joist hanger brackets. Install your brackets first and joist installation becomes a breeze.
Pro Tip
Standard tape measures have various markings, one of which typically includes a red square, or “house” shaped mark at every 16 inch interval. By following these you can quickly lay out joists and other framing.
When marking for joist hangers, use a speed square to extend the mark across the whole face of the ledger, or face board to make positioning the bracket easier.
- Start at one end of the ledger and position your tape measure so that the tip is snugly hooked over the outside edge of the ledger. Mark the ledger every 16 inches.
- Starting at the left side of your deck, position one 2x8 joist hanger at each mark, so that they are plumb, and the inside of the bracket bottom is level with the bottom edge of the ledger.
- Drive screws through every hole in the left side of the hanger to attach it firmly. Leave the right side loose.
- Cut your joists to length and position one in each bracket, so that it is tight against the left side of the bracket with its top edge even with the top edge of the ledger board.
- Push the right side of the bracket up snug against the joist and drive screws through every hole on the right side.
- Drive screws through the angled joist holes to fasten the joist in the hanger.
If you are using a double beam mark the beam starting from the same end you started marking on the ledger. Attach a hurricane tie at each mark to fasten the joist to the beam.
If you are using a double face plate, install brackets to mirror the brackets on the ledger before you position your joists.
*Be sure that any outside joists or face plates that will be exposed as a stair riser, or as a toe kick along a level change on the deck, are cut from the same material as your other outside joists. Most of our plans call for cedar but could be composite as well.
*Joists longer than 16’ in length are butt joined on top of a double beam. The ends are “sistered” together with a block cut from the same material as the joists.
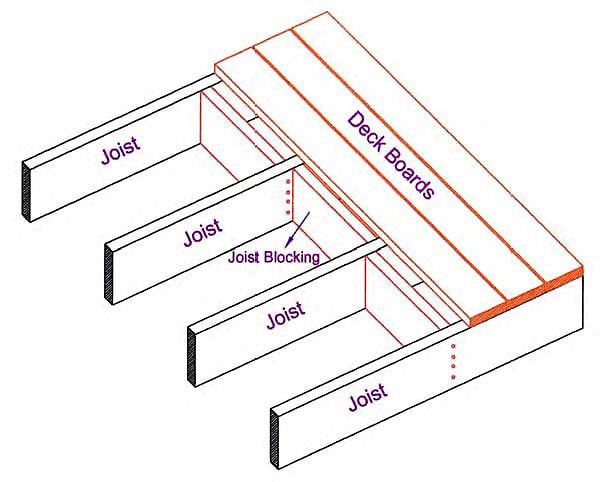
How to Block Your Deck Joists
How to Block Your Deck Joists DIY Deck PlansBlocks cut from the same material as your joists should be installed at regular intervals, perpendicular to the length of the joists. They help to stiffen the deck’s frame and prevent joists from moving or twisting as the lumber expands and contracts.
Pro Tip
Cut blocks for inside joists all to the same length, 14½ inches. This aligns the joists with perfect spacing. Outside joists may not be spaced at 16”oc or may need to adjust to get the proper fit for decking.
Leave outside joists for last and install blocking from underneath. On a low deck, where blocking cannot be installed from underneath, stretch a string from the house to the outside edge along each outside joint for a reference. Cut blocking to fit so that joist stays aligned with the string.
When using Shadoe Track or joist cap systems, use your miter saw to nip the top corners of each piece of blocking to allow for the overlap of the fastening system. Another option is to cut blocks down ½” on a table saw, so that they are ½” lower on the top edge, but still fit level on the bottom.
High Decks
Taller decks are often visible from below. Many of them even have outdoor living space underneath. So, it is important to consider how your blocking will be installed if it is visible from below. You’ll want to choose a pattern that is pleasing to the eye.
1) Alternating (but close)
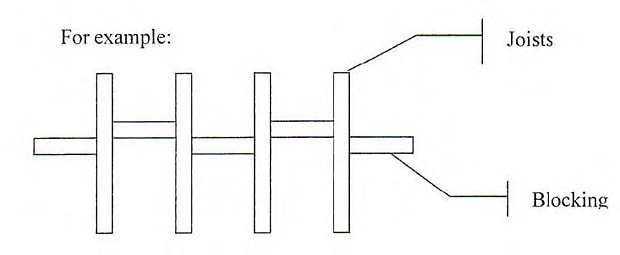
This is similar to regular blocking; however keep the boards closer together. This provides a symmetrical pattern, while also making installation simpler, since fasteners can be driven into the end of each block through the joists, rather than toe nailing.
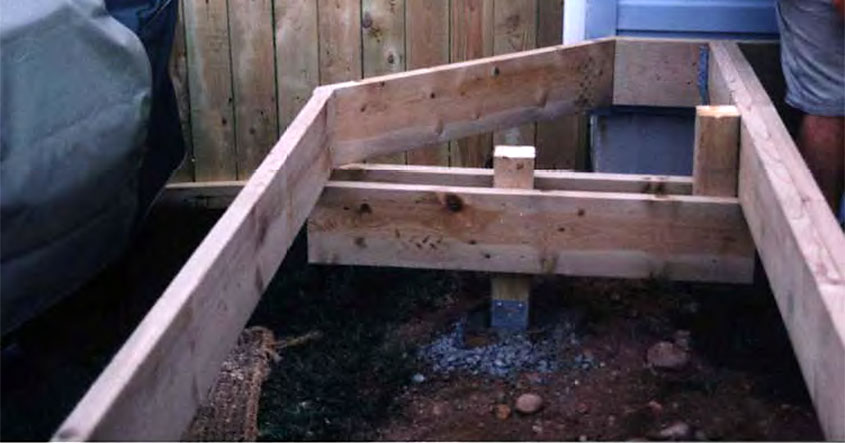
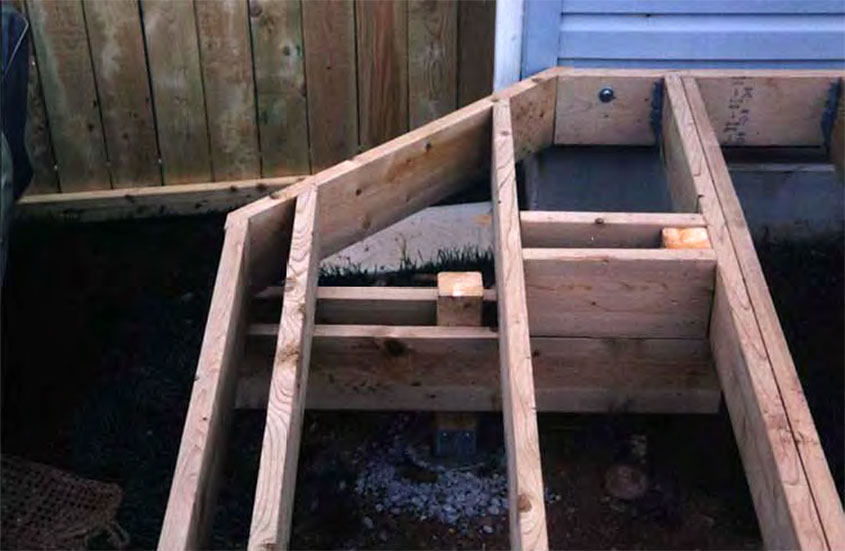
2) Straight Line
Straight line blocking gives the neatest appearance, but is the most difficult to install. If the substructure will be seen over a patio or lower deck, this method is the most desirable. Each piece of blocking gets fastened straight into the first end, while the opposite end must be toe nailed, since there will be blocking on the other side of the joist, preventing straight access to the end.
With Shadoe Track or Joist Cap
Both of these products over hang along the top edge of the joists. This space must be accounted for while blocking. One way is to just lower the height of the blocking. This way works well for low decks, or decks that will not be viewed from underneath.
The other method is to cut a light angle off the corners of the end edges of the boards, or rip 1 inch or so off the top of the blocking board. This allows the fastener system to be installed flush, while still maintaining a clean appearance from below.

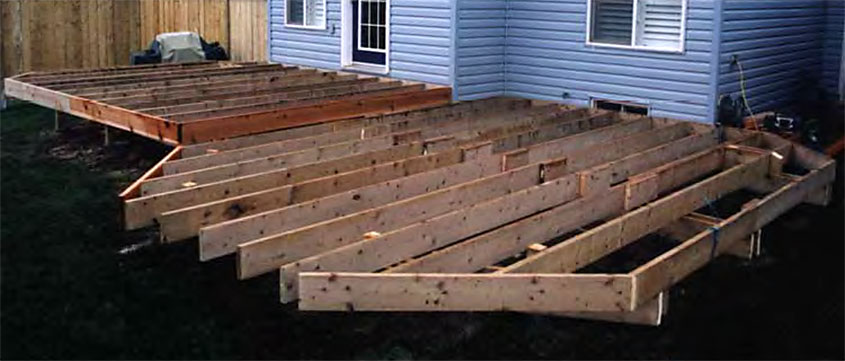
How to Frame Cut Corners
How to Frame Cut Corners DIY Deck PlansOutside Faceplates for 45° Cut Corners
When a 45° corner is required in the outside edge of your deck, you will need to install the faceplate at that corner on a 45° angle. To do this, the two faceplate pieces running into this corner will be shortened and cut at a 45° miter. If this corner is included in your deck plan, the length of these pieces will be indicated. If not, simply measure from the corner the distance you want your 45° corner to cut into the deck, along both angles of the faceplates where they meet at the corner.
Mark each faceplate at this point. A straight line between these two equidistant points will lie at 45° to the original faceplates. Cut each faceplate at this mark on a 45°, miter so that the long point of the miter is to the inside of the faceplate. Measure from outside to outside of these miter cuts with the faceplates in their original positions. Cut your corner piece that length, with a 45° inside miter at either end. The point of the miter should match up with the faceplate on each side.
Fasten your corner by driving nails or screws through the mitered ends of the corner piece, into the ends of the faceplate on either side. You should predrill mitered ends for fasteners to prevent the thin material from splitting. If the 45° corner falls on the toe kick of a step riser, or at a change in level on the deck and will be exposed in the finished deck, use a cedar (or composite) faceplate for the corner piece to match your decking.

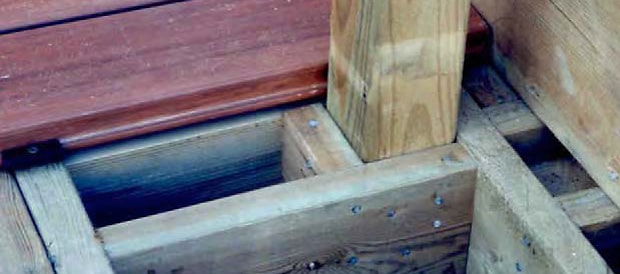
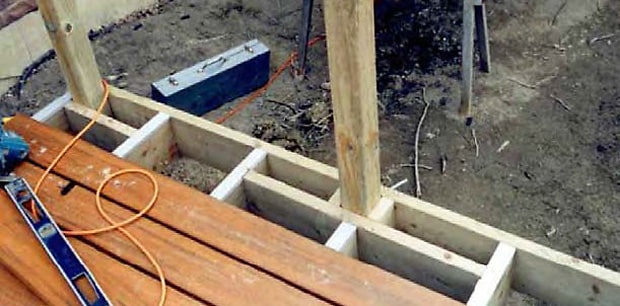
Supporting Cut Corners Extending Past the House Edge
When extending cut corners past a house corner, or anywhere that adequate support is not available, a single footing can be added to help support that corner. Install the 4x4 post on a footing, as you did with your other footings, positioned as seen in the photo. Install a short, double beam attached to both faces of the new support, so that the end extends under the faceplate and the nearest joist, which should be doubled for added strength.
Install a 4x4 support block against the double joist. Attach the double beam to this block to add support at the inside end of the beam, as pictured. This will strengthen the cantilevered beam to make the corner more rigid.
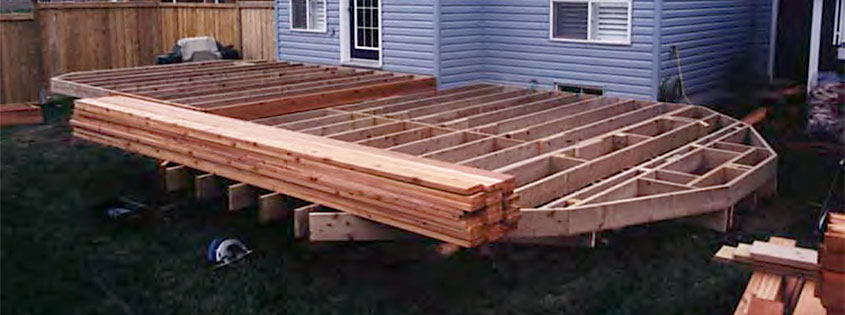
How to Install an Outside "Rim Joist" or Face-plate
How to Install an Outside "Rim Joist" or Face-plate DIY Deck PlansOur deck plans call for structural outside face-plates. These pieces are also known as rim joists and form the outside frame of the deck, fastening all other members to each other and stiffening the deck frame to prevent unnecessary vibration, flex and twisting. Decorative face-plates are often used in deck construction as well. In this case, a secondary face-plate is typically cut from lighter 1x material, or other siding and fastened to the outside face of the rim joist to cover it and create a decorative face-plate.
When installing rim joists, use a string stretched between the outside corners of the deck to ensure that the ends of all joists are cut flush with each other in a straight line. Trim any joists that don’t match up to fit. Joists that are longer, or shorter, will cause the rim joist to be out of line.
Before installing the face plate, or rim joist, at the outside face of the deck opposite the house, you will need to square up the outside joists. Use the rule of 3,4,5 that we discussed in the section on layouts to ensure these joists are square with the house. This will make laying the decking much easier and give you a more beautiful, stronger finished deck. Once these joists are perfectly square, they can be fastened to the beams.
Double check your joist spacing at each joint. It should be 16” oc. Use the same sized spacers to check this that you used when laying out the joists. Toe nail the joists to the support beams at each point that those two systems intersect. This will help stiffen the frame. Use 3 inch nails, or screws. A framing nailer is an ideal tool for this task.
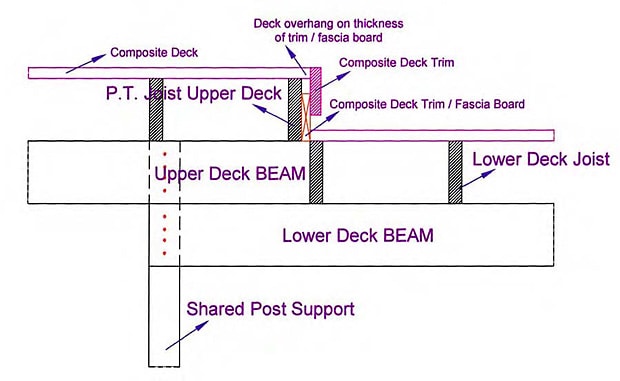
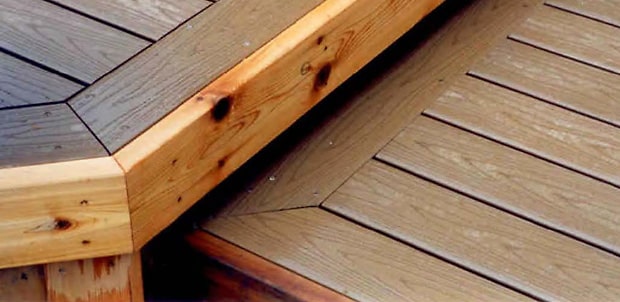
How to Frame a Level Change
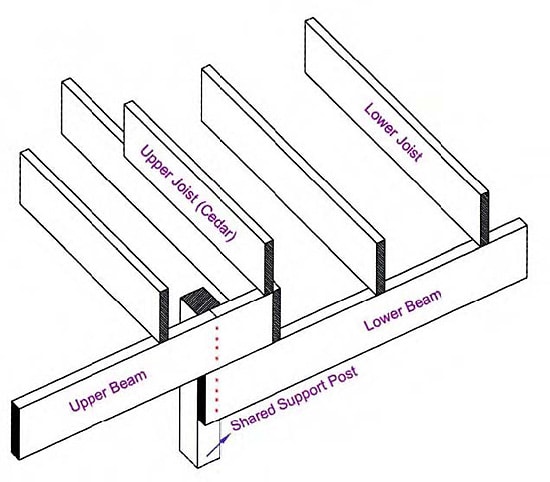
How to Frame a Level Change DIY Deck PlansWhen framing a multi-tiered deck with more than one level, frame posts can be shared between more than one level. Simply stack the double beams on top of the beams for the lower level, using the same width of material. The joists for your upper level should be sized to match the height of the deck steps, so that all changes of elevation are similar, to prevent trip hazards.
Where the breaks in deck levels will be part of an exposed toe kick, or step riser, use appearance grade lumber, such as cedar, or composite, to match your decking. This way the “reveal” (exposed portion of the faceplate or rim joist) below the deck’s trim will match the decking, instead of being made from PT lumber, which is harder to match, even with stain.
All other framing in the upper level should be installed using the same methods, spacing and materials as the lower level of the deck. The only change should apply to this transition where the two deck levels meet.
How to Frame a High Deck
How to Frame a High Deck DIY Deck PlansHigh decks have more stringent requirements than low decks. Building codes call for stronger materials, and joints the higher off of the ground a structure becomes. In many jurisdictions, ground level decks may not require any inspection, while second story decks nearly always do. Safety is the primary concern driving these differences.
Here are some changes to check your local code for:
- Instead of 4x4 support posts, 6x6 posts may be called for.
- Footings for these larger posts are typically larger, and may need to be deeper.
- Joist sizing and spacing may change.
- Fastener types and frequency may change.
- Allowance for the installation of safety rails becomes a greater concern.
These changes are not major. The construction process is still almost identical. Plan for the budgetary increase of larger posts and footings and be prepared to spend more time ensuring that each joint is properly fastened for a long lasting and safe deck. Check your local building code.
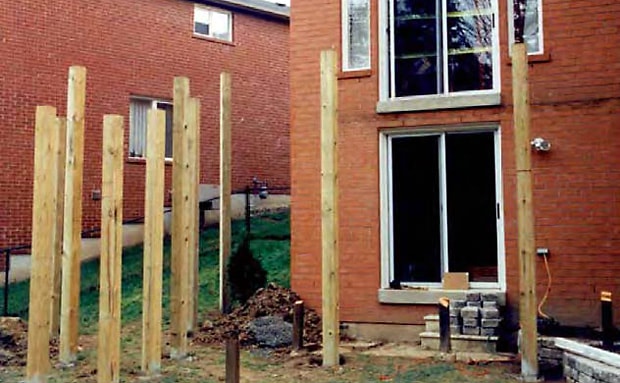
Larger support posts can create sight line issues and care should be taken to arrange them around doors and windows in a way that makes the most sense, while still providing adequate support for the deck’s frame.
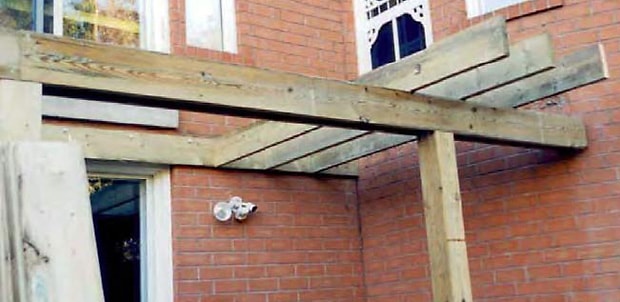
Securing Beams to Posts
Beams should be notched into the face of each post for added strength. Cut the notch as deep as the thickness of the beam material (typically 1 ½ inches for 2x beams) and the height of the beam material from the top of the post.
The notches will require some engineering to cut. It's recommended that you use a circular saw to cut the depth, top, and edges, but the larger post will require the notch to be cut away with a tool that has at least a 3 inch depth of cut, such as a table saw. You can also use a reciprocating saw with heavy blade to cut along the “outline” cut created by a circular saw to remove the notch piece.
Corner posts must be notched on the two faces that attach to the beam, and if a double beam is used, the inside face must also be cut.
The beam lumber rests on the ledge created by the bottom cut of the notch, giving the joint added strength. Lag bolts are typically used to fasten the bolt to the remaining post, behind the notch. Check your local building code.
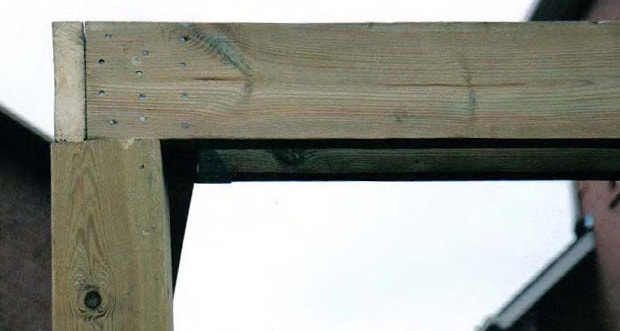
The notched joints will also provide a more aesthetically pleasing frame system from underneath. This is an added benefit if the deck has a patio, or other outdoor living space underneath.
Double beams can also be bolted through, so that both pieces of the beam are fastened to each other, through the post. Position the head of the carriage bolt on the most visible face of the beam and the nut and washer on the least visible face for best results.
Decorative Support Posts on High Decks
The larger posts will contribute “weight” to the design, but large PT posts are often unsightly. Cedar posts can be used and are lighter and easier to cut, but cost several times as much as PT posts. 1x cedar, or composite face plates, installed on all four faces of a treated post create a “wrap” that turns an ugly post into a decorative column.

Pro Tip
For even better looking posts, use a router with a “flute” bit to cut round bottom channels into the outside face of your wrap pieces to create a decorative column pattern. Use a guide rail or template to create straight cuts for best appearance. Free-handing router cuts is very challenging, and a missed cut in the face of a post can be hard to correct.
Custom Deck Framing
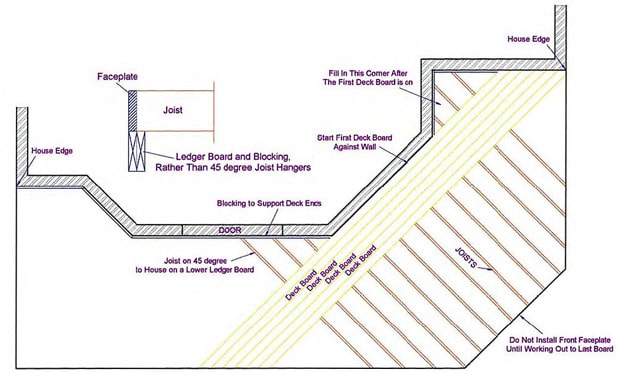
Custom Deck Framing DIY Deck PlansSetting Deck Frame on an Angle
Many home owners prefer to have the decking installed on a 45° angle to the house, so that the lines create a more interesting pattern. Rather that set your decking on a 45° angle to the frame, the frame itself can be constructed on the 45° angle. This may seem more complicated, but there are far fewer joists than decking boards. Adjusting the frame saves time and simplifies the process.
If you are using fastener clips, or any hidden fastening system, this is the only option for setting the decking on an angle to the house. The fasteners require a 90° angle between decking and frame, which can only be had if the framing is angled.
There is no requirement of code or construction that requires angled decking. The only reason to do it is aesthetic. Be sure you weigh the additional cost in time to set up the frame and materials, since 45° end cuts will create more waste. More posts may also be required to properly support the frame.
When setting the frame at an angle, joist hangers cannot be used to attach the joists to the ledger, due to the angle. The ledger in installed with a double thick support plate underneath (as described in our section on installing ledgers on stone or stucco walls) that the ends of the joists rest on top of. The mitered end is then fastened to the ledger.
Framing Around a Tree
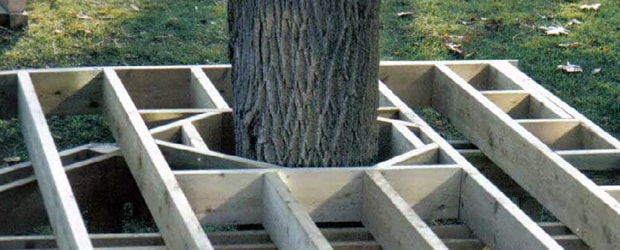
Trees add shade and interest to decks and large trees are typically saved if they are healthy. You will need to build your frame to support the ends of the decking slightly cantilevered up against the tree. The frame should be left 4 to 6” from the tree for movement and growth. The decking can be cut to fit as close as 1” from the tree. Additional trim can be installed to cover this gap as well.
Free Standing Deck Frames
Free standing frames are built using similar techniques and framing patterns. Instead of a ledger board, the edge against the house is supported by a rim joist. Additional posts are used to compensate for the loss of stability represented by the lack of a ledger board.
Check your local building codes for any changes in construction. The regulation on free standing decks is often not as rigorous, since they do not affect the house. In areas of new construction, you may have to allow time for fill dirt to settle, or use a soil tamper to pack the earth prior to free standing construction.
Hidden Fasteners
Hidden Fasteners DIY Deck PlansHidden Fasteners: Shadoe® Track Hidden Fasteners
Hidden Fasteners: Shadoe® Track Hidden Fasteners DIY Deck PlansMost deck construction is done with surface mounted fasteners, such as deck screws, or treated nails, driven down through the deck boards into the top edges of the joists below. In any construction project, an opening in the surface of material presents an opportunity for deterioration.
Water has a tendency to pool in the shallow holes above the screw heads, penetrating to the interior of your deck boards and speeding up the process of gradual deterioration. As the lumber expands and contracts with changes in temperature, this process is aggravated even further, tearing and warping the holes around the fasteners.
The moisture then travels down the fasteners into the top edges of the joists, spreading the deterioration to the underside of the decking, where the cool, dark environment will eventually turn this to rot, softening the tops of the joists.
By using a hidden fastening system, such as Shadoe® Track, you get three main benefits. First, it eliminates the need for holes in the decking, which means that your decking will last longer. Second, it is more aesthetically pleasing. Since the deck is not pierced with holes and screw heads. Third, the integrated fasteners create a stronger connection that is not as susceptible to warping and other damage.
Hidden Fasteners: CAMO Hidden Deck Fastening System
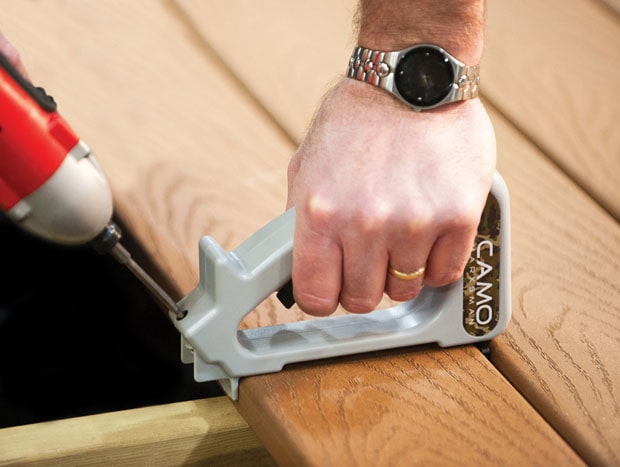
Hidden Fasteners: CAMO Hidden Deck Fastening System DIY Deck PlansUnlike specialty clip systems and other hidden hardware, the CAMO hidden fastener system uses a more traditional approach. Rather than fastening from underneath, which can be challenging and time consuming, the CAMO fasteners simply screw through the edge of the board and driven down into the joist below on an angle. This means the CAMO system can be installed using standard tools, and from above.
Benefits of CAMO Deck Fastening System
You get the high-end look of more complicated systems through the use of the CAMO hidden deck system, while installation remains virtually the same. The fasteners are hidden in the edge of the board through the use of a patent pending positioning device the holds each fastener at a precise angle and depth. This means you can install CAMO in a wide variety of decking material.
- Lumber decking, such as treated and pine.
- Premium wood decking such as cedar and epée
- High-tech decking composites will also work with CAMO
The tool fits any standard deck board and requires no pre-drilling for quick installation. Unlike bottom fastening hardware solutions, CAMO is easy to remove in the event that a deck board needs to be removed or replaced. The hidden fasteners simply back out of the board just like standard screws so that adjustments or repairs are possible.
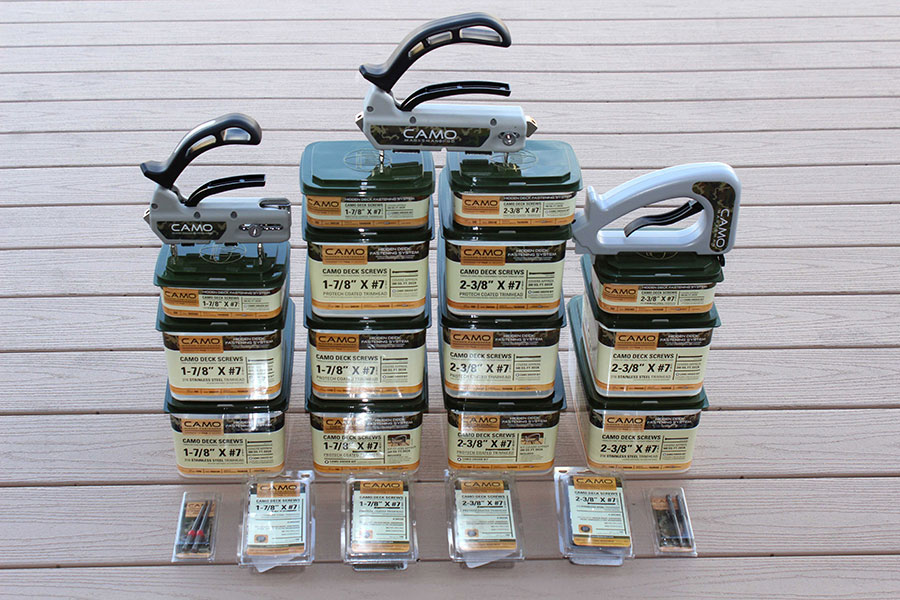
CAMO is a High Quality Tool
CAMO products are rigorously tested and come with either a ProTech coating (tested for 1500 hours of salt spray) or stainless steel, which is recommended for marine applications, such as pool decks and docks. Your fasteners will be under warranty against rust or corrosion for the life of your deck.
How to Install Joist Cap
How to Install Joist Cap DIY Deck PlansMany home owners are under the false impression that products such as composite decking boards can extend the life of their deck indefinitely. One reason this is inaccurate is that, while the deck boards may not deteriorate due to weathering, unless they choose an alternative material, the wooden frame beneath will.
By using pressure treated lumber, most decks will last for two decades, or more, with proper treatment, but over time the lumber will still suffer rot. One way to slow this process is through the installation of joist cap.
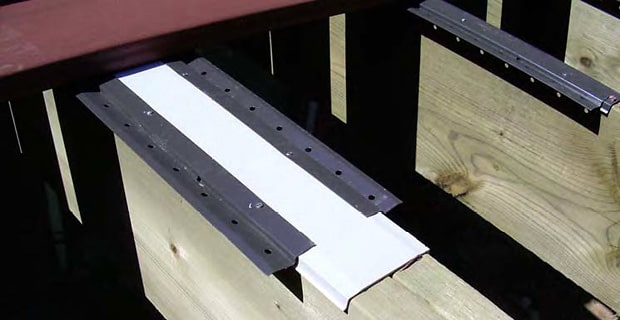
Joist cap is a thin metal cap, similar to roof edge cap, with a galvanized finish that is highly resistant to moisture, which tends to build up in the gaps between deck boards on top of the joists.
The metal strips clip over the top of a standard 2x joist, providing a complete cover for the top edge. There are both single width and double width joist caps, for those areas where a joist is doubled for strength.

Since the edge of joist cap overlaps the face of the joist, allowances will have to be made at joints where the joist meets the ledger board, or blocking. This can be done by trimming the cap with a pair of tin snips at each junction, or you can use one of the methods we outlined in the section on joist installation to adjust the adjoining members to compensate.

A rugged joint tape is used to hold the joist cap together at joints. This also seals the gap between the pieces, which can allow water underneath the cap, increasing the problem, since water under the cap cannot easily dry out.
Installing Joist Cap With Shadoe® Track Hidden Fasteners
If you are using Shadoe® Track, install the joist cap prior to Shadoe® Track installation. Track is then hand nailed through the cap using galvanized nails. Hand nailing is the best method for accurate installation versus using a nail gun, which frequently causes misalignment.
When decking is to be angled, install sections of Shadoe® Track between joists along the top of the ledger board for reinforcement.
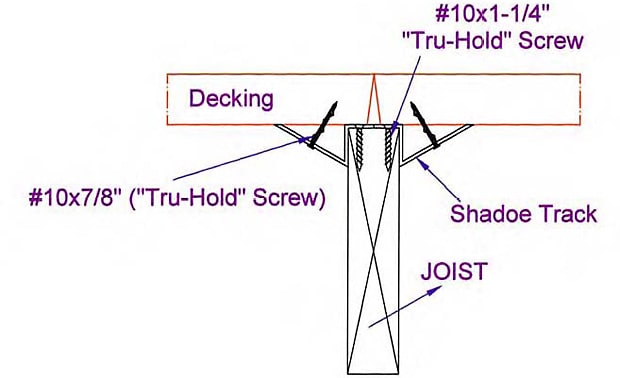
On double joists, one piece of Shadoe® Track is installed along each edge, just as you would for a single joist.
Decking
Decking DIY Deck PlansDecking: How to Install Wood Deck Boards
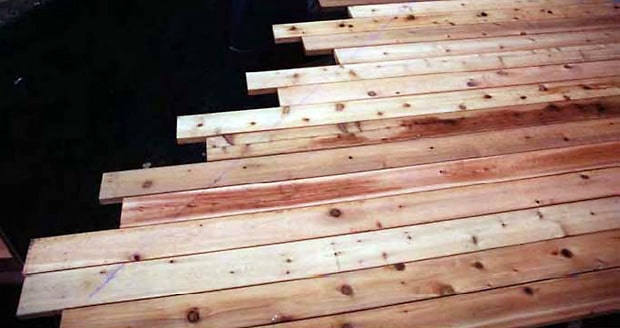
Decking: How to Install Wood Deck Boards DIY Deck PlansSecuring the First Wood Deck Board
To secure the first wood deck board, you must first chalk a line across the joists parallel with the house. If the chalk line and house do not measure parallel, adjust the first deck board or scribe the board.
Cut the first deck board to length and fasten it down.
Spacing of Deck Boards
Proper spacing is required for ventilation and expansion/contraction. If the wood is very wet when it is installed, you can probably install the deck boards tight together and a sufficient gap will open up as the boards dry.
For wood that is already dry, place a 6 penny nail between each board as you go to establish the proper gap. This will ensure that water can drain adequately from the deck, and the deck boards have room to expand and contract with the seasons.
Securing the Deck Boards
Deck boards are secured with nails or screws from the top, bottom or between the deck boards. With so many options available please refer to manufactures recommendations and be familiar with different hidden fastener systems.
Do not fasten your decking into the outside joist at this point.
Once all of the deck boards are laid down and secure, chalk a line around the outside perimeter and cut off the overhang.
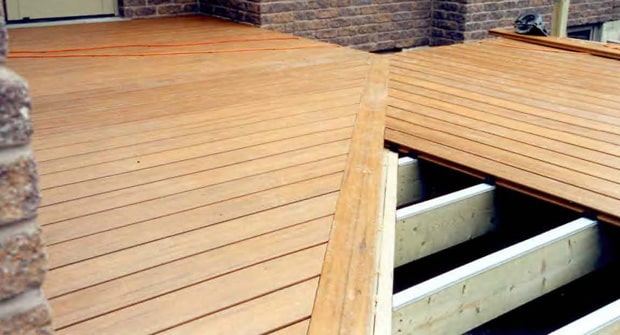
Decking: How to Install Composite Decking
Decking: How to Install Composite Decking DIY Deck PlansComposite decking, or maintenance free decking materials, vary in expansion and contraction and use many different fasteners. Be sure to check the manufacturer specifications before beginning installation. If the decking has not been installed properly (according to the manufacturer instructions) the warranty may not be honored.
Composite Decking Installation Tips:
- Before installing the maintenance free material, lay it flat on the deck surface for 30 minutes or longer (depending on the ambient temperature). This will help to eliminate any shapes or bends that may have formed in the plastic composite.
- Be sure to allow for adequate expansion and contraction, especially when building in the fall and winter. Each manufacturer gives detailed information on joint spacing for different temperatures and material lengths.
Spacing of Composite Deck Boards
This varies from product to product. Some manufactures supply spacers and some product spacing is set by the fastening clip system supplied to secure the product.
Proper spacing is required for ventilation and expansion/contraction. Check manufactures specification for recommended spacing
Securing the Deck Boards
Composite deck boards are secured with nails or screws from the top, bottom or between the deck boards. With so many options available please refer to manufactures recommendations and be familiar with different hidden fastener systems.
Learn how to install decking using Shadoe Track Hidden Fasteners, and the CAMO Hidden Deck Fastening System.
Cutting off Decking
Always leave the deck boards extending past the outside joist when lying decking. Chalk a line once all the decking is down and cut with a circular saw. When cutting off maintenance free decking, cut off the deck boards when all of the decking is complete.
It is important to cut off maintenance free all at once due to the expansion and contraction of the deck boards. This will give a more consistent straight line.
Decking: How to Install Shadoe® Track Hidden Fasteners
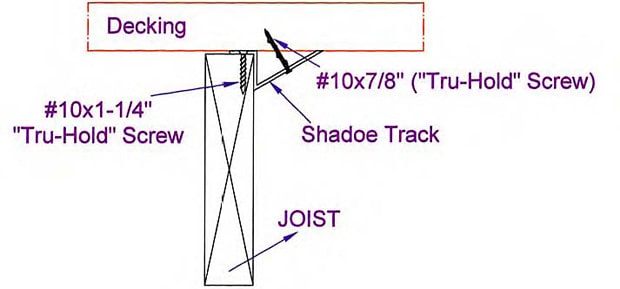
Decking: How to Install Shadoe® Track Hidden Fasteners DIY Deck PlansInstalling Shadoe® Track is a 3 step process:
- Screw Shadoe® Track to the top of each joist using "Tru-Hold" screws. The track should be flush with the top of the joist, and flat along the side of the joist. Adjacent joists should have the joints between the track pieces staggered.
- Install the deck boards one at a time.
- Kneel on top of the deck board and reach under the deck to screw up from below the deck, through the track, into the deck board. The track is designed to accommodate at least 2 screws per deck board. A high deck can be installed from below, but a second person should stand on the boards as they are attached to ensure a tight fit as the screws are installed.
- For easier installation, install Shadoe® Track on right side of joists, facing the house, and towards the inside of the deck for the outside joist.

- Do not put Shadoe® Track where rail posts are to be installed.
- Leave off the front faceplate until the last board is on to be able to reach under the deck or step.
- Install the joist blockings lower to allow for the Shadoe® Track.
- When installing a perimeter board secure a 2x4 spacer to the bottom of the deck board. Screw the 2x4 through the outside joist and spacer/boarder joist.
- Do not put Shadoe® Track where rail or privacy screen posts will be installed. A minimum of 3 screws per board are to be installed through the track into the bottom side of the board.
- When fastening into maintenance free materials full thread screws must be used.
- When installing Shadoe® Track at a joint in the decking, install a short piece of Shadoe® Track on the opposite side of the full length to provide additional support to the joint.
Decking: How to Install Deck Boards With the CAMO Hidden Deck Fastening System
Decking: How to Install Deck Boards With the CAMO Hidden Deck Fastening System DIY Deck PlansThe CAMO hidden deck fastening system uses a patented and warranted screw that is unique to them. Rather than use a hidden bracket, or other joint hardware, CAMO takes a direct approach, attaching the deck boards to the frame of the deck itself, the strongest possible joint.
To make the screw hidden, the CAMO approach is to drive the fastener on an angle, through the edge of the deck board, into the frame below. To achieve this, CAMO has developed a proprietary guide tool to work in conjunction with their specialty fasteners.

The tool has a stop that rests against one edge of the deck board and a top handle that allows pressure to be applied to pull the tool snug against the board to prevent slippage. If you have ever worked with pocket screws, you may be familiar with similar processes.
Since the guide is used resting on top of the board, with only a thin stop extending down into the groove between boards, it allows both edges to be fastened with the board in position, even along the edge that rests next to the last board installed.
The CAMO screw can be driven with a standard cordless drill or screw gun, using their patented tips shaped to fit their drive head and made long enough to run through the guide. One key feature is the CAMO’s small screw head. This allows the screw to run between boards and leave a very small hole above the head, even when it is counter-sunk.
- Mark your boards with a pencil over the center of the joist below.
- Position the board as you usually would, using spacers along the most recently attached board for a straight gap.
- Starting on the outside edge, away from the installed decking, position the CAMO tool aligned to the mark and drive one fastener into each joist along the whole edge.
- Once the outside edge is fastened down, turn your tool around and install fasteners down the opposite edge.
- To remove a damaged board, simply reverse the process. Use the tool to align the bit, press firmly on the drill to engage the head and with the drill in reverse, back the screw out of the board. Repeat until all screws are removed
Decking: How to Lay Deck Boards Around a Bump Out
Decking: How to Lay Deck Boards Around a Bump Out DIY Deck PlansWhile many homes have flat walls adjoining the deck, frequently the construction will have corners and “bump outs” for doors, windows, chimneys and other architectural features. The best way to install decking is from the outside edge in, so that any “scribed” pieces are ripped to width to fit along the wall of the house, so that the rough edge is hidden. Bump outs present a challenge to this.
Straight Decking
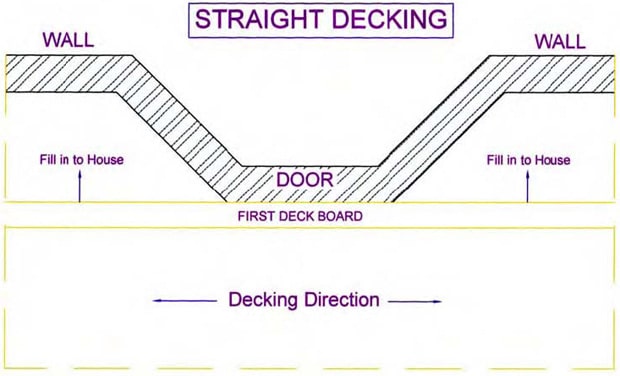
If your deck boards are being installed perpendicular to the frame and parallel to the house, lay the deck from the outside edge up to the bump out, leaving the pockets on either side for last.
Cut each piece of decking for the pockets to fit, mitering the ends if needed, similar to the illustration. Fit each piece and fasten it before installing the next to ensure a perfect fit. Lay full-width decking boards as far as you can, until the gap between the last board and the wall is too narrow for a full piece.
Measure the gap between the edge of the last full board and the wall at both ends and in at least one place in the middle of the section. Mark your deck board and cut to width using a jig saw, if the edge is not straight, or a circular saw for straight edge. Fit and fasten the last piece.
Angled Decking

If your decking is angled, or runs perpendicular to the wall, each piece will need to be cut at the end to fit against the wall.
- Lay decking up until the point that the bump out will interrupt the pattern, from end of the deck.
- Fit deck boards long enough to extend past the end of the deck and reach the wall.
- Measure and cut the ends to fit and install and fasten each board as you go to ensure the best fit.
- Install full-width boards as far as possible until the gap between the last board and the bump out is too narrow for a full piece.
- Measure, mark and cut the final piece to fit against the bump out as described for straight decking.
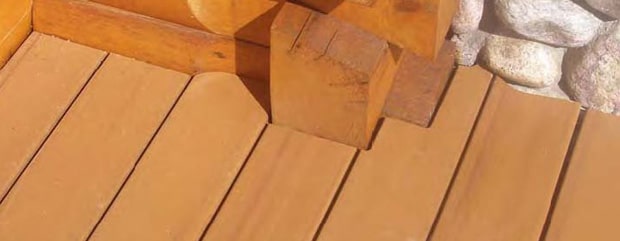
Decking: How to Scribe Decking to Stone
Decking: How to Scribe Decking to Stone DIY Deck Plans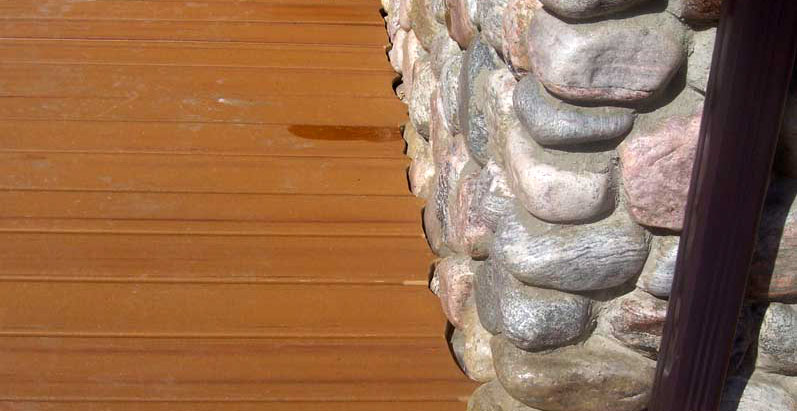
When uneven surfaces butt up to the deck surface, you will need to scribe the edge, or end of the board where it meets the stone, or other rough face.
Pro Tip
The easiest way to do this is to use a drawing compass, or a thick wooden dowel to transfer the line of the surface onto your material.
Compass Method
- Set a compass so that the scribe and pencil are an inch apart.
- Tighten the compass to lock it in place.
- Position your material as close to the rough face as possible. If the rough surface is also on an angle to the decking, miter the decking ends first.
- Place the scribe of the compass against the rock, so that the pencil’s point rests on the deck board.
- Slowly drag the compass along the surface, so that the pencil marks a line on the deck board that duplicates the line of the rough surface.
- Cut the edge with a jig saw for a tight fit.
Dowel Method
- Tape a pencil to the side of a one inch dowel section, about a foot long, so that it is parallel to the length of the dowel and the point of the pencil extends past the end of the dowel.
- Drag the dowel along the wall as described above for the compass.
- Cut the edge along the line with a jigsaw.
Scribing Around Square Shapes
- Place your deck board as close to position as possible.
- Mark the board where it will intersect with the shape while it is in position. This will provide the most accurate position for your scribe.
- Measure and mark the shape of the scribe onto the board, checking your measurements carefully.
- Cut the scribe out with a jigsaw.
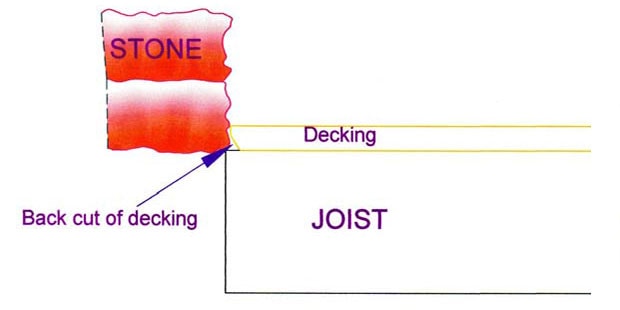
Pro Tip
Whether scribing up against stone, or other uneven shapes, you can achieve a tighter fit by back-cutting each deck board with a jig saw.
Decking: How to Install Pattern Boards
Decking: How to Install Pattern Boards DIY Deck PlansPattern boards are a great way to add visual interest to your deck and elevate it above the standard DIY deck. While neat rows of decking can give a clean and simple appearance, adding some patterns to your decking can also simplify installation on large decks that run more than one direction, or even help maximize deck materials to reduce cost.
Using decking as a pattern board
Pattern boards typically fall where two sections of decking are joined, end to end. The pattern board can be installed perpendicular to the prevailing installation at 90° if the boards are in line with each other. In this case, no special framing is needed. This works well to make use of shorter lengths of lumber where just a few inches of reach are needed.
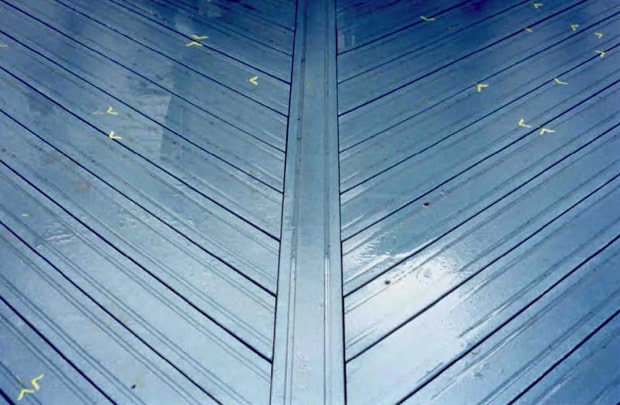
Where two sections of decking meet at a mitered corner, a pattern board, laid diagonally to join the two sections makes for neat joints and provides visual interest.
- Determine where the pattern board will lie while constructing your frame.
- Add two diagonal joists spanning the distance of the pattern board, before installing standard joists in the two adjoining sections. They should be spaced a few inches wider than the width of the deck board. In the illustration, a 2x8 is used between them, requiring a 7 ½” space.
- Install the cap board between your two diagonal joists to support the pattern board.
- Miter the joists in the two adjoining sections to match up to the diagonal joists. Space them as you normally would.
- Install your pattern board first on top of the cap board and fasten it in place.
- Miter the decking for the two adjoining sections to fit neatly against the edges of the pattern board for a clean joint.
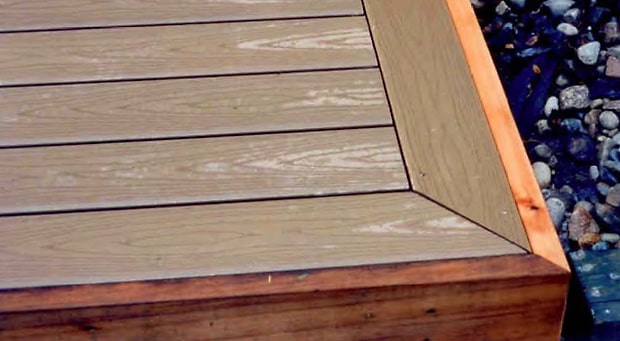
Decking: How to Install Perimeter Boards
Decking: How to Install Perimeter Boards DIY Deck PlansPerimeter boards are another type of board patterning where decking is laid parallel to the edge of the deck frame, in areas where the ends of the decking boards would simply be cut to match the frame, leaving exposed ends.
Perimeter borders serve three primary purposes:
- They cover the butt ends of your material, which gives a neater appearance and serves as edge trim.
- They can be used to make use of shorter deck boards in an area that requires just a few extra inches of length.
- They can serve to accent a level change on the deck, providing a perpendicular line to the decking to make the edge more visible.
Perimeter Board Installation
Borders are installed using similar techniques to the rest of your decking.
- Cut boards to fit, using one full piece, instead of multiple pieces, wherever possible.
- Cut miters at corners, so that end borders connect with the edge board, creating a “frame” effect around the decking.
- Deck Trim can be installed with deck overlapping trim, or trim overlapping deck and flush at the top edge, depending on your preference.
Railings
Railings DIY Deck PlansRailings: How to Install Wood Deck Rail Posts
Railings: How to Install Wood Deck Rail Posts DIY Deck PlansRail posts are typically made from 4x4 lumber. Depending on the material you use for your deck surface and trim, pressure treated posts, or cedar posts will work well. Post wraps, or covers are available to match most types of composite material as well and will generally fit 4x4 posts.
It is easiest to install posts before the decking. This can be done as the finishing step of your deck frame, or as the decking is being installed, pausing for post installation as you go.
Rail Post Layout
Mark the positions of your rail posts before installing decking. In general, one post every 4 to 8 feet is typical, check your local building codes and be sure to investigate your railing system to determine specific requirements.
There are two ways to layout deck posts:
- Start from one corner and position a rail post every so many feet to the opposite corner of the deck, or the end of the rail, if stairs or openings are present. The spacing will depend on code and railing requirements. All rail posts, except the last post will be evenly spaced.
- Measure the length of your rail section from corner to corner; divide the space evenly, so that posts are equally spaced. Choose spacing to meet minimum requirements of code and your rail choice.
Rail Post Installation
Rail posts are set on the inside face of the rim joist, or outside framing member. The post is then boxed in with blocking to create a sleeve for the post.
- Mark the position of the post.
- Install blocking between the two nearest joists, so that the blocking is 3½" off the inside face of the rim joist.
- Install blocking between the rim joist and the first blocking you installed, as needed to box the post in on all four sides.
- Set your post in place, with the bottom end flush with the bottom of the rim joist.
- Measure the height and cut the post to length.
- Install the post permanently using lag bolts through the blocking and rim joist into the post.
Intersecting with a Joist
If possible, lay out your rail posts to fit in the corner of the joist and rim joist. If spacing forces a post to be installed where a joist is mounted to the rim joist, cut the joist off 5 inches short of the rim joist. Install cross blocking between the joists on either side and reattach the cut joist to the blocking.
Forty-five Degree Corners
Anywhere that your deck comes to a forty-five degree corner, you have two choices of how to manage your post.
- Rip two posts on a 22½° angle along one edge and attach them together to create a 45° corner post.
- Install a standard post, so that one corner of the post is aligned with the inside corner of the angle.
Installing 22½° Corner Posts
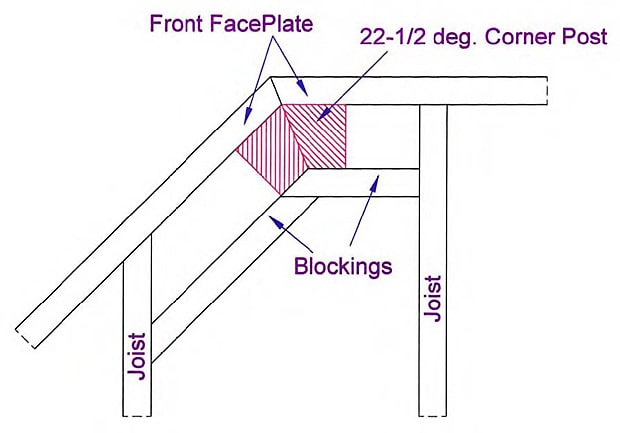
22½° posts are used when rails or privacy screens continue around an inside or outside 45 degree corner. Fasten 22½° post through both the front faceplate and with blocking to the joists.
Rail Sections Sharing a Corner Post
If a square post is being used on a cut corner of the deck cut the 2x4’s of the rail section around the rail post. Be sure to keep the same inset from the outside faceplate as the other rail sections.
Rail sections share a 4x4 corner post when 22½° posts do not permit. This often happens with maintenance free posts.
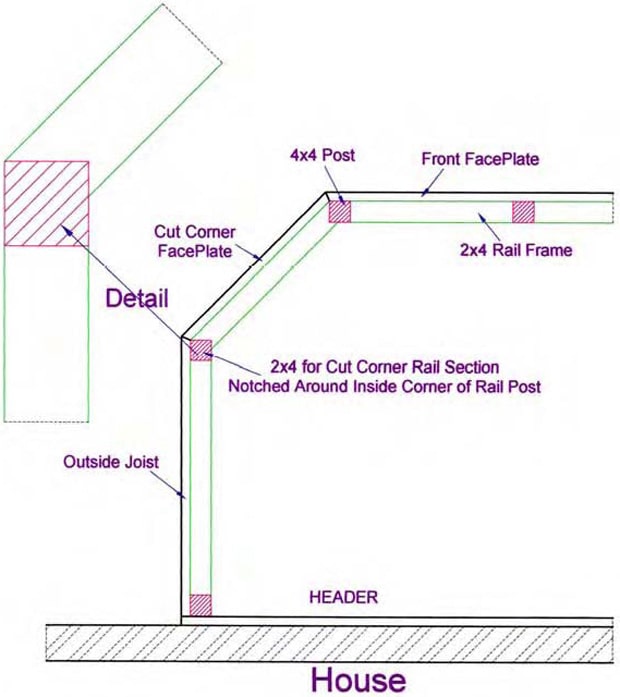
Railing Adjustment
When using method two for 45° corners, notch your railing to fit around the post. The rail width will be wider than the angled face of the post on one side. Cut the notch, so that the extra width fits around the back corner of the post and the front edge of both railing and post are flush.
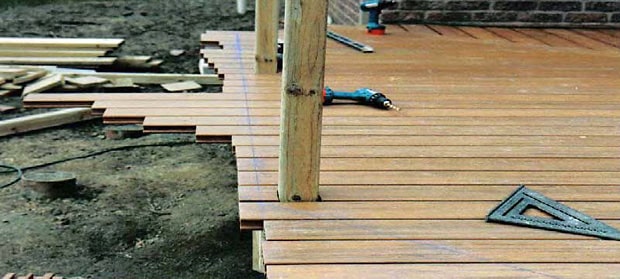
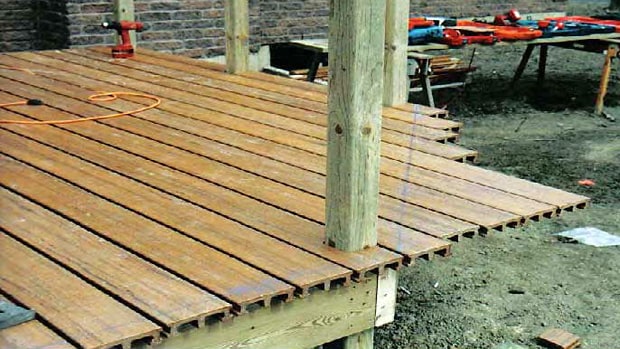
Decking Around Posts
Cut to fit the decking as described in scribing around square shapes. Leave a slight gap for the expansion and contraction of your decking materials and wooden post, to prevent future issues.
Pro Tip
Rail posts can be installed a little longer than needed and left uncut. A chalk line and level are then strung along the row of posts to mark the top height of all posts in a single row.
Cut the posts to this height, so that the top of the posts are completely level, even if slight variations in the deck occur. The top line of your rail will be the most visible marker as to whether you deck is level. This ensures the best aesthetics.
Railings: How to Install a Deck Railing
Railings: How to Install a Deck Railing DIY Deck PlansWhile many aspects of deck construction may not even require permitting or inspection in many areas, especially in the rural US, it is wise to pay attention to building codes, as they describe some of the safest ways to construct decks. Railings are one area that is often looked at closely during inspections, so be sure to do your homework on the local codes before buying material and starting the installation process.
Types of Railing
Deck rails come in a huge variety of styles and installation methods. You can find them in almost any common material, from metal to wood and composite lumber products. There are three main categories of railing construction.
- Complete rail systems: These come either fully assembled or ready to assemble and are the simplest method for rail construction. They are also typically the most expensive. If you choose this route, study the manufacturer’s literature closely before you begin.
- Railing components: Often similar to complete rail systems, these types of railings come with pre-machined top and toe rails and balusters of various styles that fit between the rails. These types of rails go together quickly and take much of the guess work out of construction.
- DIY railing: Standard lumber can be made into a simple railing fairly simply. You will need material for the top and toe rails and something to use for balusters in between.
Standard Rail Construction
The standard is a 36 to 42 inch high rail with balusters every 4 inches, to prevent small children from easily slipping through. Hand rails are required for most steps with more than one riser and have specific size and shape requirements.
If you are buying material from a home center or lumber yard, they will likely have some hand rails to choose from for your stairs. These may need to be installed in addition to the deck railing system in some cases.
Top Rails
Top rails typically are shaped to fit the hand and have either a dado (a long, narrow groove) on the bottom side, or “mortises” (a round, or square hole for the end of the baluster) for each baluster. A mortised rail is the simplest and strongest. With a dadoed rail, you will need to space each baluster individually.
Toe or Bottom Rails
Bottom rails often match top rails in shape or dimension and can be purchased with either a dado, or individual mortises for each baluster. Sometimes they are narrower than the top rail.
Rail Installation
It is easiest to build railings from the bottom up. This makes gravity your friend, as it holds parts down, for easier installation.
- Cut and position spacers on the deck along the section of railing between the posts, tall enough to position the bottom face of the toe rail at the desired height above the deck.
- Place your toe rail on the spacers, and cut to fit between the posts, if needed.
- Attach the toe rail to each post. This can be supported by L brackets, or other hardware that came with your rail system, or screws can be used in the case of lumber rails. Predrill all holes and use at least two screws in each post and in each end of the rail.
- Install balusters into the toe rail. Mark their positions with a tape measure, if your toe rail is dadoed. If you have mortises, fit one baluster in each hole.
- Install the top rail to fit over the balusters. When working with a dadoed top rail, mark each balusters position. With mortises, start from one side and slip the balusters into their spots one at a time.
- Fasten the top rail, similar to the bottom rail.
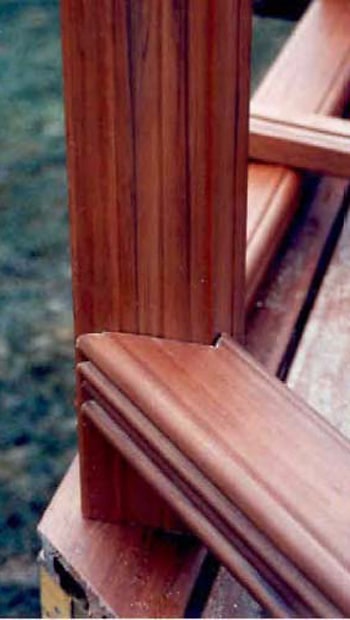
Rail Systems
Use spacers as described above. Trim the rail sections to fit as needed. Position each section of rail between the posts and, starting with the toe rail; fasten it in place using the manufacturer’s suggested method.
Trim and Post Caps
Trim can be added along the bottom edge of the top rail, top edge of the toe rail, or in the form of caps on each post, to create a neater appearance, or add decorative detail.
No Toe Hold Rail
A simple rail can be built, with only a top rail and a strip of blocking along the bottom, in line with the posts, directly on the deck floor. This is commonly seen on backyard decks, made from PT or cedar lumber.
- Install your top rail between the posts as previously described.
- Install a nailing strip along the bottom of the top rail and along the deck, directly below, and in line with the strip on the top rail. The strip is typically made from 2x2 lumber and nailed, or screwed in place.
- Install one baluster every four inches, running from the bottom face of the top rail, to the deck. Nail or screw the top and bottom end of each baluster into the nailing strip.
- A second strip can be added on the outside of the nailing strip for trim and added strength.
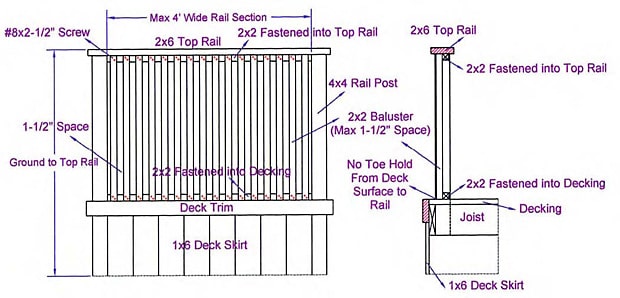
Railings: How to Install Glass Panels in Wood Frame
Railings: How to Install Glass Panels in Wood Frame DIY Deck PlansOne alternative to a wooden rail on your deck is a wood framed rail, with heavy tempered glass panels in place of the traditional wooden balusters. A wood frame glass paneled rail allows the view from your deck to remain virtually unrestricted. It’s also a great option when the architectural style of the house calls for something more modern.
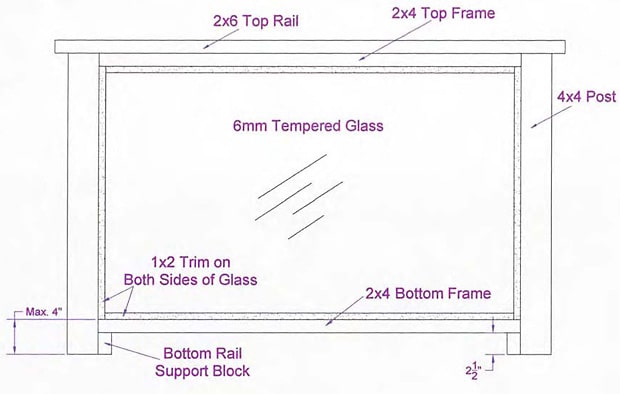
Glass Panel Railing Specifications
Glass panels present a couple of challenges to rail building. First, their breakability makes them a safety hazard, calling for a specific type of glass. Second, they are heavier than the equivalent wooden balusters, and require adequate support to prevent structural failure.
Since the wooden frame of your rail is fully exposed, a decorative species, such as cedar works best. The pieces will need to be structurally sound and capable of supporting the following live loads.
- Your Top Rail needs to support a horizontal pressure of 50 pounds per lineal foot, or 250 pounds across the length of each section.
- The Top Rail must support a vertical force of 100 pounds for lineal foot.
- The bottom frame will need to support a glass panel of 6 mm tempered glass.
- The glass panel itself must be capable of sustaining a horizontal pressure of 113 pounds per lineal foot.
- Use three inch screws to fasten the top rail and top and bottom frames in place.
Confirm all construction details with your local building code.
Railings: How to Install Aluminum Railings
Railings: How to Install Aluminum Railings DIY Deck PlansPlease check with your local building code enforcement agency to confirm the construction specifications if using Aluminum rails. This section is included as a general educational guide only. Consult the manufacturer’s installation guides for complete details.
Another option for your deck railing is a modular aluminum railing system. Aluminum is highly corrosion and rust resistant, strong and light weight. The modular systems, or S.T.A.R. makes the installation simple.
Snap Tight Aluminum Railing (STAR)
This section the installation process for the STAR system. The STAR system features a continuous, square aluminum top rail. The post bases feature base plates that slide down over the mounting bracket at the bottom each post to hide the bolt fasteners.
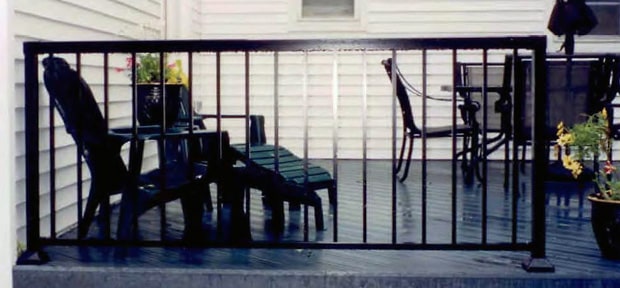
Aluminum Railing Installation
Since deck boards are not thick enough to support a fastener long enough to securely mount the STAR system posts, blocking needs to be installed in the deck frame, before decking is applied in every place that a post base will be mounted on top of the deck. Use long deck screws to secure the blocking.
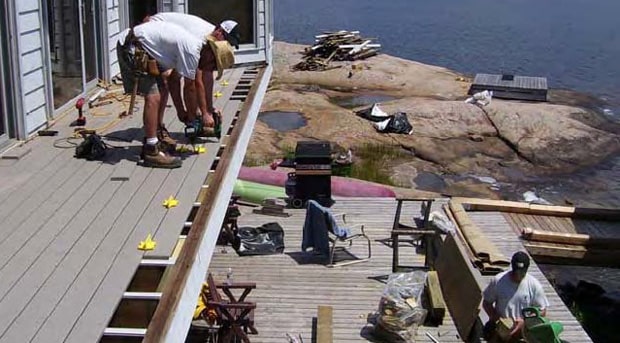
Measure and cut your posts using a reciprocating saw with a metal blade, circular saw with an abrasive blade, hack saw, or other power saw with a metal blade. Railings can be cut using the same tool.
- Measure the edge of the deck where the rail is to be installed.
- Evenly space the posts along the entire length of the area where the railing will be installed. Do not exceed the maximum length of rail section between posts.
- Install rail bracket to each post head for fastening rail in place.
- Cut top rail a little long at each end. Fit a top rail end cap to each end.
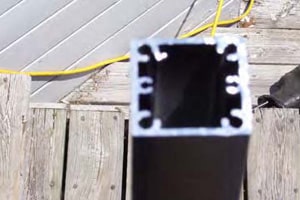
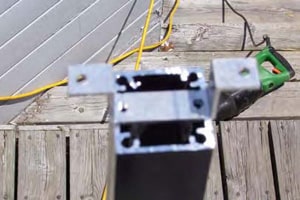
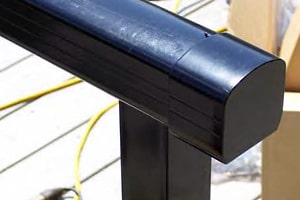
Top Mount Cover Sleeves
Where joints are required between sections of rail, a top mount rail sleeve is required. Mount the top mount cover sleeve on top of the post where the two sections meet. Cut your rail to fit into the cover sleeve on each side.
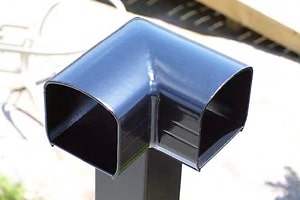

At every 90 degree corner, install a corner sleeve. Corner sleeves create a square corner by receiving a rail into each side of the corner. The sleeve is secured into place with screws from the underside. The rail is fastened in place with screws up from the bottom on each side.

Where a rail terminates against the house you can choose to use an end post, with a top mount cover sleeve for the top rail, and the bottom rail mounting to the side of the post as you would for any post, or the railing can terminate against the house, supported by hardware brackets.
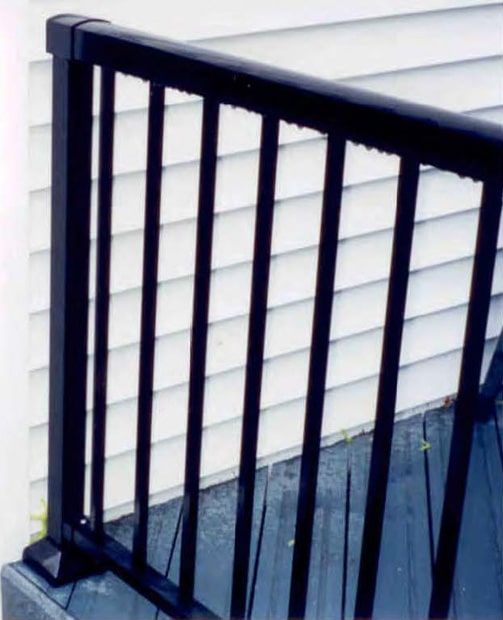
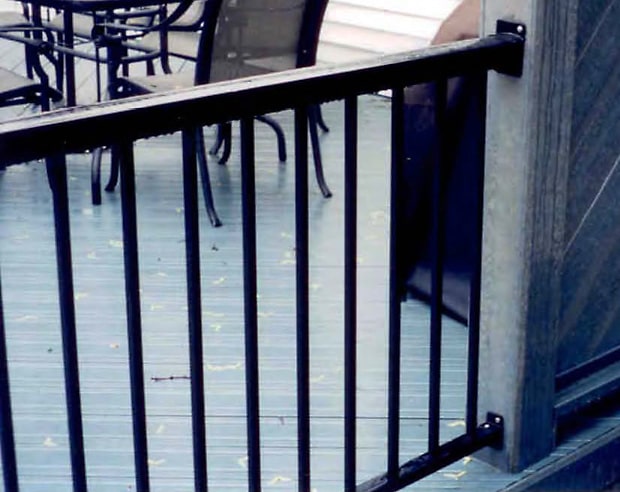
Stair rail sections are designed so that the top and bottom rails can run at the same angle as the stairs. The balusters are mounted loose to allow them to remain vertical, parallel to the posts. Mount a post at the top and bottom of the rail. Cut your rail section to fit between the two posts. Mount the rail to the top post and swivel the bottom end of the rail to fit in the brackets. Then attach using the supplied screws.
For more installation instructions, consult the manufacturer’s install manual for details.
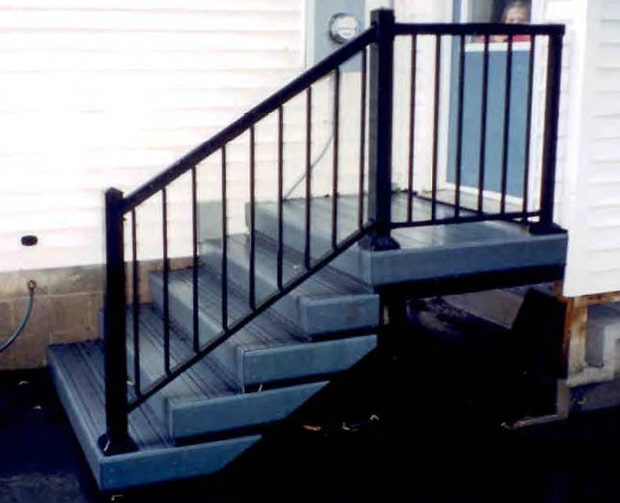
Installing Glass in an Aluminum Rail
An aluminum railing system designed for holding glass has a U shaped top and bottom rail, with an open groove facing down from the top and a matching groove facing up from the bottom rail. The glass is slid into place, with the bottom rail attached at both ends, then the top rail is fitted into place.
Glass panels can be either “friction fit” or held in place by a gasket. Friction fit panels are installed with the glass directly against the aluminum rail. Gravity and a snug fit hold the panel securely into place. A gasket panel features a rubber strip in both top and bottom rails, designed to fit snugly against the glass.
Skirts
Skirts DIY Deck PlansSkirts: How to Install Horizontal Skirt Supports
Skirts: How to Install Horizontal Skirt Supports DIY Deck PlansA deck skirt is a trim panel fitted from the bottom of the deck trim to the ground. It serves two major purposes. First, it prevents small animals, and objects crawling or being blown underneath the deck.
Both the top and bottom edges of the skirt require horizontal support. The top edge of the skirt is supported by the deck face board. A PT 2x4 strip is used to support the bottom edge along the ground. If the rail posts run to the ground, the 2x4 strip can be mounted to the face of the posts.
If the posts are cut off even with the bottom of the deck, you will need to install blocking every 4 feet to attach the support to. Cut PT 2x4 pieces to fit from the bottom of the decking to the ground. Position these blocks vertical with the top end against the back of the deck face plate, or rim joist. Attach with screws.
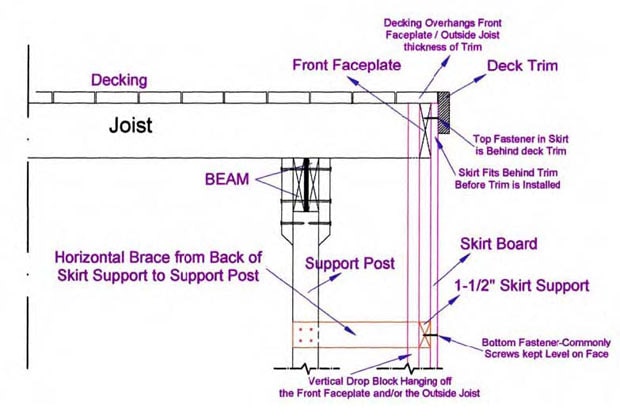
The horizontal 2x4 skirt support board is installed parallel to the rim joist, or faceplate of the deck, so that it is level.
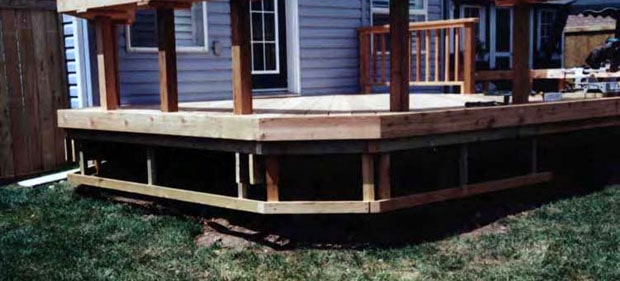
- Use a string level and chalk line to mark the bottom edge of the support by drawing a line on the faces of the deck posts, or blocks.
- Secure the bottom skirt support to the posts/blocks with screws.
- Cut vertical skirt sections to fit each face of the deck, using a circular saw.
- Cut the skirt to height first, so that the top edge will run level the bottom edge of the deck’s top trim board and the bottom edge of the skirt support.
- Cut one section of skirt to length to fit each face of the deck.
- Miter the edges of corner pieces for a tight fit.
- Use full sized pieces of skirt from either end, working toward the middle of long sections. Cut the center piece to fit.
- Fasten the deck skirt in place with nails, flush with the bottom edge of the deck’s top edge trim.
- Fasten the bottom edge of the skirt along the face of the lower support using nails or screws.
- Fasten 2x4 supports back from the bottom support of the skirt, to the deck posts underneath to make the skirt secure.
Skirting on a Slope
On a slope, install the bottom skirt support parallel to the sloping ground. Mark and cut the skirt to match the angled support. If using single side by side boards for skirting, leave a minimum of ¼ inch between boards. Space the skirt’s bottom edge ¾ inches above grade by using a standard piece of 1x4 lumber on the ground as a spacer.
Skirt Support on Tall Decks
Install skirt supports that are taller using similar techniques. On a tall deck, more support is required. If the height of the deck is over 4’, one horizontal support is required for every 4’ of height. Run braces from the lowest skirt support back to each deck post and fasten in place with screws. Frame doors into the skirt using 2x4 lumber wherever required.
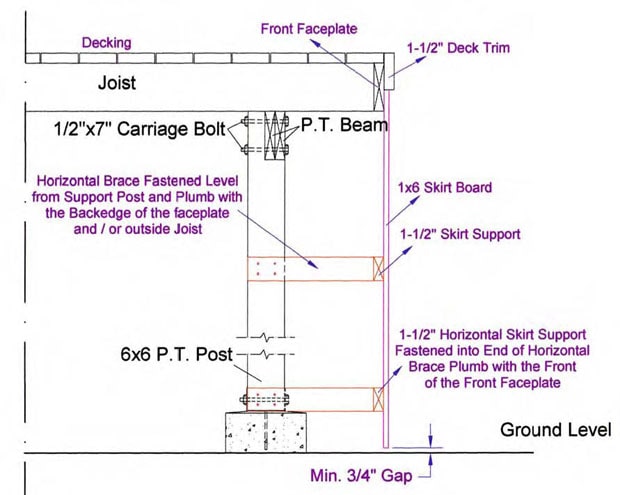
Skirts: How to Install a Skirt Around a Deck
Skirts: How to Install a Skirt Around a Deck DIY Deck PlansWood
Solid 1X6 cedar skirting is installed from the bottom side of the horizontal trim down to the ground. A recommended ¾” ground clearance is left between the bottom of the skirt and the ground. Follow the grade of the ground angling the bottom of the skirt with the grade for a clean, straight look. Leave a minimum ¼” air space between the skirting boards. Install corner pieces of skirt first working towards the center of each of the sections. This will avoid a small corner end piece leaving the ripped pieces in the center. If building with maintenance free skirt, check manufacturer’s installation instructions.
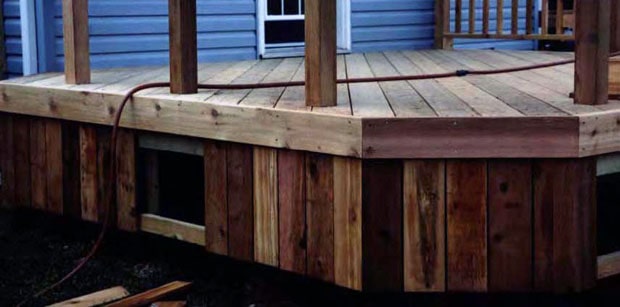
Lattice
Lattice skirt can be installed to standard skirt support. Find where the lattice sheets butt together, and install a 1x3 decorative trim over the joint. Use the same trim on the corners and along the bottom of the deck skirt.
Composite and Vinyl
Composite and vinyl skirts are used for complete maintenance free projects. Some manufacturers have skirt or cladding profiles while others recommend using their decking profile. Be familiar with the different manufacturer’s profiles. Refer to “Installing skirt and deck trim that are the same thickness” below for installation tips.
Installing Skirt and Deck Trim that are the Same Thickness
When installing horizontal deck trim and vertical skirt that are the same thickness, over hang the deck boards the thickness of the skirt past the front faceplate and/or past the outside joists.
Use a scrap of ¾ inch lumber to space your skirting above the ground. Put fasteners at the top edge of your skirt high enough to be hidden behind the deck’s trim board. Use a straight edge to set the bottom fasteners in a straight line, in the center of the skirt support you installed behind.
Skirt Gate Construction
Deck skirts provide a nice finishing touch, but they can block access to vital areas, such as valves for water, or hot tubs, or electrical plug-ins. The area under the deck can also be use as storage, once access is established. Skirt gates can help.
Frame your gate skirt with 2x4 lumber to create a strong, stable frame. Use the same boards you used for your skirt to face the gate panel. Use fence gate hardware to mount your access panel. They will last longer and provide easier operation than indoor, or lightweight outdoor hardware.
Build the gate itself with a rectangle of 2x4s with a diagonal 2x4 brace running from the bottom hinge side to the upper latch side to keep the gate square and keep the weight evenly distributed between the hinges. This will help prevent sagging as well. Cut your deck gate so that the bottom edge matches the skirt on either side.
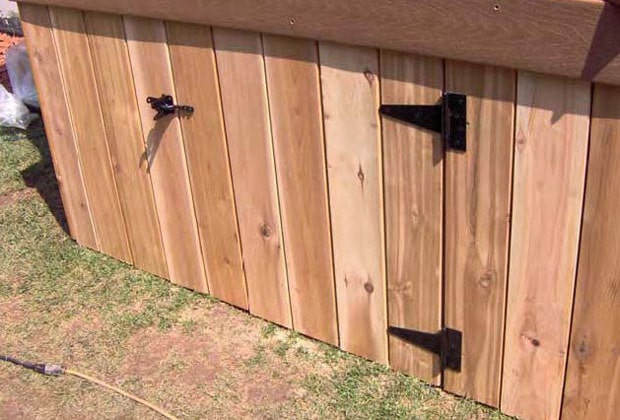

Skirt Gates on Upper Levels
On upper levels, build your gate the same as for lower level gates. Cut the bottom edge of your gate to clear the deck by ¾ inches. Position handles and hinges to clear stairs, rails and other nearby features. Use 2x4 bracing diagonally on either side of the gate to stabilize the skirt.
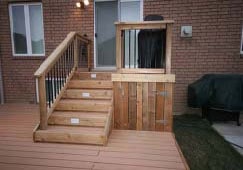
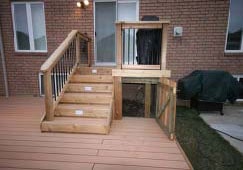
Stairs
Stairs DIY Deck PlansStairs: How to Install Box Steps on Your Deck
Stairs: How to Install Box Steps on Your Deck DIY Deck PlansAnatomy of a Step
Steps are made up of three main parts. The top of a step is known as the “tread”. The “riser”, also sometimes known as the “toe kick” is the front face of a stair that runs from the top of the stair below, to the bottom of the tread. Many deck stairs have no risers, having open space under the tread instead. A “stringer” is the diagonal support running along each side of stairs in traditional stair construction.
Deck Steps
Stairs on decks are typically wide and short. This is for safety and ease of construction. A typical deck stair “tread” or top, is made with two deck boards, side by side. When building steps, it is essential to build every step the same height as the others to prevent tripping. A standard stair is 10 by 8, or approximately ten inches wide and eight inches tall.
For decks that are less than 18 inches tall, one step is typically sufficient. The simplest way to construct a single step is the box step. If your deck needs multiple stairs, multiple box steps, or stringer stairs are the solution.
Single Box Step
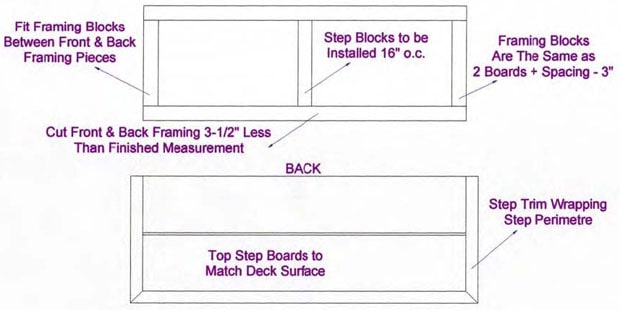
Box Step Construction
- Cut five pieces of framing, three pieces 3 inches shorter than the width of your stair tread.
- Cut two pieces as wide as your stair tread from 2x8 PT material.
- Stand the front and back pieces on edge and position the three shorter pieces between them, perpendicular to the front and rear pieces to create a rectangle.
- Position one short piece flush with either end of the front and rear pieces.
- Position the remaining piece in the center of the rectangle.
- Fasten the box together using 3 inch deck screws.
Pro Tip
- Make your steps two boards wide.
- Keep your stair rises to a maximum of 8”.
- Do not install trim along the back edge of the step, it will create a trip hazard.
Double Box Step
Double box steps are built using the same techniques as for a single step. You will need one box for each step.
- Build your bottom step twice as wide as a single step.
- Build your top step as you would for a single step.
- Fasten the two frames together, with the back framing members flush with each other.
- Add decking on top of your frame.
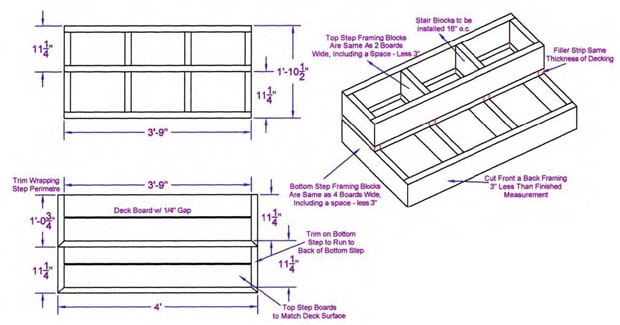
Stairs: How to Install Wood Riser Stairs on Your Deck
Stairs: How to Install Wood Riser Stairs on Your Deck DIY Deck PlansWood Riser Stairs
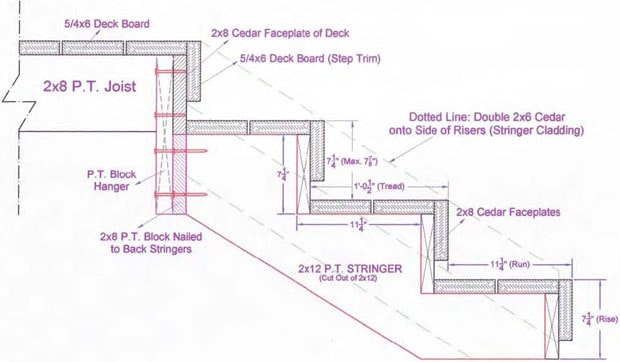
Calculating Stair Rise
Use a string and string level to determine the height of the stairs.
- Mark the end of our stairs with a stake driven in at the point where the bottom riser will sit. The distance should be evenly divisible by twice the width of your decking boards. If not, adjust the position of the stake.
- Stretch your string out to the stake and adjust it until the level bubble is centered.
- Measure from the string to ground level at the base of the stake.
- Divide the height of the string by 8. Divide any remainder and add it equally to each step (for example, 33” deck height, equals 4 stairs, 8 ¼” each)
Stringer Stair Construction
Stair stringers are cut from 2x12 lumber. For exposed side stringers, use cedar lumber. Make one stringer for each 16 inches of stair width. Allow for light boxes if riser lights will be installed. Stair risers are cut from 2x8 material. Stair treads are made from deck board material.
- Use a framing square to mark stringers. Use the outside of the “L” to mark for rise and tread.
- Starting from the outside corner of the square, find the mark that indicates the dimension of your tread. Position the square with that mark on one long edge of the 2x12 and the corner of the square on the board.
- Starting from the same point, locate the mark that matches the dimension of your rise on the other “leg” of the square. Position it on the same edge you used for the tread mark.
- Trace along the square’s outside corner to mark a “v” notch with one angle of the V being equal to the tread, and the other equal to the rise.
- Repeat for each step, so that the tread starts where the rise below ended.
- Cut along the marks to remove the “v” sections.
- Cut the ends of your stringer at 90 degrees to the top tread, and the bottom rise, sot that the bottom will set flat on the ground and the stop will rest flat against the drop block.
Attaching Stringers to Deck With Drop Blocks
Stringers must be securely attached to the deck at the top end. The bottom end is typically left free floating, with gravity holding it in place. Work carefully to ensure the stringer height is spaced properly down from the top of the deck and level.
- Attach 2x4 drop blocks at each corner and at least one in the center of your stairs.
- Position them so that the top end rests against the bottom of the deck boards, with one flat face against the inside of the rim joist, or deck face plate.
- Screw them in place.
- Attach a piece of 2x6 horizontally along the bottom edge of the rim joist across the width of the stairs.
- Screw through this stair “ledger” to the drop blocks.
- Fit the Stringers so that the back angle of the top fits flush against the face of the stair stringer you installed. Screw through the ledger into the stringer.
- Attach treads to the top of each step notch on the stringer with screws.
Attach risers to the front of each notch.
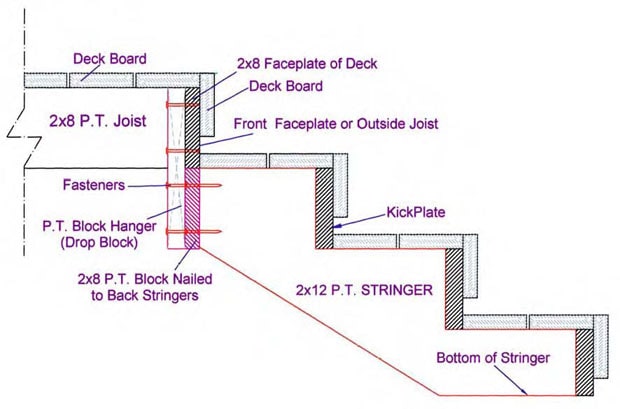
Drop blocks for stair support are fastened to the back of the front faceplate or outside joist. The stairs are secured to the drop blocks thru the back frame of the stairs.
DO NOT install drop blocks where rail posts or step lights are to be installed.
Low Maintenance Riser Stairs
To create composite deck stairs, use the same construction techniques described for standard stairs. Replace the treads and risers with composite material. Be sure that stringers are spaced no more than 16 inches apart. Composite material will not support the same weight as PT and other wood lumber. Add blocking as needed below stair treads to prevent sagging.
- Low maintenance stairs are built similar to wood stairs
- A kick plate of decking or trim is used rather than 1 ½ “ Cedar
- A wood filler the same thickness as the maintenance free kick plate supports the front edge of the tread and is covered up by the stair trim
- Stringer cladding may be one or two pieces wide depending on the width of the material
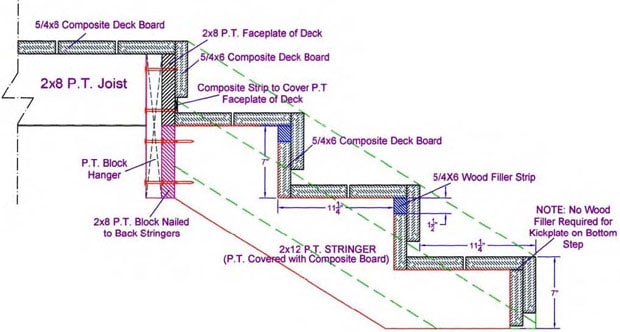
Riser Stairs and Landings
Landings are used to break up the run of the stairs and often to change the stair direction. Landings are supported by their own post, beam, joist structure.
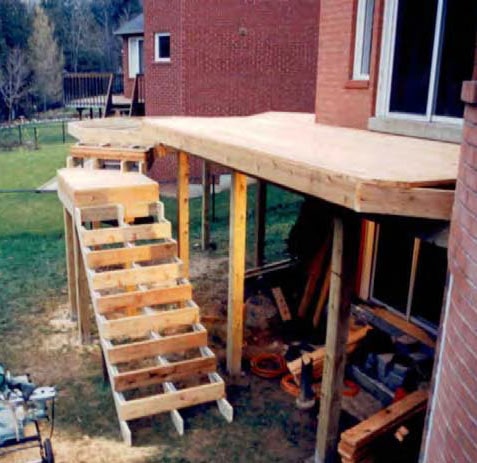
Be sure to off set the center stair stringer if lights are being installed into the risers of the steps. Stair rail is installed at 32” to 36” in height on the stairs.
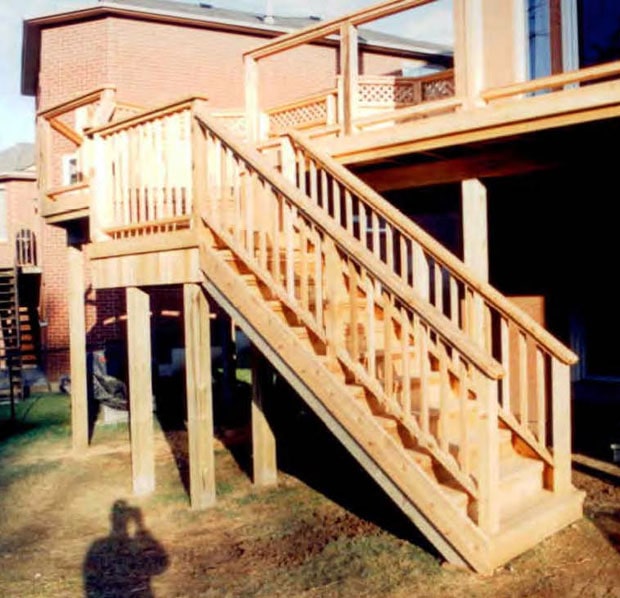
A 2x8 cedar trim board is fastened to both outside stringers just above each piece of riser trim. This adds strength to the stringers, boxes in the stairs, and closes in the space under the bottom rail to meet building code. Low maintenance decking and cladding can also be used for almost maintenance free stairs.
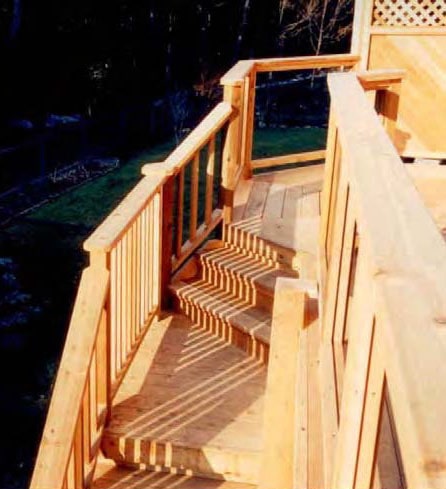
This landing has been used to change direction of the stairs. 42” hand rail was required on the landing for this high deck.
Riser Stairs that Finish on a Landing
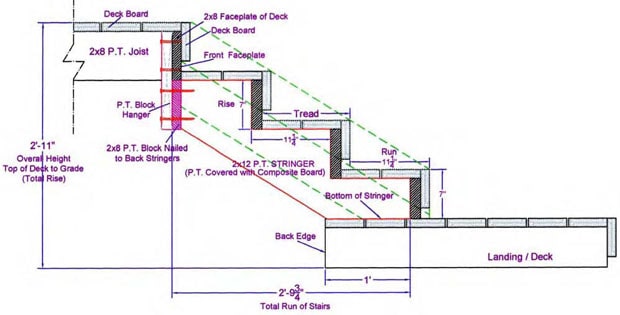
To calculate number of stairs and stair rise and run:
- Overall rise (35”) divided by maximum rise (8”) = 4.375 = 5 stairs
- Overall rise (35”) divided by 5 stairs = 7” step rise
- Landing is 3 treads/ 4 risers (4x7”) below deck level
- Run is always 2 boards wide on stringer stairs
- Run (11 ¼ ) x 3 stairs = 33 ¾ “ Front faceplate to kick plate of last step
- We recommend that the landing extends 12” under the bottom step
- Total run (33 ¾ “) – 12” support of landing under step = 21 ¾ “
- Front faceplate of deck to back edge of landing = 21 ¾ “
Remember:
Deduct 1 ½” or thickness of the kick plate off of the top of the back of the stringer which allows for the front kick plate. Deduct the thickness of the decking off of the bottom of the stringer.
Stair Trim
Make sure that any riser trim that is added to your steps is positioned flush with the tread to prevent tripping hazards. Use trim at least 3 ½ inches wide and make sure it is completely secure. Smaller trim is likely to work its way loose and cause a hazard. Avoid trim on the sides or rear of treads. The goal should be to keep the surface open and free from possible obstructions.
Stairs: How to Install Wrap-Around Stringer Stairs on Your Deck
Stairs: How to Install Wrap-Around Stringer Stairs on Your Deck DIY Deck PlansRiser/Stringer Stairs with Outside Corners
The framing for stringer stairs with outside corners is similar in every way to standard stringer stairs, except at the corner. Space stringer every 16” OC and mount them using drop blocks as described in the stair building section. When calculating corner miters, take the angle of the corner, for example a 45° corner is made up of two 22 ½ ° miters. The risers, or toe kicks, get mitered at the corners where the meet the riser coming from the opposite angle of the corner.
- Mark, cut and install all stringers, checking for level.
- Install an additional stringer at the inside of the corner, on each angle of the corner to provide support for the corner of the stair.
- Measure and cut each riser, or toe kick, to fit each stair. Cut the mitered end first, then measure and cut the square end for accurate, simple miters.
- Attach each riser, fastening them to the stringers with at least two deck screws, or nails, wherever they riser meets the stringers.
- Measure and cut any notches, or other adjustments required. *In the photo, the riser on the second stair down is notched for a step light and wiring.
- Add wiring and other internal structure while the stairs are still open and accessible.
- Add stair treads once all framing and internal construction is complete.
- Install decking boards on top of treads, if needed.
- Install trim once all other parts are in place for best appearance.
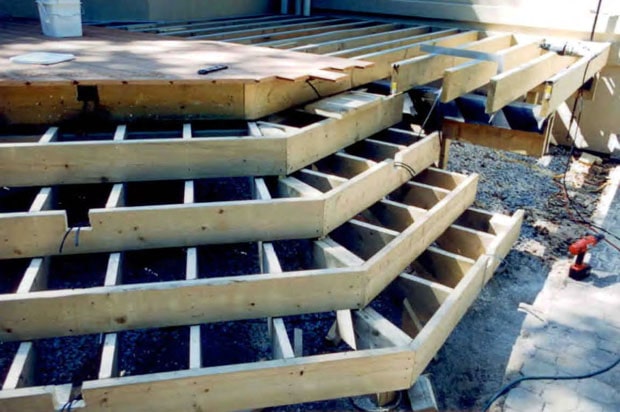
Another option for framing outside corner supports is to add solid lumber blocking in the space between the two stingers closest to the corner.
- Measure the corner space and mark it out on a piece of 2x12 PT lumber.
- Cut along the lines with a circular saw, or miter saw.
- Dry fit the blocking and make any adjustments needed for a perfect fit.
- Set the blocking so that the top edges are flush, or a little below the top edge of the stringers and riser. This makes tread installation simpler.
- Nail or screw through the stringers and riser into the edge of the blocking on all sides to fasten it in place.
- Use multiple pieces, if needed, to cover the entire space. Install pieces from the rear out for easier installation.
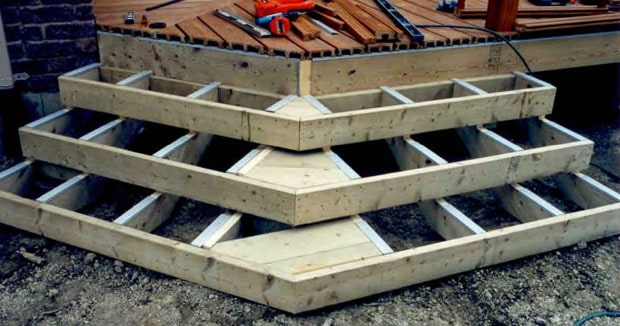
Box Steps with Inside Corners
When building box steps with inside corners, frame one side of the corner as if it were stand alone. The toe kick goes from the face plate back to the drop block. Add blocking and Fasteners as if this stair were complete. Add the opposite angle so that it butts up to this toe kick. This a much stronger joint than if the toe kicks were mitered together.
Overlap outside corners, with the front piece mitered to fit the angle of the opposite face. Miter the back piece to sit flush against the back of the front toe kick at the joint.
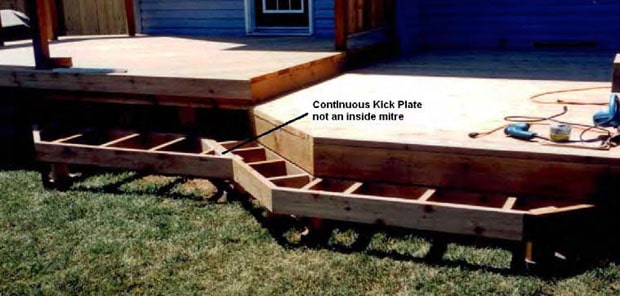
Always build the bottom step of a box step first to provide a foundation for the steps above. For box steps that end with an angle, install the toe kick so that it runs parallel to the faceplate of the deck. Measure the angle off of the toe kick. *In the photo, the end of the step runs 45° back from the toe kick. Overlap these corner joints, rather than joining them on the miter for a stronger joint. Since the outside end piece has the least support, extend it over the toe kick, flush with the face of the toe kick for added strength.
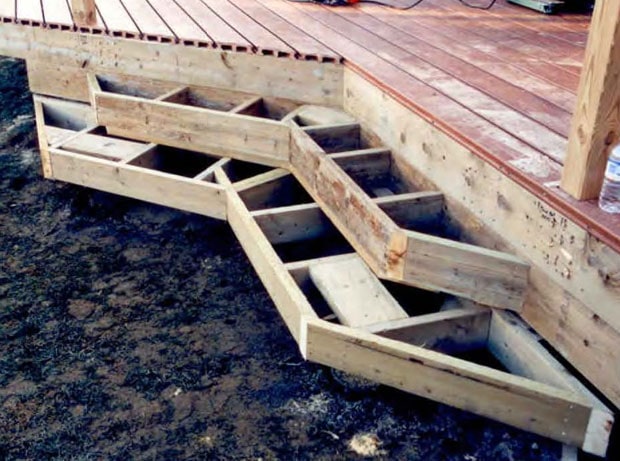
Measure using the bottom step as a template for your top step. Layout the top step so that the backset is even on all faces, unless the ends are to be longer or shorter. If your box steps are large you will need footings. Space them as you would for deck support and install the footings and posts before you begin frame construction for simplicity.
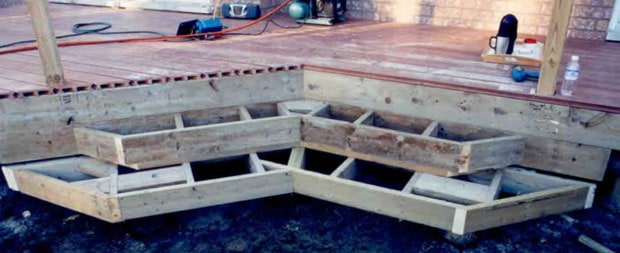
How to Install Deck Trim
How to Install Deck Trim DIY Deck PlansDeck trim serves one main purpose, aesthetics. Deck trim material is typically chosen to match the deck boards used to cover the top of the deck. Common choices are cedar and maintenance free composite decking.
Most deck trim is installed horizontally. Use a material that matches your decking for a neat appearance. When installing horizontal trim, there are a few things to keep in mind.
- Always mount trim so that it is flush, or barely below the level of the deck top or stair treads for safety. This prevents tripping and makes your trim last longer as trim that protrudes will get kicked and eventually pop loose.
- Use at least two fasteners, one high, one low, every 12 to 16 inches along the entire length of every piece of trim. A pin, or finishing nail gun works well for this. Use fasteners that are at least as long as a double thickness of your trim material, for best results.
- Cut all miters to fit tight. If you are unsure of the angle, or fit, cut the mitered end first, fit it and adjust as needed, before cutting the other end to length. Use mitered corners when the corner is an outside corner.
- Cut and fit inside corners overlapping, as the photos indicate. This is an easier to get a clean, neat joint. It is also stronger.
- Keep your trim parallel to the deck top for best appearance. Use a chalk line to mark the top of any trim board that is not flush with the top of the deck or another piece.
- Use the bottom edge of your deck trim as an installation guide for skirting. Mount the skirting so that it runs up to and touches the bottom edge of your trim board.
- To prevent splitting in dry wood trim, use a small drill bit to pilot drill pieces before nailing them in place.
It is best to make repairs to trim as soon as they appear. This keeps your trim in good condition and prevents further damage to the deck. Keep trim stained and sealed if it is wood, to prevent rot.
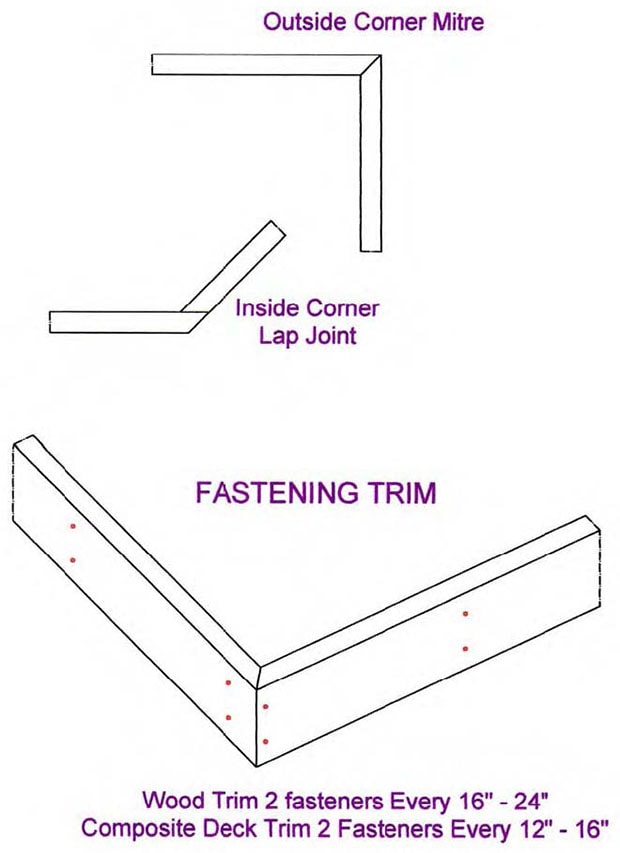
Benches
Benches DIY Deck PlansBenches: Wood Deck Bench Plan
Benches: Wood Deck Bench Plan DIY Deck PlansBenches can be either free standing on the deck, or the bench can be attached to, or built into, the deck. Free standing benches are furniture, and not considered part of the deck. Attached benches are part of the deck.
Under no circumstances can any type of bench, even built in benches with a back, be used as a guard on any deck higher than 24 inches above grade. Be familiar with local building codes in your area to ensure bench placement passes building code standards.
A standard bench for a deck is 18” tall. Two 4x4 support legs with 2x6 framing and trim is common construction. Benches are built two or three boards wide on a 2X6 frame. Blocking between the front and back framing member should be installed every 16” the same as the decking. Bench support legs can be placed every four to six feet.
Trim on the bench is installed the same as the horizontal deck trim. Be sure to install the fasteners in the trim as often as the fasteners in the decking when installing maintenance free trim. Every 16” is most common.
Below is a plan for a wood bench.
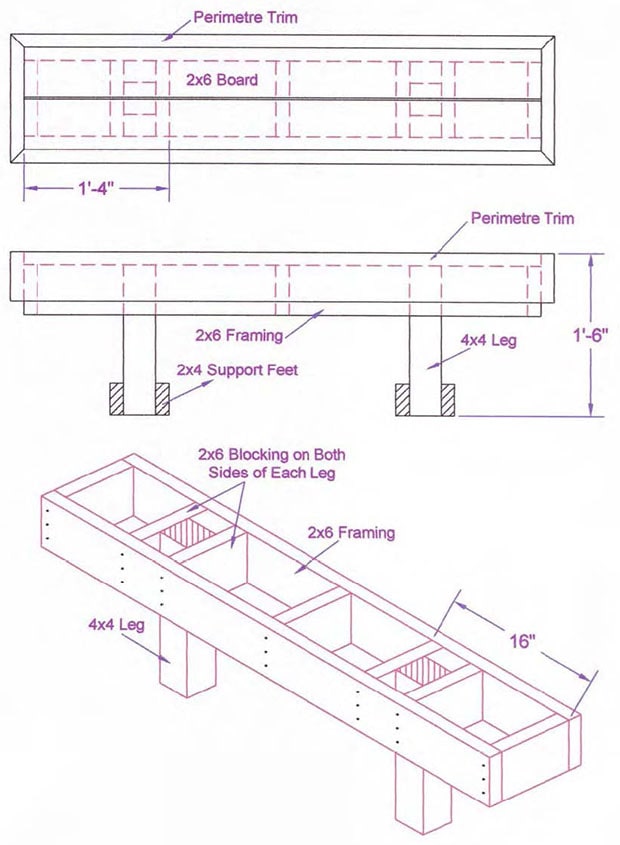
Here is the finished wooden bench for your deck.
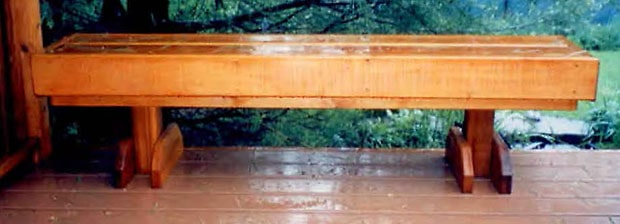
Benches: Composite Deck Bench Plan
Benches: Composite Deck Bench Plan DIY Deck PlansA standard bench for a deck is 18” tall built on two 4x4 support legs. For a full maintenance free bench, frame using pressure treated 2x4 material (instead of the 2x6 framing used for a wooden deck) and trim with maintenance free material.
Trim on the bench is installed the same as the horizontal deck trim. Be sure to install the fasteners in the trim as often as the fasteners in the decking when installing maintenance free trim. Every 16” is most common. The maintenance free trim will cover both the 2x4 frame and the bench seat edge.
Often maintenance free support legs can be made if the material being used has a matching railing system with 4x4 posts. Blocking between the front and back framing member should be installed every 16” the same as the decking. Bench support legs can be placed every four to six feet.
Below is a plan for a maintenance free deck bench.
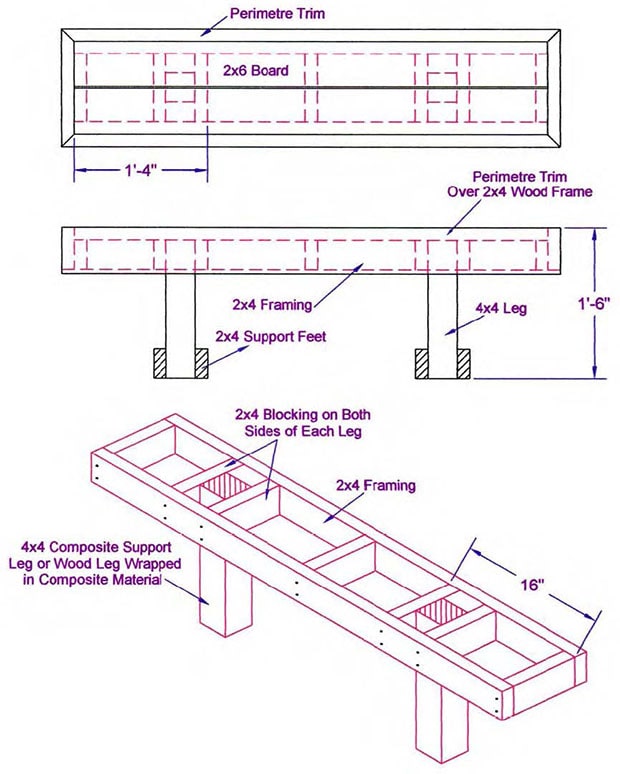
The maintenance free bench with composite trim attached.
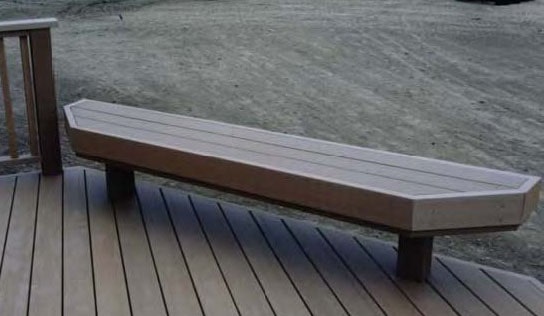
Benches: How to Build a Wrap-Around Bench
Benches: How to Build a Wrap-Around Bench DIY Deck PlansStandard bench height is finished 18" above the deck. Benches are built two or three boards wide on a 2X6 frame (2x4 for maintenance free bench). Blocking between the front and back framing member should be installed every 16" the same as the decking. Bench support legs can be placed every four to six feet apart.
Trim on the bench is installed the same as the horizontal deck trim. Be sure to install the fasteners in the trim as often as the fasteners in the decking when installing maintenance free trim. Every 16" is most common.
If installing outdoor lighting under the bench, split and dado the bench leg support post to run the outdoor lighting wire through.
Below is the substructure used when framing a wrap around bench.

A wrap-around bench under construction.
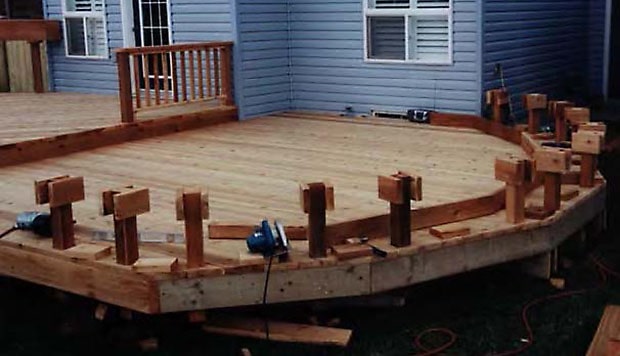
The completed wrap-around bench.
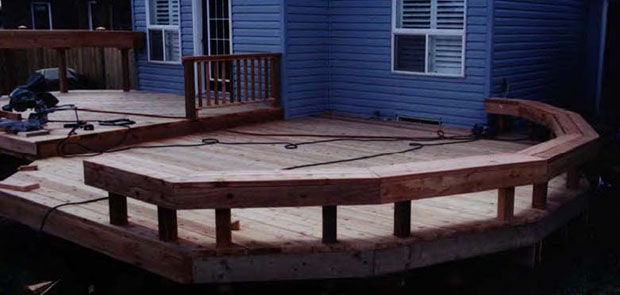
Planters and Planter Boxes
Planters and Planter Boxes DIY Deck PlansBuilt in planters or movable planter boxes are both constructed in similar ways. 2x3 framing material inside the planter box is commonly pressure treated. It is recommended to fasten outside planter boards on from inside the planter box when possible to hide any face fasteners.
Planters can be made out of cedar or maintenance free decking material and can be either free standing, or built into the deck. Almost all planter boxes have a false bottom. It's usually not necessary to have a planter box full depth so false bottoms are put in using ¾" or 1½" material. Set the height of the false bottom in relation to the depth of the planter. A 16" deep planter has a false bottom placed 8" to 10" deep. If lighting is being installed in the planter, be sure to pre-run the low voltage wire up through the false bottom during the framing stage.
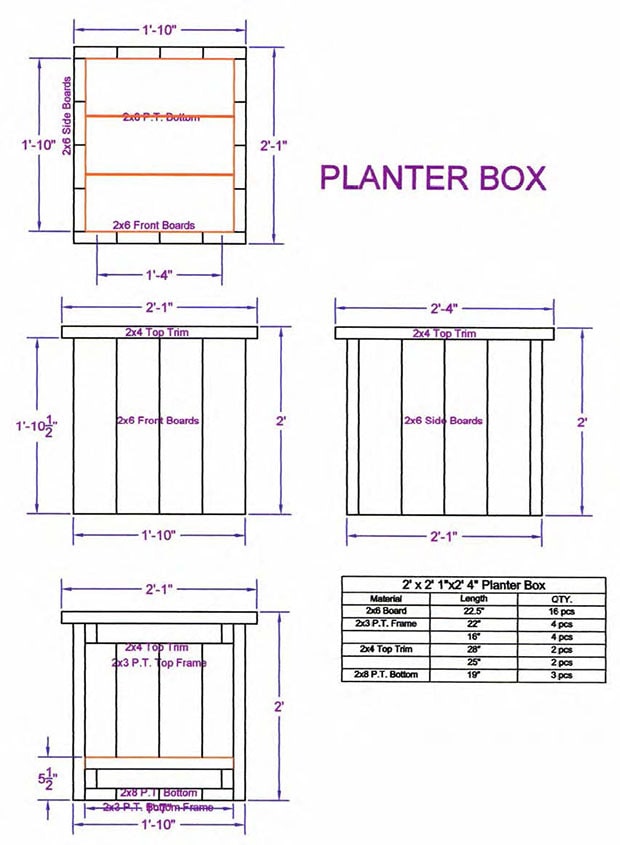
It is recommended that you put your plants in pots inside the planter and cover the base in mulch. This makes yearly planting and fall clean up simple. Avoid, when possible, putting planting soil directly into the planter as the soil will seep out between the board spacing and the boards will rot prematurely due to being damp and in contact with the dirt year round.
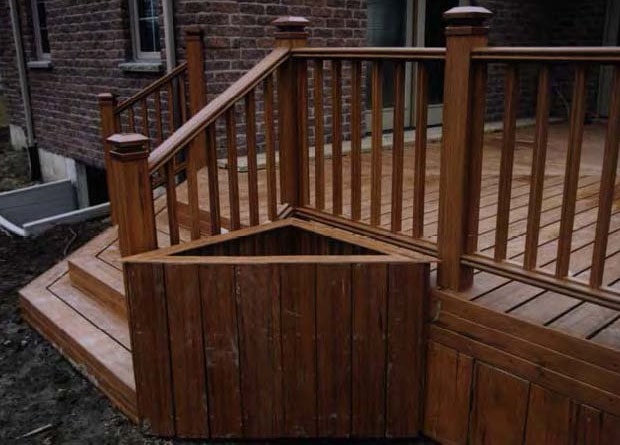
Privacy Screens
Privacy Screens DIY Deck PlansMany decks are elevated well above grade, exposing you to the view of your neighbours. While that may be fine in many cases, you may not want to be on display every time you use your deck. A privacy screen is essentially a decorative fence attached to your deck to provide privacy from your neighbours. Because a privacy screen may be replacing a railing on higher decks it must be constructed to the same standards as a railing to provide safety, as well as privacy. (Check local building codes for specific requirements when installing privacy screens also being used as guard rails)
Privacy screen posts are installed the same way as rail posts, with each of them set inside the outside joist and/or faceplate. Match the space from the bottom 2X4 framing member to the top of the deck surface the same space as the railing horizontal bottom space. Install the top 2X4 at the finished height of the privacy screens less the thickness of the finished top rail. Privacy screens are often trimmed in with routered 1X2 trim around the perimeter to give it a more finished, professional look.
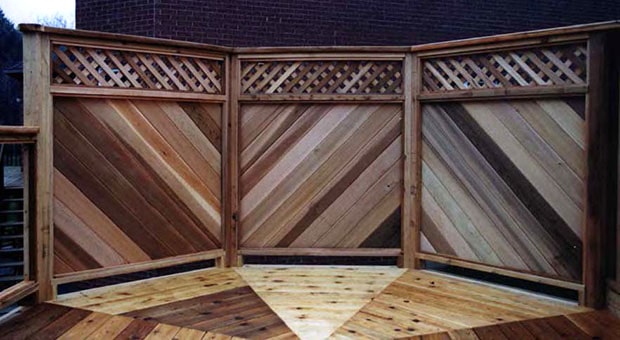
Privacy Screens: How to Build a Lattice Privacy Screen
Privacy Screens: How to Build a Lattice Privacy Screen DIY Deck PlansThis privacy screen is made with handmade square lattice with 1 1/2" spaces. It could also be made with lath or 1x2. Be sure the staples are facing the outside of the deck. If you use angled lattice it is installed in the same way. 1x2 is used to frame the lattice and can be routered in the outside edge to give a more finished professional look.
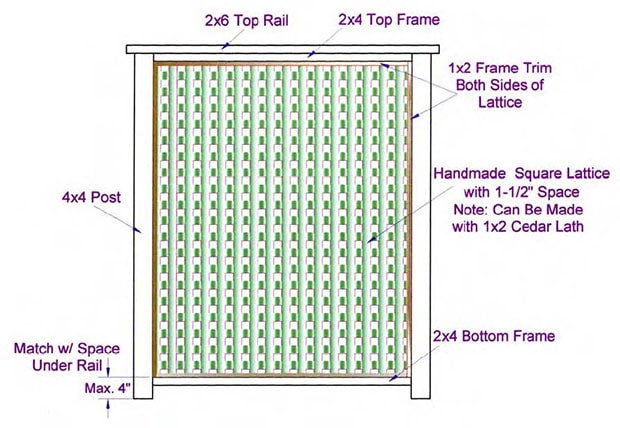
Materials List
| Posts | 2 | 4x4x6' |
| Top | 1 | 2x4x4' |
| Bottom | 1 | 2x4x4' |
| Trim | 4 4 |
1x2x4' (horizontal) 1x2x5' (vertical) |
| Lath | 20 15 |
4' Lath (horizontal) 5' Lath (vertical) |
| Top Rail | 1 | 5' |
Note: If building more than one section, recalculate the number of posts and the length of the top rail.
| Posts | 2 | 4x4x8' |
| Top | 1 | 2x4x4' |
| Bottom | 1 | 2x4x4' |
| Trim | 4 4 |
1x2x4' (horizontal) 1x2x6' (vertical) |
| Lath | 23 15 |
4' Lath (horizontal) 6' Lath (vertical) |
| Top Rail | 1 | 5' |
Note: For heavy lattice change lath strips to cedar 1x2"
Privacy Screens: How to Build a Tongue and Groove Privacy Screen
Privacy Screens: How to Build a Tongue and Groove Privacy Screen DIY Deck Plans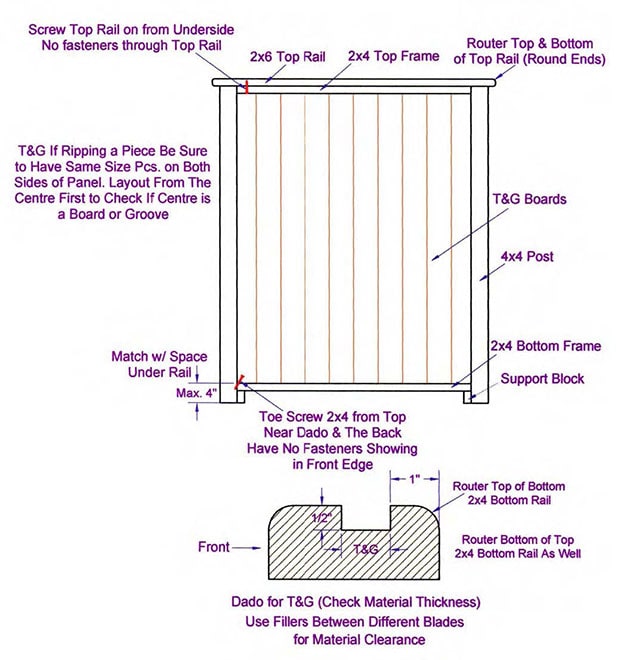
Material List
| Posts | 2 | 4x4x6' |
| Top | 1 | 2x4x4' (dado) |
| Bottom | 1 | 2x4x4' (dado) |
| Panel | 9 | 1x6x5' (T&G) |
| Trim | 4 | 1x2x5' (vertical) |
| Top Rail | 1 | 2x6x5' |
| Posts | 2 | 4x4x8' |
| Top | 1 | 2x4x4' (dado) |
| Bottom | 1 | 2x4x4' (dado) |
| Panel | 9 | 1x6x6' T&G |
| Trim | 4 | 1x2x6' (vertical) |
| Top Rail | 1 | 2x6x5' |
Note: If building more than one section recalculate the number of posts and length of the top rail.
Example: A 12’ length of privacy screen requires 4 posts and a 14’ Top rail.
Privacy Screens: How to Build a Tongue and Groove Privacy Screen with Top Lattice
Privacy Screens: How to Build a Tongue and Groove Privacy Screen with Top Lattice DIY Deck Plans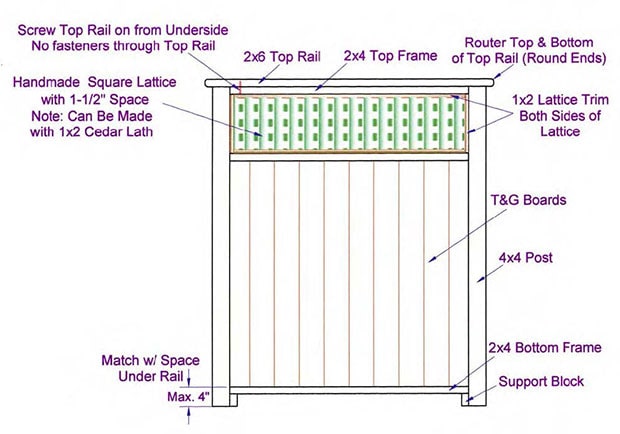
Material List
| Posts | 2 | 4x4x6' |
| Top | 1 | 2x6x5' |
| Horizontal Frames | 3 | 2x4x4' |
| Lath and Trim | 8 4 |
1x2x4' (horizontal) 1x2x6' (vertical) |
| Panel | 10 | 1x6x4' (T&G) |
| Posts | 2 | 4x4x8' |
| Top | 1 | 2x6x5' |
| Horizontal Frames | 3 | 2x4x4' |
| Lath and Trim | 8 4 |
1x2x4' (horizontal) 1x2x6' (vertical) |
| Panel | 10 | 1x6x5' (T&G) |
Note: If building more than one section recalculate the number of posts and length of the top rail.
Privacy Screens: How to Build a V - Pattern Tongue and Groove Privacy Screen
Privacy Screens: How to Build a V - Pattern Tongue and Groove Privacy Screen DIY Deck Plans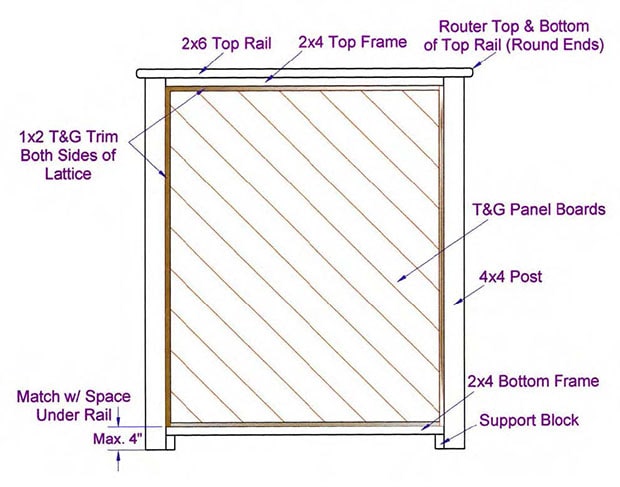
Material List
| Posts | 2 | 2x4x6' |
| Frame | 2 | 2x4x4' |
| Trim | 4 | 1x2x4' (horizontal) |
| 4 | 1x2x5' (vertical) | |
| Top Rail | 1 | 2x6x5' |
| Panel | 2 | 1x6x1' (T & G) |
| 2 | 1x6x2' (T & G) | |
| 2 | 1x6x3' (T & G) | |
| 2 | 1x6x4' (T & G) | |
| 2 | 1x6x5' (T & G) | |
| 2 | 1x6x6' (T & G) |
| Posts | 2 | 2x4x8' |
| Frame | 2 | 2x4x4' |
| Trim | 4 | 1x2x4' (horizontal) |
| 4 | 1x2x6' (vertical) | |
| Top Rail | 1 | 2x6x5' |
| Panel | 2 | 1x6x1' (T & G) |
| 2 | 1x6x2' (T & G) | |
| 2 | 1x6x3' (T & G) | |
| 2 | 1x6x4' (T & G) | |
| 2 | 1x6x5' (T & G) | |
| 2 | 1x6x6' (T & G) |
Note: If building more than one section recalculate the number of posts and length of the top rail.
Privacy Screens: How to Build a V-Pattern Tongue and Groove Privacy Screen with Top Lattice
Privacy Screens: How to Build a V-Pattern Tongue and Groove Privacy Screen with Top Lattice DIY Deck Plans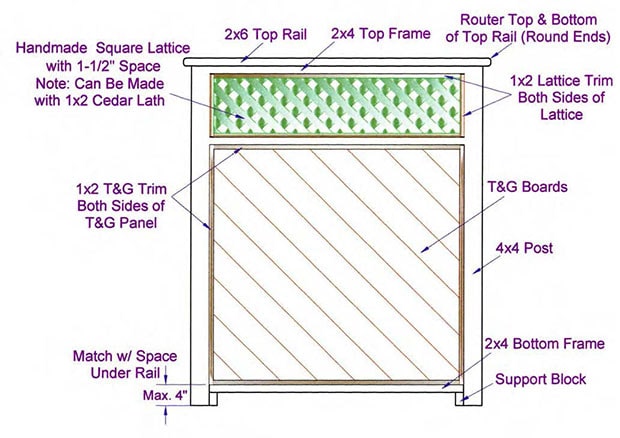
Material List
| Posts | 2 | 4x4x6' |
| Top | 1 | 2x6x5' |
| Horizontal Frames | 3 | 2x4x4' |
| Lath and Trim | 8 4 |
1x2x4' (horizontal) 1x2x6' (vertical) |
| Panel | 10 | 1x6x4' (T&G) |
| Posts | 2 | 4x4x8' |
| Top | 1 | 2x6x5' |
| Horizontal Frames | 3 | 2x4x4' |
| Lath and Trim | 8 4 |
1x2x4' (horizontal) 1x2x6' (vertical) |
| Panel | 10 | 1x6x5' (T&G) |
Note: If building more than one section recalculate the number of posts and length of the top rail.
Privacy Screens: How to Build a Frosted Glass Privacy Screen
Privacy Screens: How to Build a Frosted Glass Privacy Screen DIY Deck Plans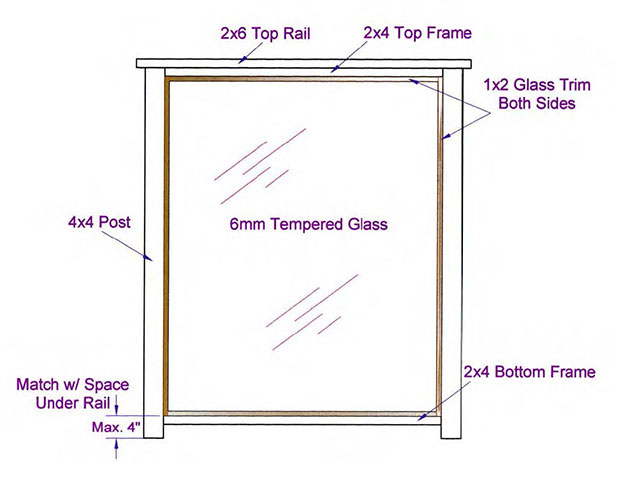
Material List
| Posts | 2 | 4x4x6' |
| Frame | 2 | 2x4x4' |
| Trim | 4 4 |
1x2x4' (horizontal) 1x2x5' (vertical) |
| Top Rail | 1 | 2x6x5' |
| 1/4" tempered glass panel to be ordered to fit. | ||
Note: If building more than one section recalculate the number of posts and length of the top rail.
Privacy Screens: How to Build a Fixed Louver Privacy Screen
Privacy Screens: How to Build a Fixed Louver Privacy Screen DIY Deck Plans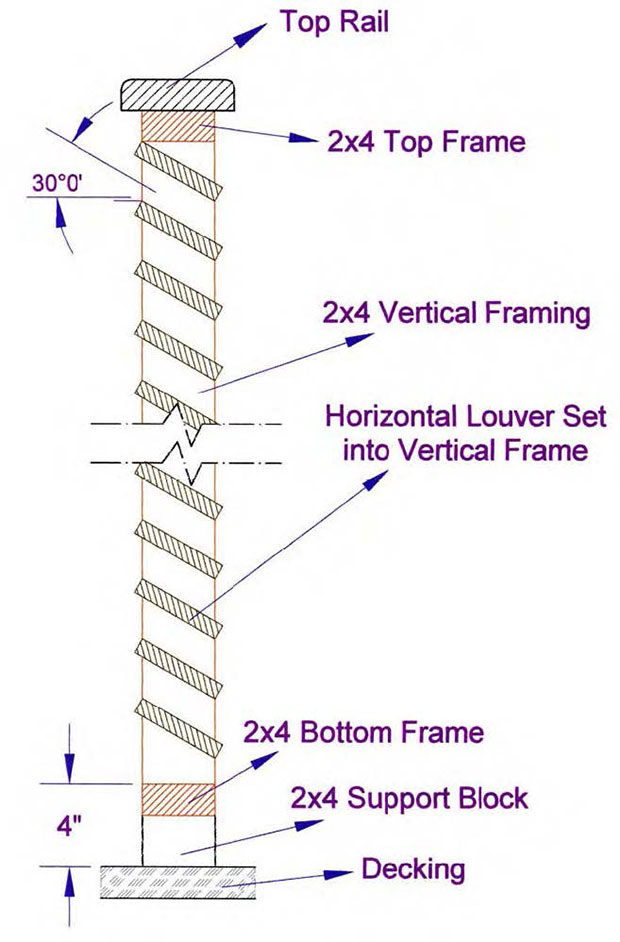
Horizontal louvers are a fixed piece that is set between a cut out or routered out vertical frame. Louvers are mainly made out of cedar but can also be made out of some maintenance free products.
How to Install Low Voltage Outdoor Deck Lighting
How to Install Low Voltage Outdoor Deck Lighting DIY Deck PlansOutdoor lighting, generally, is low voltage. Post lights and step lights are the most common. Lights are run in a continuous series through low voltage outdoor lighting wire from a transformer.
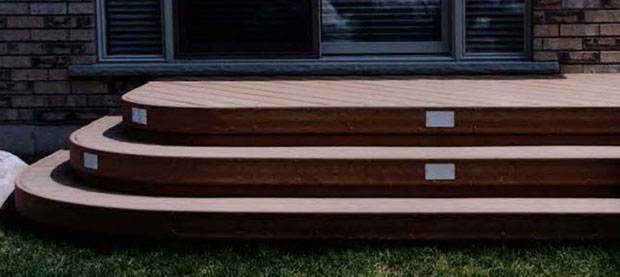
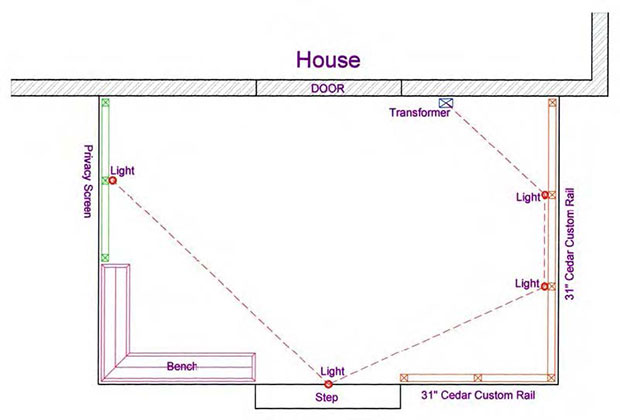
The wire starts at the timer/transformer, through each light and ends at the last light. Each bulb on average is 12 watts. Multiply the number of lights by each 12 watt bulb to calculate the transformer size. Example: 10 lights X 12 watts = 120 watt transformer. Check bulb watt size on larger planter lights, these bulbs are often larger. If a large number of lights are being installed, split the wire and branch it off the timer/transformer in two runs. Those two separate runs will allow the lights through the system to glow consistently.
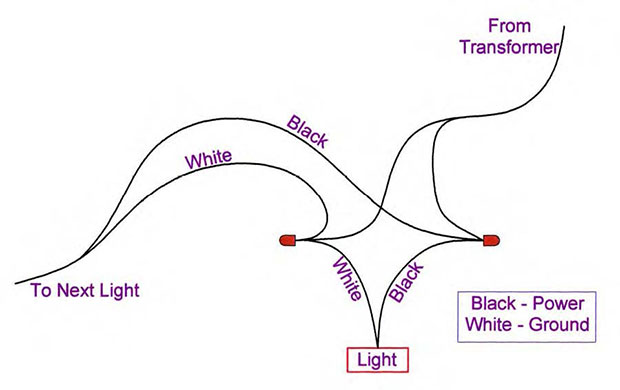
Outdoor lighting is built in during construction. Step lights, post lights and planter lights are available router lens cover in flush with all decking materials.
Ensure that all wiring is all concealed for an overall built in look.
Step light openings are cut and routered into the trim before the trim is installed.
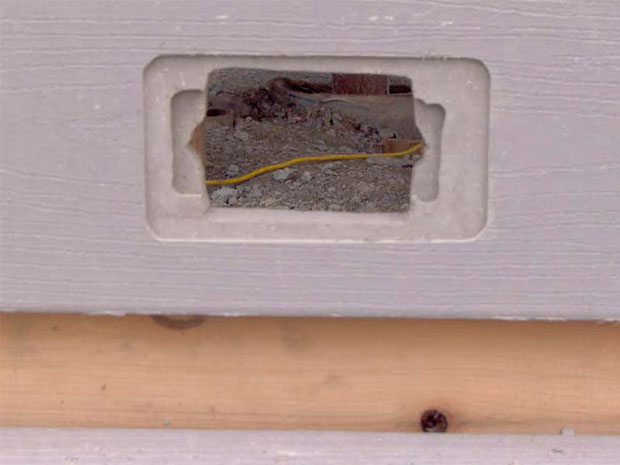
The lighting wire is run in a loop and fished outside of each step light opening.
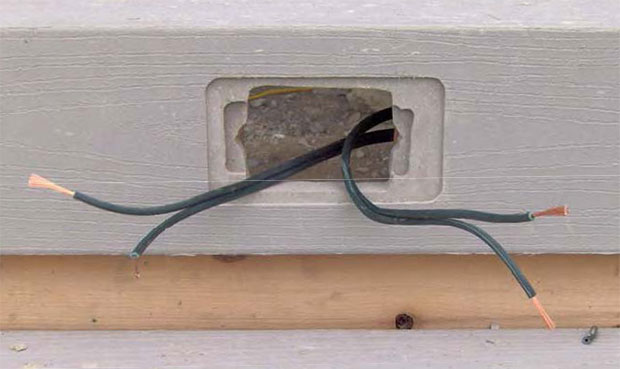
The fiberglass step light box is connected with man connectors.
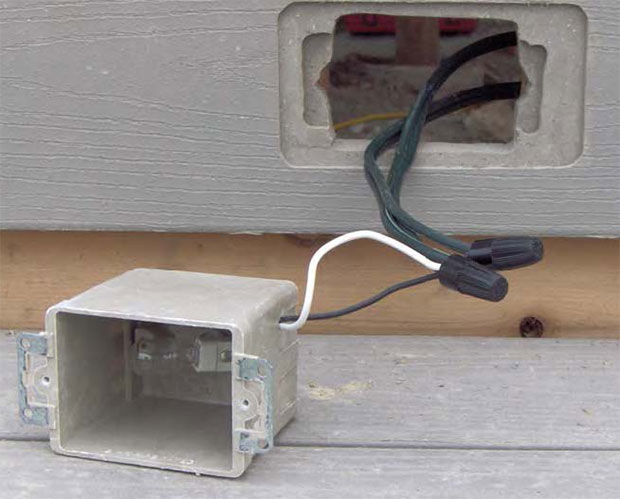
Secure the step light into the opening using four pan head screws and install the bulb.
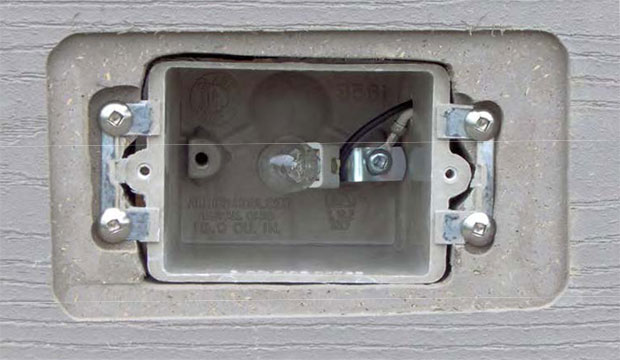
Secure the lens cover into place. Be sure the back side of the lens cover is clean before installing.
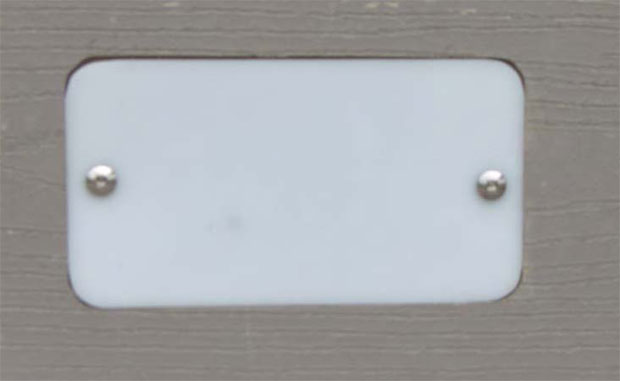
Secure the wiring in place using electrical staples. Keep the wire connection facing up.
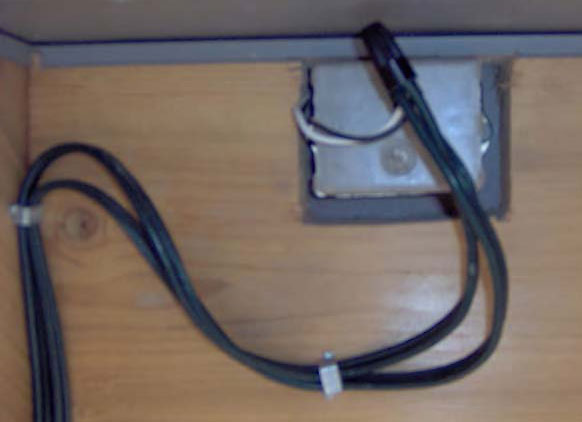
On riser stairs secure all wires neatly. Below is the final exposed look from the underside of the deck.
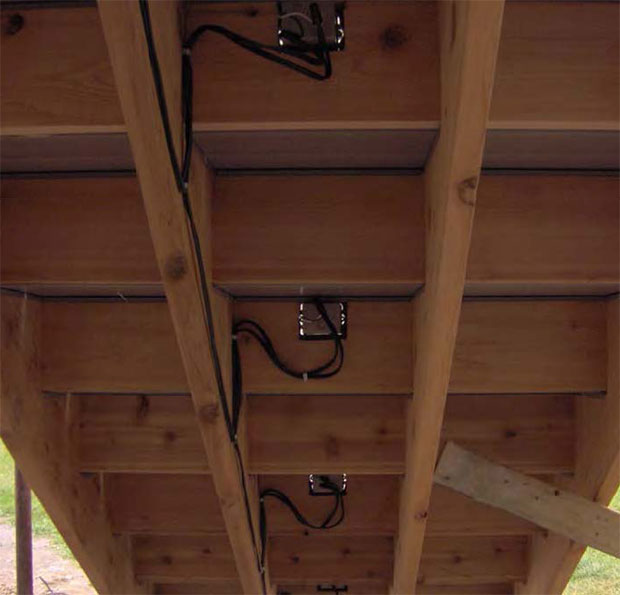
How to Frame an Arch or Curve on Your Deck
How to Frame an Arch or Curve on Your Deck DIY Deck Plans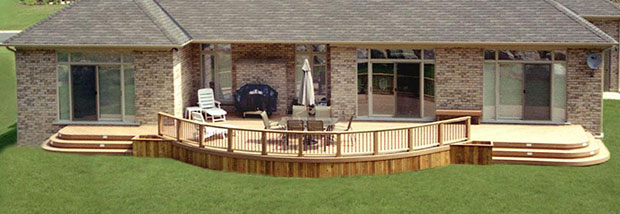
Curves along the edge of your deck, and steps, add a unique visual element to your deck that set it apart from simpler designs. You can find some deck plans with curves in our online store. Curves require some extra work, and more experience to build. We'll show you how below.
To frame an arch, or curve along the edge of your deck, your joists need to be long enough to cover the range of the curve. The curve itself can be laid out using a string, or light piece of lumber as a compass.
Marking Your Curve
Using a String
- To use a string to mark the curve on your joist ends first measure the width of the curve you intend to create, from one end to the other.
- At the edge of the deck, where your curve will be, mark the center of the curve’s width. From this center mark, measure back half the width of the curved area onto the center joist, perpendicular to the edge to be curved. For example, for a 36 inch curve, from the middle of the edge to be curved, measure back, perpendicular to that edge, 18 inches.
- Drive a screw in at this point so that about one inch of it remains standing out above the surface of the joist to tie a string onto.
- Tie a string to this screw long enough to reach the edge of your proposed curve. From the edge of the proposed curve, measure back 1 ½ inches to account for the face plate. Tie a pencil, or other marking instrument to the string, so that, when your marker stands upright with the string tight from the screw, the point of your marker hits 1 ½ inches back from edge point of your proposed curve. (in our hypothetical 36 inch curve, this will be 16 ½ inches)
- Keeping the string taut, move around the curve, marking each joist on its top edge at the angle of the curve, until all joists are marked in line with your proposed curve.
- From the top mark you just made, use a speed square, or other square to mark each joist on each face, in line with the end of the line you just marked. This will indicate the angle of the cut for each joist. Use a reciprocating saw to cut the joists off following these lines.
Using a Board
For this method follow the basic instructions for the string method, substituting a strip of lumber in place of the string.
- Select a straight piece of lumber for your “compass board”, ½ to ¾ inches thick and about 1 ½ inches wide and at least half as long as your curved area is wide. (for our hypothetical 36 inch curve, the board need to be more than 18 inches long)
- Measure your curved area as described in the string method and mark the center spot at the edge of your proposed curve.
- Measure back from the edge half the width of your curve along the middle joist and make a mark.
- Drive a screw through your compass board at one end, so that it fastens the board at the marked spot and the free end extends out past the edge of your desired curve. Leave the screw loose enough that the board can rotate around it easily, like the hand of a clock.
- Measure from the head of the screw along your compass board and make a mark, 1 ½ inches back from the edge of your proposed curve. (on our 36 inch curve, this would be 16 ½ inches)
- Drill a hole through your board at the mark you just made, slightly larger than the diameter of your writing utensil so that the marker fits easily through the hole without too much wiggle room.
- Fit the writing utensil through the hole and rotate the board along the arc of your curve, pivoting from the screw. Mark each joist where your “compass” passes over it. Mark the faces of the joist as described in the string method and cut them.
Cutting Your Joists
Cut the joists off following the marks you just made. Use a handsaw, or reciprocating saw with a coarse blade. Start your cut lined up with the top edge mark and use the marks on the faces of the joist to keep your blade aligned to the correct angle as you cut down through the joist.
Blocking
Install Blocking between the joist ends along curves to prevent joist spacing from shifting. Cut your blocking pieces from joist materials and miter the ends so that each piece fits as close to the ends of the joists as possible. Nail, or screw blocking in place by toe-nailing your fasteners through the mitered ends into your joists.
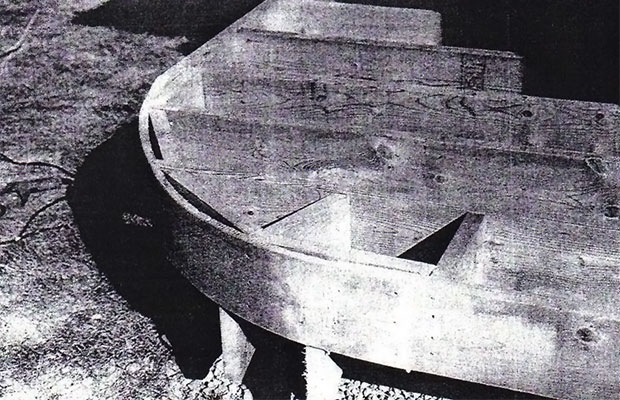
Installing the Face-plate
Standard two by lumber does not bend well. If your curve is more than slight, you will need to work with something thinner. Standard framing lumber, ripped to ¾ inches thick on a band saw will work for average curves. You will need two layers to provide a ridged edge.
For tighter curves, slice your framing material thinner and build it up. Three layers of ½ inch thick material works well. With multiple layers, apply wood glue between layers and use clamps along the face to laminate the pieces together.
Small vertical cuts, known as “kerfs” can also be made in the back face of ¾ inch material with a circular saw set to 3/8 inch depth, to make the piece more flexible. Cuts are typically spaced ¾ inches apart.
Attach your face-plate pieces with screws through the face-plate at each joist end with screws. Use at least three screws in each joist, top middle and bottom. Do this with each layer, positioning screws in top layers so that they do not hit screws already installed. Use a countersink bit, so that screw heads will run in flush with the face-plate surface.
Face-plate Splices

Where joints are required in curved face-plates, use a reciprocating saw to cut miters at greater than 45° at the ends where the two pieces meet. The angles should be the same on both pieces. This creates a thin wedge at the end of both pieces, for a longer overlap. Glue and nail the overlap, then sand the joint smooth once the glue is set.
Skirt Supports
If the curved edge of your deck is a step, or matches up to one, a skirt is needed underneath the edge of the deck face-plate. The skirt should be set back so that the face-plate stands out at least ¾ inch in front of the skirt. To do this, attach skirt supports to each joist end, so that they extend below the bottom edge of the joist the same height as the thickness of the joists, or 7 ½ inches for 2x8 joists.
Install the skirt using the same material and technique as the face-plate.
Cedar or Composite Decks
Remember to use cedar for the top layer of curved face-plates on cedar decks for appearance. On composite decks, a layer of composite material should be installed on top of your curved face-plate. Since composite material is not strong enough to serve as structural support, a full 1 ½ inches of face-plate must be installed before adding the composite.
Framing Curved Stairs
Cut stair stringers from 2 x 12 PT lumber for every 16” of straight face-plate and one every 8 to 12” on the curves. Stringers on curves will need to be set on an angle to the main frame, so that the stringer is as close to perpendicular with the face-plate as possible.
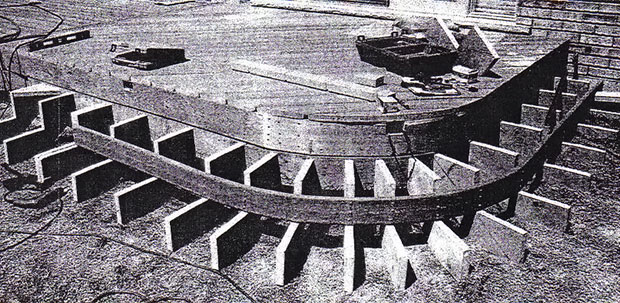
Block between joist ends as described for deck edge curves.
Install the face-plate as described for deck edges. Leave room for cedar, or composite if called for. Mark spaces and cut for deck lights, if called for.
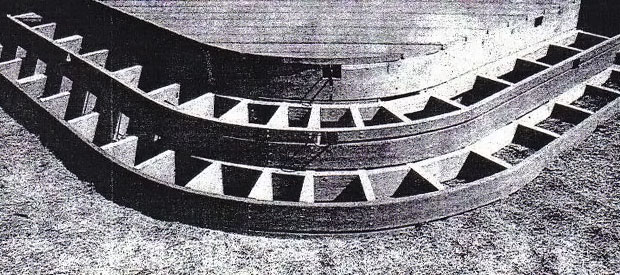
Pro Tip
Composite decking companies, including Trex, often make color matched edge cladding that can be bent to fit curves. Use this if possible, rather than cutting composite material thinner to fit tight curves.
Install the front trim board, flush with the deck top, over your face-plate, using the same techniques.
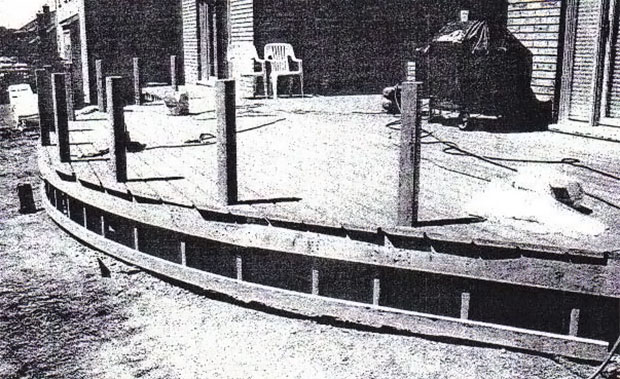
Decking boards cannot be bent to follow curves in the edge of the frame. Lay your deck boards to overlap face-plates and mark the curve as previously described, by running a pencil along the bottom face, against the face plate. Remove the marked boards, cut to fit and reinstall. Use a jig saw or band saw for cutting the curves.
Have a look in the shop for some deck plans with curves.
How to Frame a Deck for a Hot Tub or Spa
How to Frame a Deck for a Hot Tub or Spa DIY Deck PlansDo you have a hot tub? Whether you have a hot tub on a concrete pad, or are looking to build a deck to support your spa, we have deck plans for a deck with a spa.
Decks to Support a Hot Tub
Hot tubs and spas require more support per square foot than an empty deck, or one with only benches and other furniture. This is known as the “live load” and is measured as pounds per square inch. You will need to check your local building codes to determine what type of footing your hot tub requires.
Low and Grade Level Decks
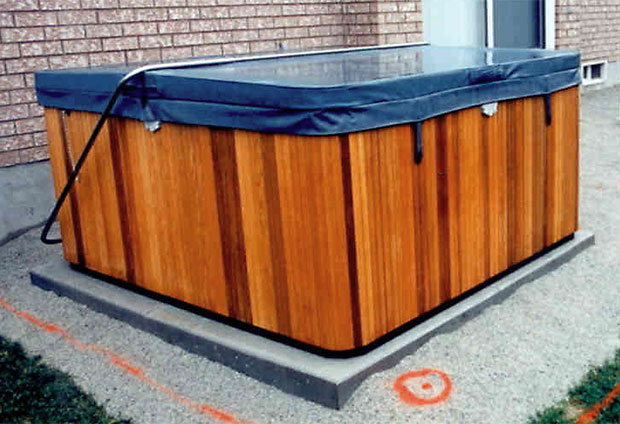
On short decks, the hot tub is not typically installed on top of the deck. Instead, a concrete pad, poured according to local building code, is installed to provide a footing for the hot tub and the deck is then built around it. Framing members should be left 1 inch away from all hot tub surfaces, on all sides, to allow room for removal of the hot tub if required. Decking can easily support the short cantilever required to fill the area close to the hot tub.
When deciding how tall your deck will be, keep in mind the transition from deck to hot tub and plan to accommodate easy access. A 16 to 18” rise from the deck surface to the top edge of the hot tub is common. Take any exterior motor housings and steps on the hot tub itself into account. It is best to work with dimensions taken directly from a hot tub set up in the same configuration and with similar equipment to the one you are installing.
Other Considerations
It’s a good idea to have your pad poured so that there will be at least a 6" lip of concrete on all sides of the tub. This allows for repositioning, or support of motors and other necessities.
If the hot tub cover has a manual, or automatic arm to install and remove it, get specifics on clearances and all dimensions of the arm and its operation. Clearances from the cover to the bottom of the tub and the rise from deck to tub edge will be important as well. You may need to check these dimensions with the hot tub on site.
Familiarize yourself with the motor mount and dimensions, including height and required maintenance access areas. Customized framing for lift out access panels will likely be required to accommodate these elements. This can be done on site, with the hot tub in place.
Installing Decking
Install decking up to ¼” from hot tub to leave room for expansion, contraction and slight shifting of both the deck and the hot tub.
Tall Decks and Hot Tubs
If the deck level is higher than the top of the hot tub, or the deck is built on uneven ground, the hot tub is placed on top of the deck. The area under the hot tub should be framed as a separate system, with its own footings. Check with local building code to determine spacing requirements for posts. Adjust the height of the hot tub deck framing to match with surrounding deck height, making allowances for 2x6 under decking and other differences.
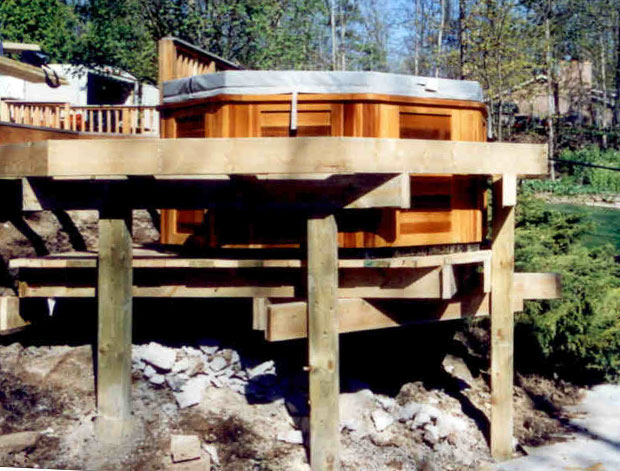
Standard 4x4 posts can be used for supports, and 2x8 joists will support the weight of most typical hot tubs. Check local building codes for footing requirements. Twelve inch on center spacing between joists underneath the hot tub will help provide extra support and 2x6 decking is preferred. If composite decking is being installed on the rest of the deck, install the 2x6 deck underneath and cover it with composite up to the hot tub for the right look, without sacrificing structural integrity.
Framing Lift Out Hatches
Lift out hatches can be framed into the deck to provide access to elements underneath the deck. This is useful for water faucets and other features that might be underneath the deck, as well as hot tubs and swimming pool equipment. Once decking is installed on both the deck and the hatch, the top of the hatch is flush with the deck making it almost invisible.
To frame a lift out hatch, mark it’s location on the deck’s joists. If the hatch is to be wider than 14 ½ inches, or whatever the spacing of your joists will be in that area, a section of one or more joists will need to be removed.
Mark the four corners of the hatch required and add 1 ½ inches on ends where joists will be cut away. Use a chalk line to mark the joists between these four corners and cut joists away where they cross the area for the hatch. Install perpendicular blocking between the nearest uncut joists to hold up the ends of these cut joists.
Make the blocking from joist material and install it flush with the ends of the cut joists to create the ends of your hatch opening. Support the blocking ends with joist hangers and fasten the cut joists to the blocking, with their top edges level so that all joists and blocking are level with the deck frame.
Inside Framing
Cut and install a rectangular ring of 2x4 PT lumber inside the rectangle you formed with the blocking. Fasten this ring 3 ½ inches down from the top of the deck frame. This will be the support system for your hatch frame.
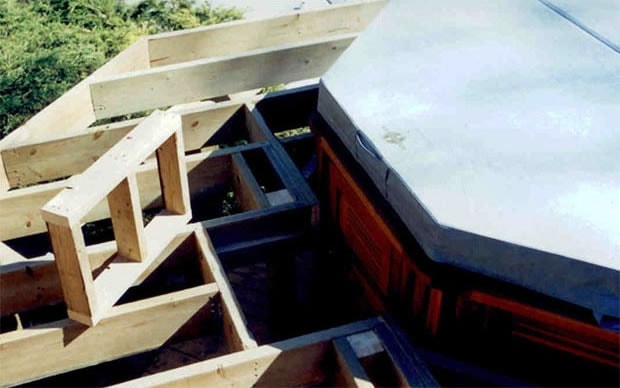
Build a second ring ½ narrower and shorter than the first. This ring sets on top of the first so that there is a ¼ inch space on all sides. This is the frame of the hatch. Install decking up to the hatch frame on all sides. Cut deck boards to cover the hatch frame, so that there is a 1/8 gap between the hatch and the main deck on all sides. Attach the pieces to the hatch frame. Drill a 1½ inch finger hole through the deck boards at each end of the hatch for lifting.
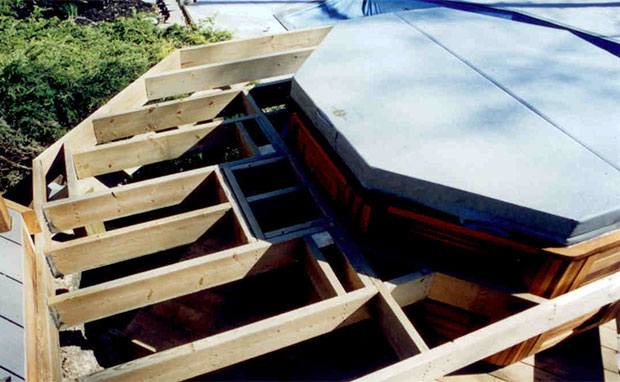
Framing Around an Octagonal Hot Tub
When working around an octagonal hot tub, the frame is built up to the hot tub, leaving a square opening with 1 inch clearance from the hot tub on four sides. Install angled blocking one inch away from the remaining sides of the hot tub made from joist material. This allows room for the hot tub to be removed if needed while supporting the decking.
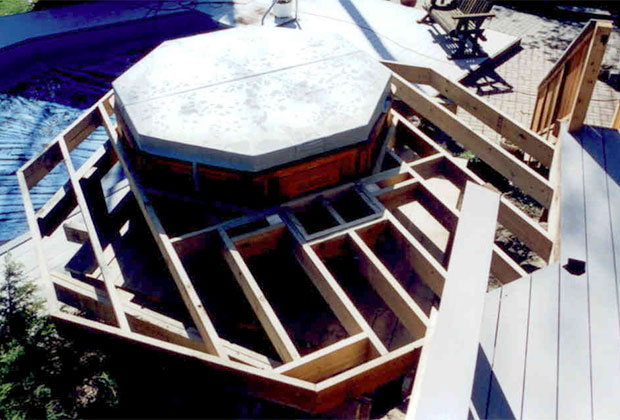
Have a look at some of our deck plans for decks with hot tubs and spas.
How to Frame a Deck Around a Pool
How to Frame a Deck Around a Pool DIY Deck PlansFraming around pools is very similar to framing around hot tubs that are set on concrete pads. Before finalizing deck plans, consult pool manufacturer’s specifications for decking. You will need to allow for specific clearances and access to any necessary equipment, etc. Set up the pool frame before constructing deck if possible.
Have a look at some deck plans for decks around pools.
Mark all underground water and electric lines and flag all lines, even if above ground, before digging footings for visibility. Reposition footings if required. Install additional footings if needed to maintain the minimum spacing between posts. If possible, add, or adjust posts in such a way that the spacing of the remaining posts remains even.
Matching Pool and Deck Height
If your deck and pool top are to be the same height, set posts and leave them slightly long. Install the pool frame and level it. Work from this level to cut posts and set the deck frame height. A laser level is a good idea in this case, since the level will need to remain even over an extended area. Remember to allow for any top trim on the pool and the thickness of your decking, as well as any requirement for space to allow for installation of a winter cover.
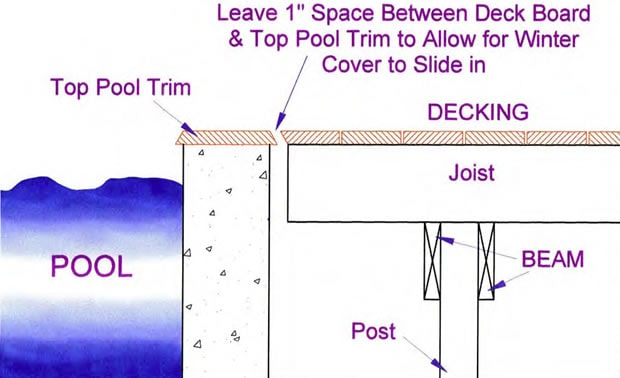
If the pool is to be higher than the deck, determine how much and if any steps will be required, make them wide enough to enter and exit the pool safely before stepping down to deck height. Setting the pool lower than the deck is not recommended for safety reasons. Decks tend to shed debris as well, which would make the pool harder to maintain.
Framing on Uneven Ground
Post heights may vary considerably if matching a pool that is set next to a slope, or an area of uneven ground. Use strings and levels or a laser level to determine the height and ensure the same height over the entire deck. If the deck must step down to the pool, place the level break as far back as possible from the pool edge.
Ledger Boards Against the Pool Frame
In some cases, you may want the deck to attach to the pool frame. In these cases, a ledger board can be installed around the perimeter of the pool, level with the pools edge. Check with manufacturer before pursuing this route to ensure that your pool can bear the added weight.
Before installing the ledger board, install a deck board along the pool’s top edge to help stiffen it and give you something to match the height of the ledger board to. Self-tapping screws can be used to mount the deck board to the top metal edge.
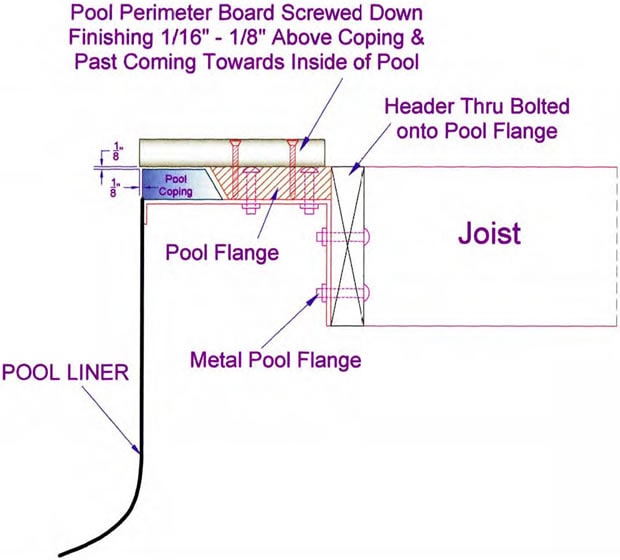
Drill through your ledger and the metal pool flange as described in the section on ledger boards. Do this at least every 24 inches in the pools edge, and one at the top of each post in the pool’s frame.
Fit bolts through every hole from inside the pool frame, so that the bolt end protrudes through the ledger board. Fit washers and nuts onto the bolts from the outside and tighten them snugly with a socket wrench.
Miter the corners where the ledger meets at any corner of the pool. Fasten the ledger corners to each other with screws. Install joist hangers every 16 inches along the ledger board and install your joists as described in the section on ledger boards.
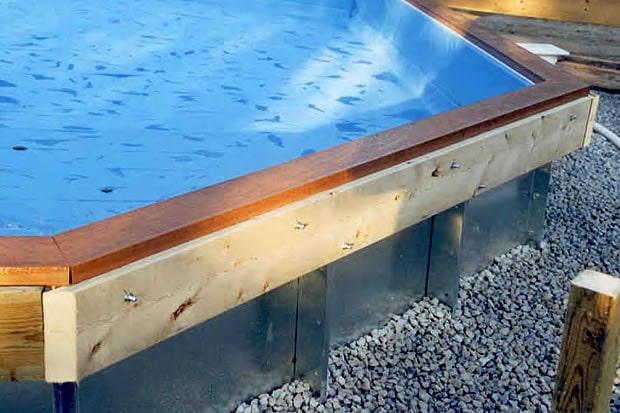
Have a look at some deck plans for decks around pools.
Custom Walkways and Bridges
Custom Walkways and Bridges DIY Deck PlansWhen connecting separate deck sections on raised decks, or connecting decks to concrete sidewalks, or other outdoor living areas, walkways and bridges can be used in place of stairs. You will need to check local building codes to determine maximum slope, width, railing requirements and framing and footing standards.
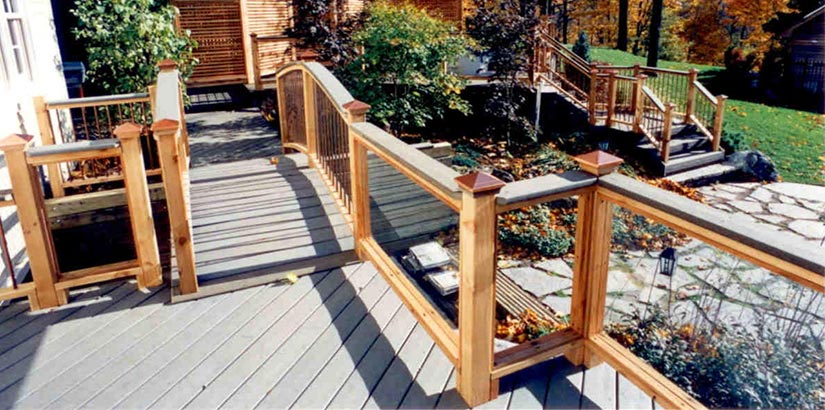
Construction techniques are typically similar to deck framing. Use strings and levels to lay out your walk, ensure that joists are installed at least every 16 inches, and use blocking where needed to make sure your walkway is structurally sound. If the walk is more than 8 feet long, you will need additional footings.
Overlap at the end of any walkway should be at least 1 ½ inches over solid framing, or supported by a ledger attached to the deck joist under the attachment point. Bolt the walkway and deck frames together to ensure structural integrity.
Arched Bridges
Arches for bridges can be laid out using the techniques described for curved edges. Use larger 2x12 lumber to make your side beams out of, and ensure that all supports are at least 7 ½ inches tall at every point.
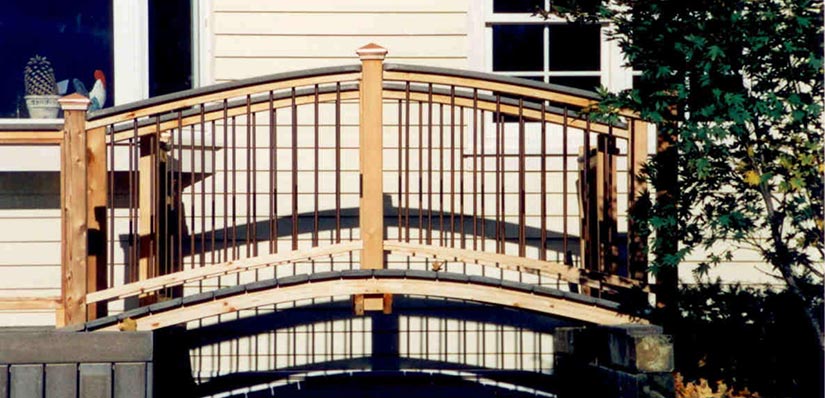
Gazebos
Gazebos DIY Deck PlansGazebos: How to Build a Gazebo Foundation
Gazebos: How to Build a Gazebo Foundation DIY Deck PlansGazebos are a fairly traditional garden structure used for outdoor entertaining. They are defined by their solid roof and open sides, are typically free standing and can have from four to eight sides. Our gazebo plans feature a traditional octagon pattern. Gazebo construction is more complex than most deck building, due to the angled framing and eight sided structure.
There are two basic foundation styles available in our gazebo plans. The first features a “pie shaped” floor pattern with eight, equally sized triangles. The other is a much simpler framing scheme with standard 16” oc joists for straight decking. The “pie” plan is favored for aesthetics, while the standard framing is favored for simplicity.
The dimensions of each piece will vary based on the plan you selected and will be included in the cut list with your plan. The construction techniques are similar, regardless of gazebo size.
Eight Equal Triangles Framing
The frame is supported on 4x4 posts set in standard footings as described in the post setting section of this deck building guide. The center of the frame is a double joist “beam” running directly down the middle. On either side of this, two, concentric, half-octagon frames provide the joist structure that your decking will be applied to.
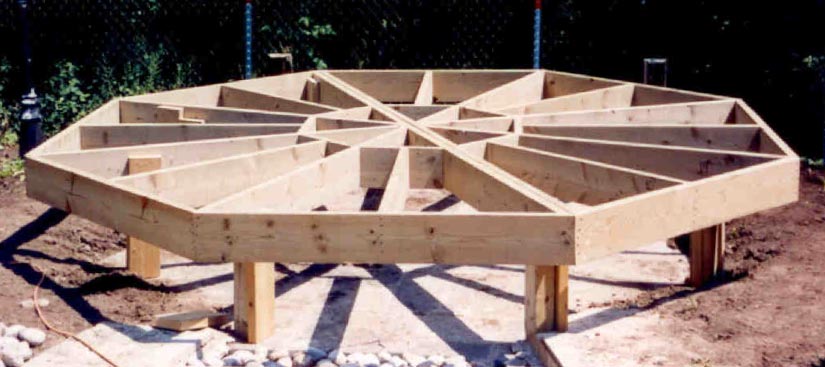
Since there are eight sides, all angles are set at 22 ½ °, versus the 45° standard angle for square cornered structures. Any structure that has a constant perimeter will have corner angles that add up to 360°. With a four cornered structure that means four 90° corners, each made up of two 45° angles. With an octagon it is eight 45° corners made up of two 22 ½ ° angles each.
Post Footing Layout
The simplest way to layout an octagon pattern is with two overlaid rectangles following the dimensions from your plan for spacing. The two rectangles should set at 90° to each other, to create a “cross” shape so that the center of both rectangles are in exactly the same position. The distance between the left corner of one rectangle to the right corner of the other, should be exactly the same as width of the rectangle.

Use your plan to determine where the joists will fall inside this outline and layout your posts accordingly. Determine which posts need to be notched to support the frame and make your cuts.
Octagon Frame Construction
The frame is built in two identical half-octagon sides. Half of the central beam serves as the base of each frame, with three spokes running off of this beam to create four triangle sections. The outer frame, or rim joist, is cut in four equal length pieces with ends mitered at 22 ½ ° to create 45°corners at the end of each spoke and the ends of the beam.
Blocking with mitered ends is installed between these spokes to create the center half-octagon for each side. A short spoke is cut to fit inside each of piece of blocking running to the center. All joints need to be securely toe nailed so that each half-octagon is sturdy.
Assembling the Frame
Join the two half-octagons by aligning the two center beam pieces in the center, with each end supported on top of a post. Attach the remaining “spoke” joists to their corresponding posts with lag bolts to hold the foundation in place.
Framing for Straight Decking
The frame for a straight deck uses a perimeter double beam, as outlined in the deck building guide on framing. Two concentric octagons are formed around the posts, with one attached to the inside face of the posts, and the other on the outside.
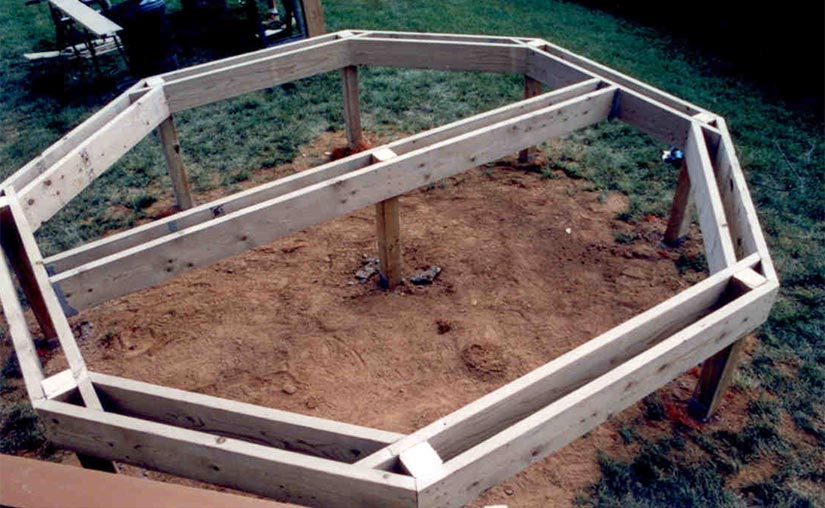
Assemble the outside octagon first. The pieces are all equal length and cut at 22 ½° on both ends. Fasten to the posts first, then attach at the corners by toe nailing through the mitered ends. The inside octagon has two different length pieces, four long, four short. The ends are cut at 45°. Install the long pieces first. Bolt them to the posts, then toe nail the ends to the outside octagon pieces.
Fit the shorter pieces in place with their ends resting on the longer pieces at either end and toenail them in place. Use fasteners long enough to go through both octagon pieces and into the post at each end of each of the four shorter pieces.
Top Frame
The top frame is larger. Begin construction by cutting all eight outside frame pieces to length. Miter each end of each piece at 22 ½°. Start by attaching two of the outside frame pieces together, by nailing joists between them. Space the joists at 16”oc. Fasten the remaining outside frame pieces together and measure and cut each joist to fit along the angled sections. Nail them in place.
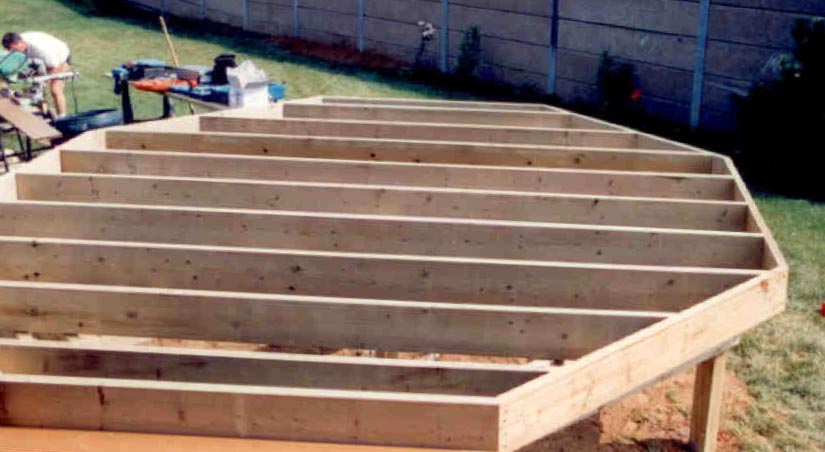
Mount the top frame on top of the beam foundation you constructed and toe nail it in place, or fasten the upper frame to the foundation with hurricane ties.
Installing Floor Decking
Eight Section Floor Frame
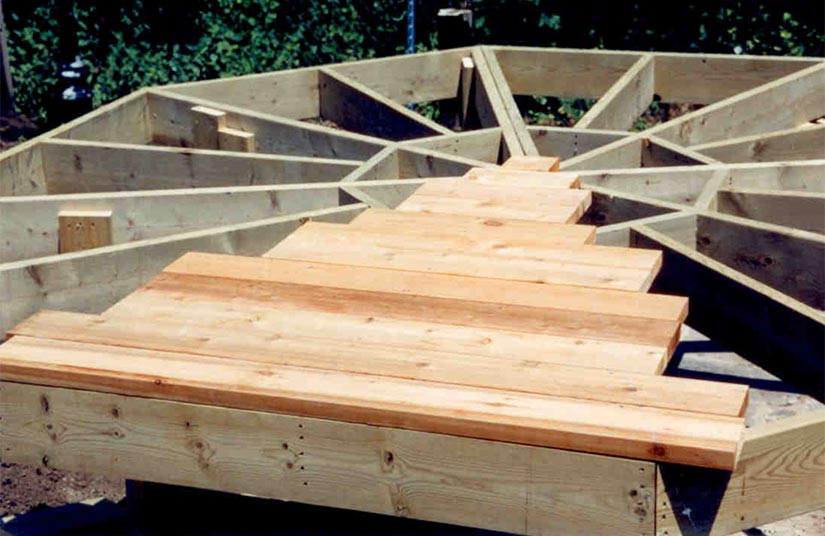
Lay decking section, by section. Position each row of boards parallel to the outside edge, starting from the edge. Cut each piece to overlap the diagonal line separating the triangle sections on each end. Fasten the boards in place. Mark the diagonal ends even with the diagonal “spokes” underneath, using a chalk line and set a circular to a depth that is just barely more than the thickness of the deck boards and cut the boards off on the chalk line.
Cut one end of the boards for the next section to match up to the ends of the first. This will be 22 ½ ° if your cut is straight. Adjust if needed. Cut the other end so that it extends over the diagonal line at the other end of the second section. Fasten the boards in place and mark and cut them as you did for the first section.
Continue like this until seven sections of the octagon have decking. Measure and cut each piece to fit snugly for the last section and fasten it in place.
Straight Decking Floor Frame
Install deck boards as you would for standard deck construction. Start along one edge, perpendicular to the joists. Cut the boards so that they overhang the edges of the frame at either end and fasten them in place. Install all of the deck boards in this manner. Mark and cut the edges with a chalk line to match the frame.
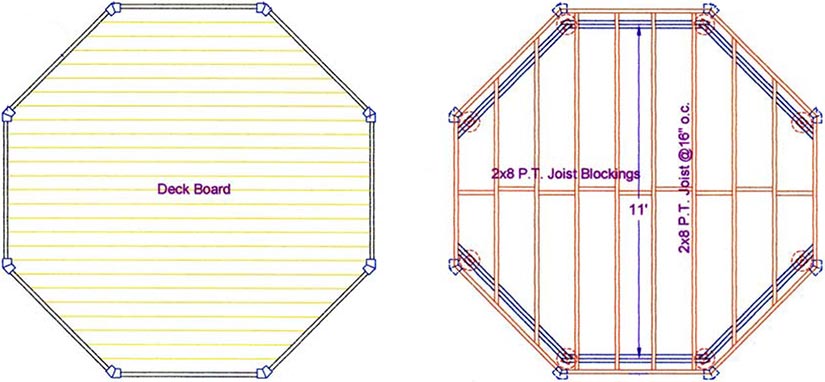
Gazebos: How to Frame Your Gazebo Roof
Gazebos: How to Frame Your Gazebo Roof DIY Deck PlansGazebo Corner Posts
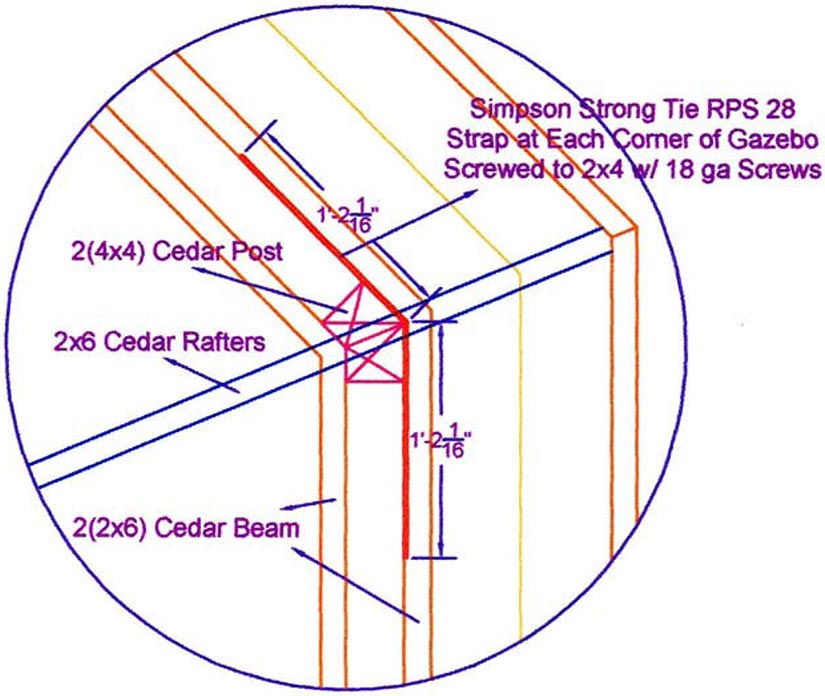
The roof structure is supported by ripped down 4x4 posts fit together in pairs at each of the eight corners. Consult your plan for thickness. The inside edge of each post piece will be cut at 22 ½ °, so that they fit together to form the corner. Fasten them to the substructure at the bottom with lag screws and toenail the posts together through the mitered edge. The bottom end is notched to fit over the edge of the outside plate.
Gazebo Roof Foundation Ring
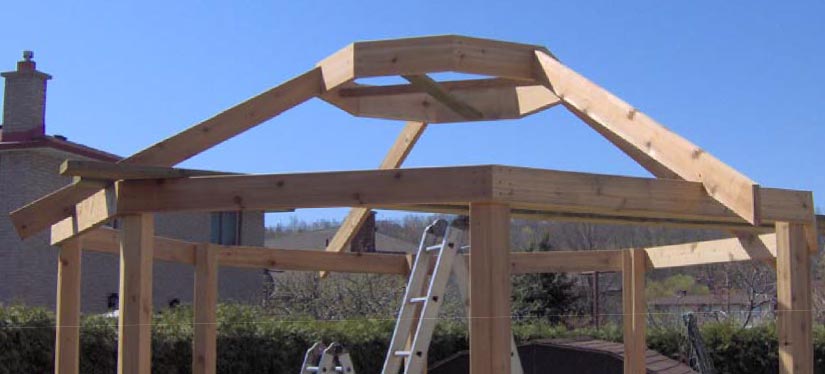
This ring sits at the top of the posts and is built similarly to the outside beam structure of your foundation, if you chose the straight decking model. There are two concentric octagons. Assemble the outside ring first.
- Cut the pieces to length with 22 ½ °miters at each end. Fasten them to the tops of the posts and to each other at each corner.
- Cut the inside octagon with 45° miters at each end. There will be two lengths of pieces, four short, four long.
- Install the long pieces first. Lag bolt them to the posts and toenail each end where it meets the inside face of the outside octagon.
- Install the four short pieces by toe nailing through the ends. Use fasteners long enough to go through both pieces and into the posts.
Building the Single Tiered Gazebo Roof

- Cut your eight full length rafters to size. The top end is mitered according to the plan, while the bottom end gets a special notch, known as a “bird’s mouth” (see image in Short Rafters section, below) that will rest atop the fascia ring, to keep the rafters from pushing out too far.
- Cut the bird’s mouths with a jig saw, or reciprocating saw.
- Cut the center spire according to your plans. This piece is eight sided and all eight rafters will rest against it at the top, so that they are angled up, pinned between the bird’s mouth and the spire.
- Determine how high above the floor your spire is supposed to be and support it, so that the rafters rest with the notch of the bird’s mouth, firmly on top of the fascia ring and the top end against the spire.
- Toe nail each rafter to the fascia ring and the spire
Blocking the Rafters
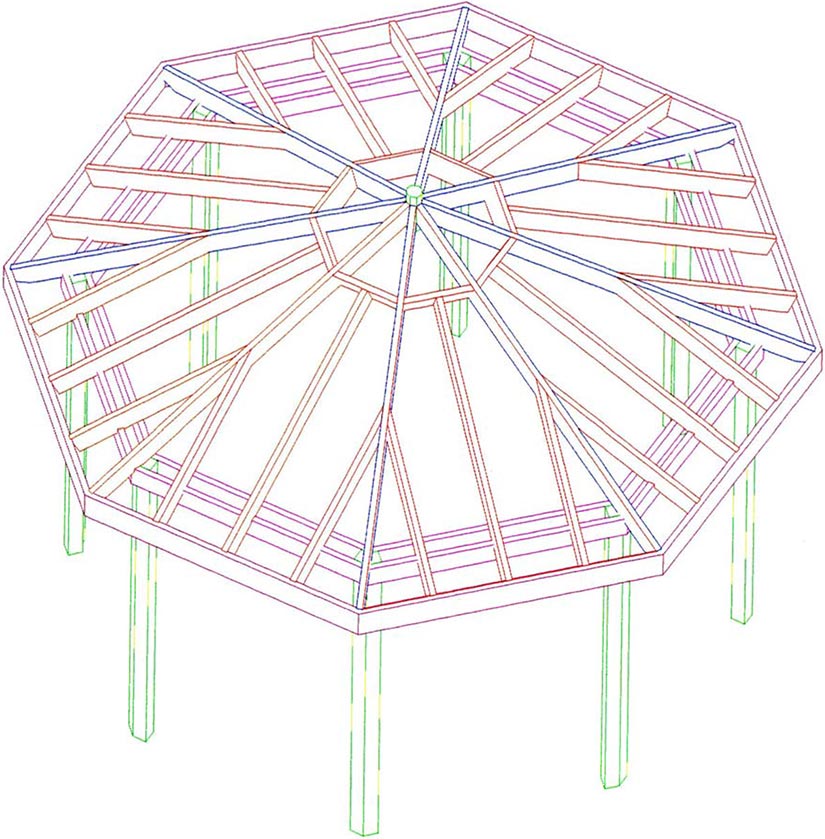
Cut and install mitered blocking between the rafters to form an octagon, about ¼ of the way down from the spire. Cut the blocking to suit your plan and install it, by toe-nailing the mitered ends of each piece to the faces of the rafters on either end of each piece.
Short Rafters
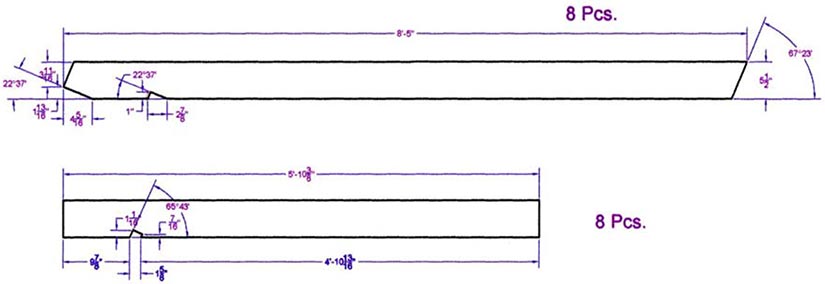
- Measure and cut a shorter piece to fit between every two rafters, with a bird’s mouth, and the end mitered to fit against the blocking you installed. They will help to stiffen the structure.
- Cut two more short rafters with mitered ends, for each short rafter. Consult your plan for length and miter angle.
- Fit the mitered short rafters alongside the main rafters one on either side of each of the short rafters you installed.
Fascia Boards
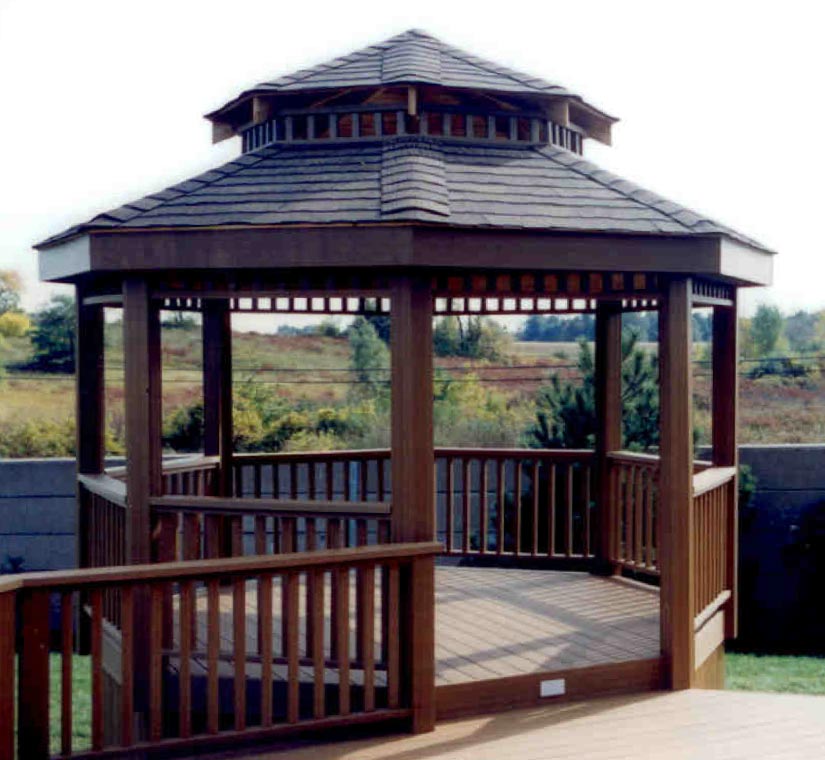
- Mark and cut your rafter ends according to your plan, so that the end of each rafter is vertical.
- Cut and install a band of rafter material around the outside edge of the roof frame, attached to each rafter end.
- Toe nail the corners of the fascia boards together at each corner.
Alternative Rafter End Treatment
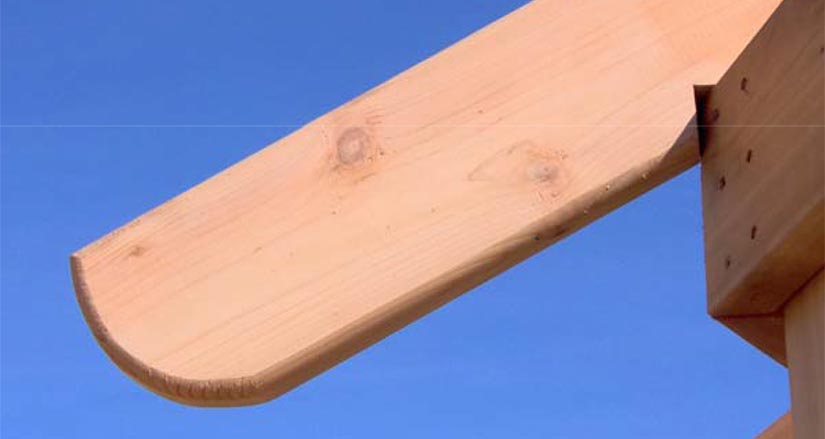
Rafter ends can also be left long and cut to present decorative ends, instead of installing fascia. In this case, install blocking between the rafter ends to stiffen them and keep them vertically plumb.
Building the Two Tiered Gazebo Roof
Main Gazebo Roof
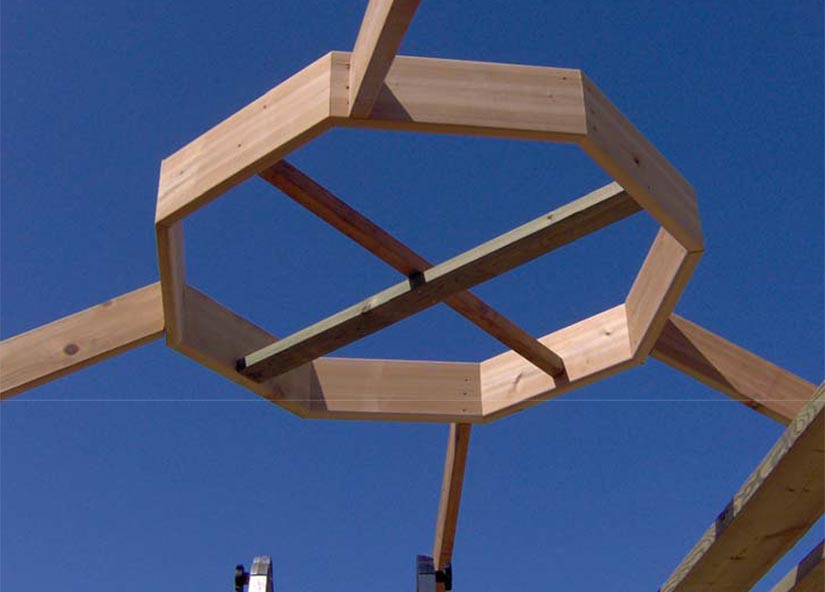
The main roof is framed similarly to the single tiered roof. An octagon frame takes the place of the spire to hold the place for the second roof tier. Assemble the frame with removable cross bracing through the center to hold it ridged while the rafters are installed. This frame is the same dimensions as the bottom frame ring of the second tier.
Main Gazebo Roof Rafter Installation
- Cut a birds mouth in each rafter and miter the upper end to fit flush against the octagon center frame.
- Support the octagon from underneath to hold it at the proper height and level.
- Install rafters one at a time, installing opposing rafters to support the octagon.
- Fasten rafters by toe nailing into the frame at the birds mouth and driving fasteners into the end of each rafter, from inside the octagon.
- Install two rafters against each flat face of the octagon and one at each corner of the roof.
Rafter tails can be cut for fascia, or left long and cut with a decorative detail as described in the single tiered roof section.
The Top, or Second Tier Gazebo Section
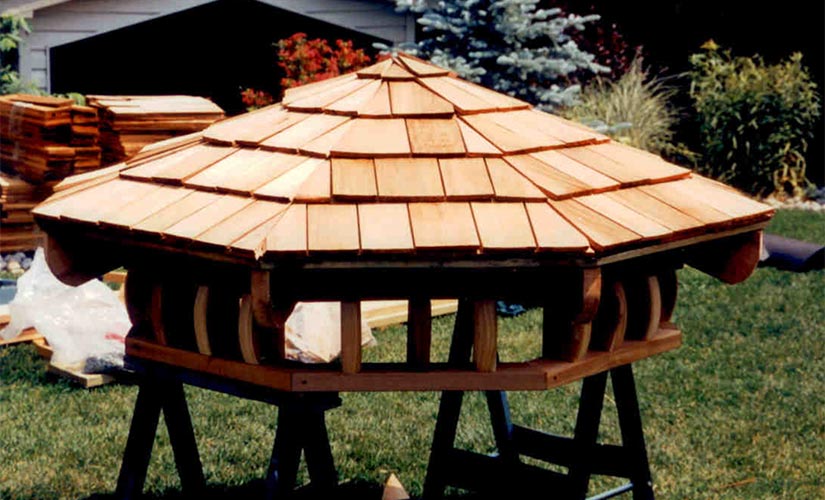
The top section of the roof, or “cupola”, rises up out of the lower roof once assembled, with vents on all eight faces. Cut and assemble the pieces of this separately, on the ground, before installation. Assemble the section similarly to the instructions for the single tiered roof.

The base of this top roof section is two octagonal frames made of 2x4, with the same outside dimensions as the center frame of the main roof. Half-moon shapes cut from 2x4 with a band saw create an open rail section between the two octagons.
The upper roof is framed using similar techniques as described for a single tiered roof. Roof decking, felt paper, and shingles are added to the upper roof section before it is installed.
Installing the Second Roof Tier
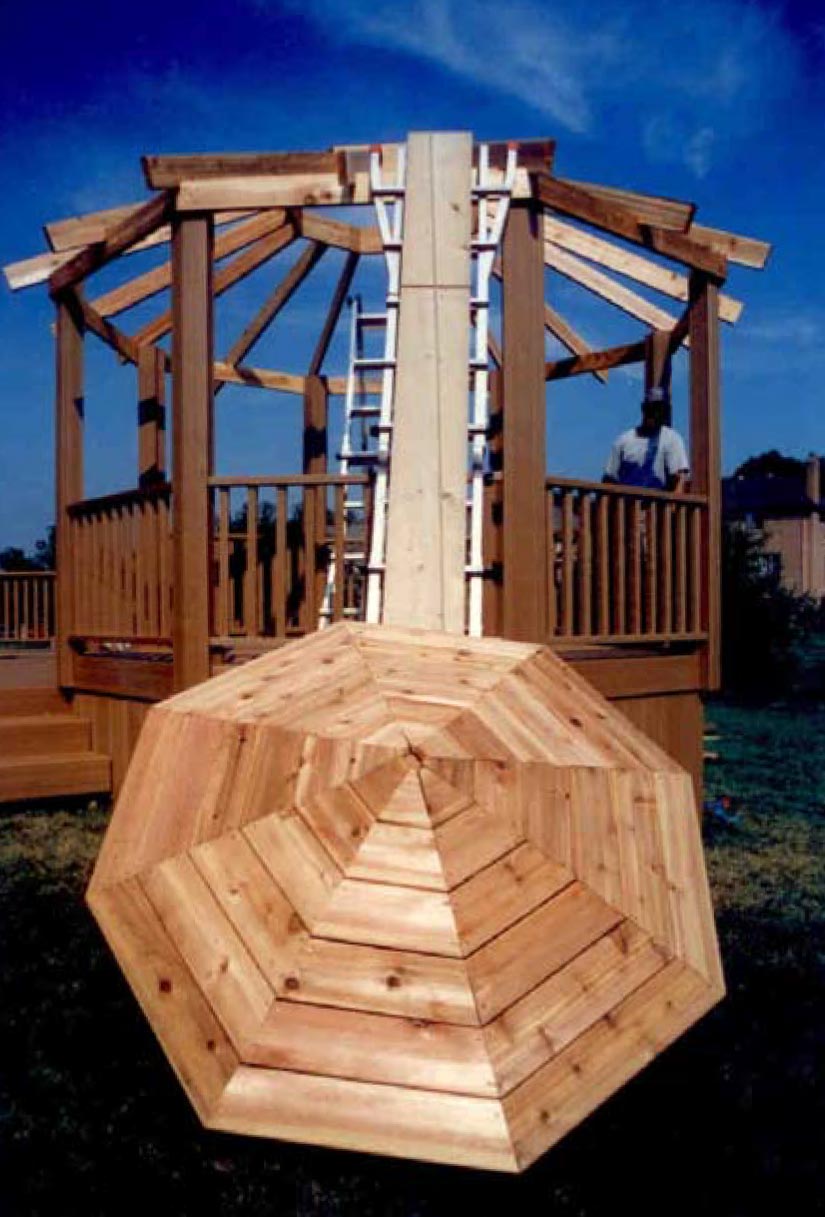
Once all rafters are secure, but before roof decking goes on, put the second tier roof assembly in place and fasten it down. Inspect the center octagon frame for stability before beginning this process. The roof assembly puts a lot of downward pressure in a very small area. Apply weight to ensure the roof frame is stable before introducing this additional stress.
Lifting the Second Tier Gazebo Roof
Position a heavy step ladder, long enough to reach from the ground to the center octagonal frame on a fairly low angle, with its feet firmly on solid ground and the top end extending just past the top edge of the octagon.
Cut lumber planks to fit over the ladder steps to create a bed for your “ramp”. The second tier roof assembly will slide up this and into position.
Work Safely
- Secure a rope long enough to pass over the entire gazebo structure to the ground on the opposite side, to the second tier roof assembly.
- Station a helper at the ground end of this rope to take out slack as the assembly is raised, to prevent it sliding back down.
- With at least one strong helper, put the assembly in place at the bottom of the ladder and slide it up the ladder slowly.
- Have the rope handler keep the rope tight at all times so that the assembly will not slide back.
Fit the Second Tier Roof Carefully and Fasten in Place
Carefully take the assembly up and over the edge of the octagon and slide it over until it fits neatly on top of the octagon. Fasten the second tier roof assembly in place from underneath the octagonal frame.
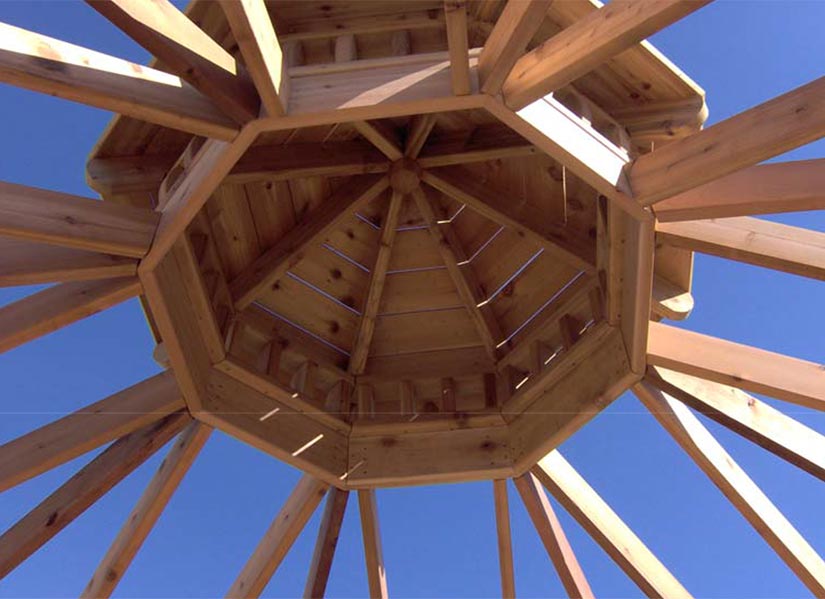
Gazebos: How to Install a Gazebo Railing and Trim
Gazebos: How to Install a Gazebo Railing and Trim DIY Deck PlansGazebo Railings
Any standard wood deck railing system or custom deck railing can be used for gazebo construction. Any gazebo that is set more than 12” above grade will require a rail to meet building code. Check local codes to determine specifics. In general, rails are 36” to 42” in height, and have spindles or “balusters” spaced less than 4” apart.
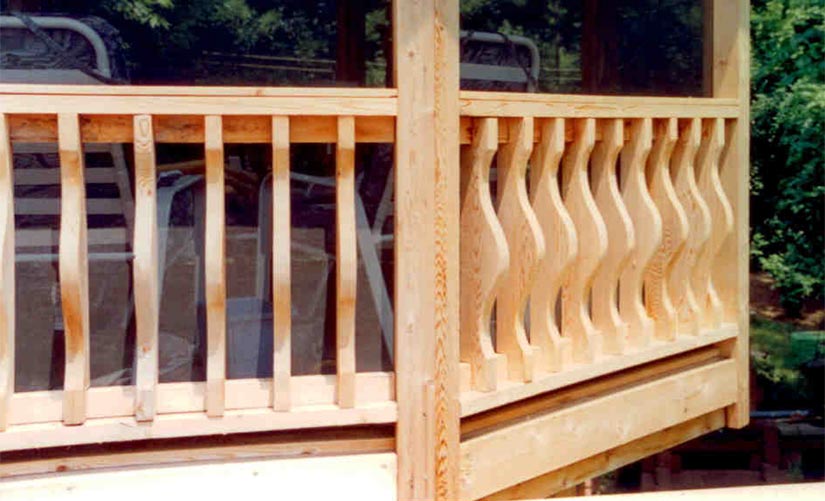
There are also rules regarding width and thickness of rail cap, check local codes to determine specifics. In general, most rail systems are designed to meet code.
- Measure between posts at the height of the top of your rail and at the height of the bottom of your rail to ensure proper fit.
- Cut top and bottom rails to fit each section specifically. A miter saw works best.
- Install your bottom rail between posts first. If you are using a sectional rail system, the whole rail may be installed at once. Use spacer blocks under the bottom rail to hold it at the proper height. Use a level to double check the pitch of the rail.
- Install rail with fasteners to both posts. If brackets are used, attach brackets first, then position bottom rail to fit. Otherwise, pre-drill your rails to prevent splitting and use screws to fasten them in place.
- Fit your balusters or spindles into the bottom rail and fit the top rail in position on top of the spindles.
- Fasten the top rail in position as you did the bottom.
Pro Tip
Modern deck railings use balusters that fasten to both top and bottom rails once in place. If you are installing one of these rails, double check the spacing between top and bottom rails to ensure it is consistent.
Gazebo Trim
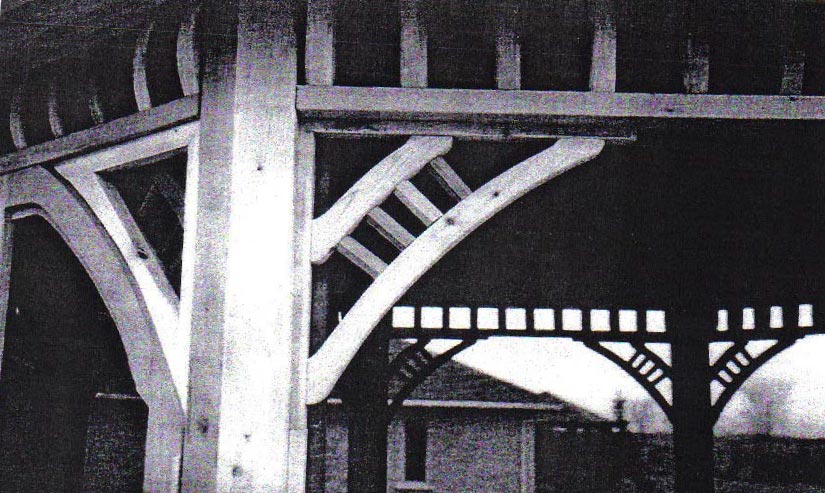
Trim pieces such as corner brackets, or corbels are often fitted into the 90° corners between the horizontal roof framing and the posts, or the top rail and posts.
Brackets are often cut out, fitted with decorative beads and appliques, or made from metal. Corbels are solid wood or plaster brackets. Both are typically triangle shaped.
- Fit the brackets into the corner and mark any and all screw holes on the bracket to the rail, post, or horizontal frame.
- Drill pilot holes through the brackets if they do not exist already. Mark the holes as described in step one.
- Fasten the bracket in place with the screws provided with your bracket or corbel, or deck screws.
Wooden trim pieces can be used to cover gaps in construction around post bases and other places. When using screws to fasten trim, always predrill before installation.
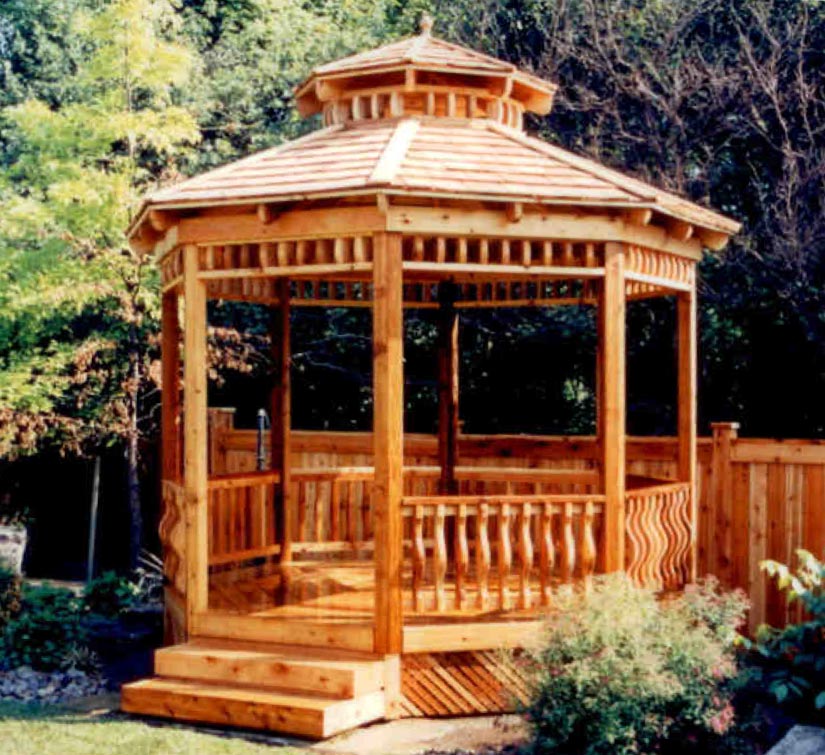
Gazebos: How to Install the Gazebo Roof Deck
Gazebos: How to Install the Gazebo Roof Deck DIY Deck PlansUse standard 5/4 cedar decking boards for your roof deck. This will provide a solid foundation for the remaining two layers. Install the boards so that the good face is turned toward the ground. The underside is visible and the top side is not only out of view, but will be covered by felt and wood shingles.
Installing the First Section
- Position deck boards on each “pie shaped” section, starting at the lower edge. Fit the first board parallel to the fascia, overlapping it evenly, according to plan dimensions.
- Fasten the board in place so that both ends overhang the edges of the triangular section. Use two fasteners into the top edge of each joist through the deck board.
- Add decking boards, moving toward the peak of the roof. Cut each board so that the ends overlap the edges of the triangular area between the main rafters and fasten them down.
- Mark the edges of the triangular section with a chalk line even with the center line between the triangular sections.
- Set a circular saw to a depth just barely deeper than the thickness of your deck boards. Cut along the chalk lines on both sides and remove the cut away pieces.
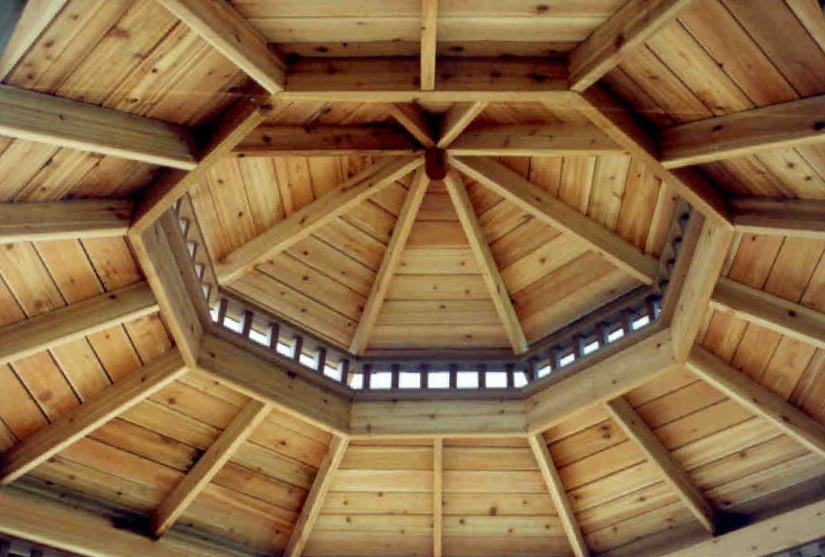
Completing the Gazebo Roof Deck
- Cut the ends of the boards for the next section to match the first, on a 22 ½ ° miter, long enough that the remaining end will overlap the opposite edge of the triangular section between main rafters.
- Fit the boards in place as before, starting from the bottom edge. Fasten each board in place as previously described.
- Mark and cut the long ends of the boards to fit the triangular area between the corner rafters.
- Continue decking in sections until you reach the last section. Measure and cut each piece to fit the last remaining section with miters on both ends.
Finishing the Gazebo Roof
The gazebo roof goes on in three layers to provide a water tight surface. The middle layer is made up of roof felt. On top of that, shingles are installed to suit. Common choices are shingles that match your home or surrounding out buildings, or cedar shingles to match the trim of the gazebo.
Installing Roof Felt
- Roll roof felt across the first section so that it overlaps by at least six inches on both sides.
- Nail the felt in place with roofing nails fitted with plastic washers. Use one nail every six to twelve inches, smoothing the felt to keep it taut between nails.
- Cut the bottom edge of the felt along the edge of the fascia with a utility knife, or heavy scissors.
- Install the remaining sections in the same way, overlapping the felt along the edges where it meets the other pieces.
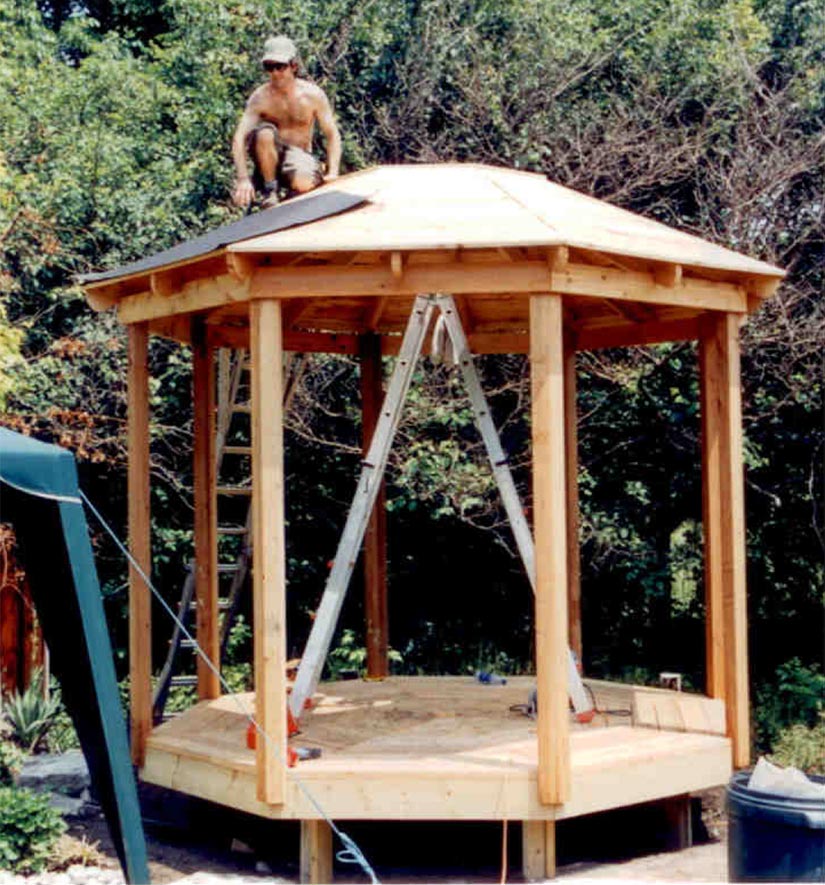
Installing Shingles
Shingle installation is a fairly simple procedure. It will vary slightly depending on whether you use cedar shingles or composite. The image below shows a fully shingled, curved roof.
- Start shingle installation along the bottom row at one corner. If you are using composite shingles a solid starter strip is used. Cut each shingle to fit using a utility knife, so that the edge is angled to fit with the rafter.
- Nail the shingle in place using manufacturers recommended fasteners and spacing. Shingles above should cover nails on the row below.
- Fit the shingles side by side until the bottom row is filled across an entire section.
- Start the next row above the first, using the manufacturer’s recommended spacing. Continue adding shingles until you reach the top.
- Use ridge shingles to cover the gap between sections along the corner rafters. Follow manufacturer’s recommended procedure for fitting and fastening.